Was at the junkyard (i like to check it out as snowblowers show up there a lot.) And there was a "loose" Tecumsh LH195 engine from 2005 sitting in a pile of junk. They put it on the scale for me, and it was all of $15, so i bought it. The blower housing was pretty dented, but i don't use those cyclone blower housings anyway. Figured there wasn't a lot of risk here, so gave them the $15.
Took the engine home, removed the blower housing (threw it away.) pulled the head and checked the bore. Damn i doubt this thing ran an hour! the bore was unreal with cross hatching. there was barely any carbon on the head. It was for sure a snowblower engine, but i don't know why someone removed it from the machine.
The only problem was a 7/8" PTO. didn't know this at the time, it had a pully on the PTO which hid the shaft. But after removing that, knew i had to take the whole motor apart to get to a 3/4" pto.
Pulled the flywheel and removed the electric start ring gear (it's just added weight.) Removed the side cover and found the inside pretty clean too. Removed the piston and found the ring gap to be .015". Now even light wear engines usually have .020" to .025" ring gap. So i knew this engine was pretty fresh. Regardless of what you read in the Tecumseh manuals, if you buy a brand new long block or new motor, the ring gap is never less than .010". Even though their specs are lower than .010" ring gap, it's just never is less than .010". So a .015" ring gap meant i wasn't going to waste a new set of rings on this motor.
I put the crankshaft in the lathe and turned it down to 3/4". Then to the mill and re-cut the 3/16" keyway. These 7/8" pto crankshafts are nice, because you end up with a full 3" long pto when you're done with all this.
Installed the crank and piston. And then welded and cut the original cam to a new high lift cam (basically a dyno255 cam clone.) Removed the governor and plugged the hole with a 10-32 allen bolt. Buttoned the motor up, and lapped the valves and checked the valve lash. (Usually when i weld/cut a cam, the valve lash needs some adjusting.) Amazingly it was pretty spot on at .006". Also did some light porting to remove sharp edges on the passages to the valves.
Also I did media blast the block. Did this because i wanted to paint this motor black...
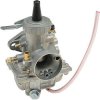
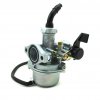
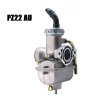
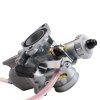
Installed a old school blower housing with a 4 leg pull start. Powder coated the blower housing and cylinder shield black. Installed the motor in a freshly re-done Speedway Scarab frame. with the engine installed, made a custom exhaust and intake manifold for the new pz22 slide carb.
Lit the motor up and man it's a rocket! late model motors can really go and go good! Don't over look these motors. Yes they have the smaller exhaust valve. yes the bore is a little smaller than pre-1990s HS50 engines. But it's no big thing!
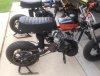
Here's the bike all done with the Tecumseh LH195 (looking like an older HS50):
http://www.pinrepair.com/minibikes/p/speedway1972scarb_mine3.jpg
http://www.pinrepair.com/minibikes/p/speedway1972scarb_mine4.jpg
Took the engine home, removed the blower housing (threw it away.) pulled the head and checked the bore. Damn i doubt this thing ran an hour! the bore was unreal with cross hatching. there was barely any carbon on the head. It was for sure a snowblower engine, but i don't know why someone removed it from the machine.
The only problem was a 7/8" PTO. didn't know this at the time, it had a pully on the PTO which hid the shaft. But after removing that, knew i had to take the whole motor apart to get to a 3/4" pto.
Pulled the flywheel and removed the electric start ring gear (it's just added weight.) Removed the side cover and found the inside pretty clean too. Removed the piston and found the ring gap to be .015". Now even light wear engines usually have .020" to .025" ring gap. So i knew this engine was pretty fresh. Regardless of what you read in the Tecumseh manuals, if you buy a brand new long block or new motor, the ring gap is never less than .010". Even though their specs are lower than .010" ring gap, it's just never is less than .010". So a .015" ring gap meant i wasn't going to waste a new set of rings on this motor.
I put the crankshaft in the lathe and turned it down to 3/4". Then to the mill and re-cut the 3/16" keyway. These 7/8" pto crankshafts are nice, because you end up with a full 3" long pto when you're done with all this.
Installed the crank and piston. And then welded and cut the original cam to a new high lift cam (basically a dyno255 cam clone.) Removed the governor and plugged the hole with a 10-32 allen bolt. Buttoned the motor up, and lapped the valves and checked the valve lash. (Usually when i weld/cut a cam, the valve lash needs some adjusting.) Amazingly it was pretty spot on at .006". Also did some light porting to remove sharp edges on the passages to the valves.
Also I did media blast the block. Did this because i wanted to paint this motor black...
Installed a old school blower housing with a 4 leg pull start. Powder coated the blower housing and cylinder shield black. Installed the motor in a freshly re-done Speedway Scarab frame. with the engine installed, made a custom exhaust and intake manifold for the new pz22 slide carb.
Lit the motor up and man it's a rocket! late model motors can really go and go good! Don't over look these motors. Yes they have the smaller exhaust valve. yes the bore is a little smaller than pre-1990s HS50 engines. But it's no big thing!
Here's the bike all done with the Tecumseh LH195 (looking like an older HS50):
http://www.pinrepair.com/minibikes/p/speedway1972scarb_mine3.jpg
http://www.pinrepair.com/minibikes/p/speedway1972scarb_mine4.jpg