High Performance Mods for my 1.75hp flathead Briggs

Minimichael

Well-Known Member
#1
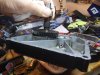
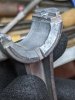
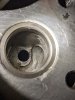
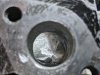
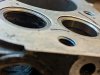
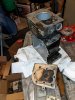
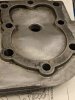
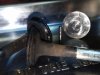
This little rope-start 2hp has been smokin since I got it, and not in a good way. Add to that the threaded iron exhaust was too long and has now stripped out the block's exhaust port.

So for good, bad or otherwise, this family favorite is really down for the count.

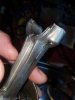
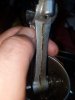
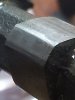
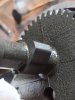
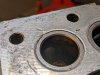
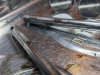
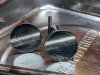
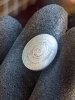
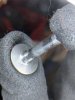
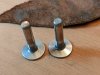
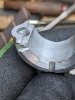
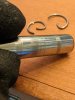
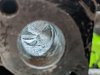
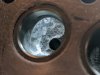
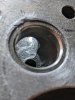
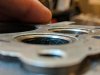
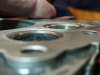
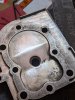
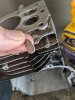
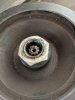
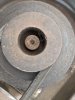
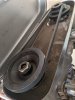
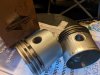
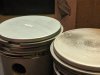
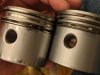
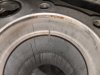
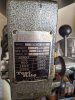
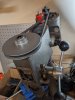
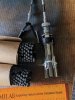
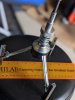
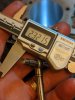
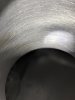
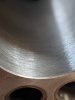
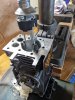
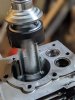
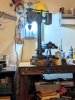
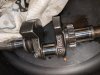
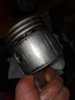
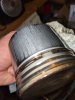
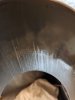
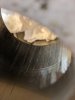
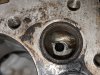
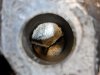
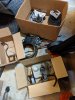
Since I've opened it up to assess the damages, I thought I'd post some pictures of the state of affairs inside this old 6B-S...

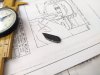
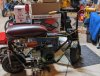
My ultimate goal is not only to resurrect the lil' guy, but to see if I can bring out a noticable performance improvement with the usual porting, valve job, and in this case - attempted rebore. I've done a couple of these small briggs' so far, but this could be the first one I've known pre- and post-rebuild.

The little wobbly bonanza frame this engine has been mounted to was getting up around 20-25mph. So there's that benchmark at least.

We'll see how far I get on this project...
 

Attachments

Last edited:

Minimichael

Well-Known Member
#2
I hope a resize to +0.010" is enough for the cylinder because the oversize piston is already on its way. I found it as nos on eBay for about 25 bucks. I still have the connecting rod in my eBay cart, too.

So far, I've measured the cylinder and found it is only +0.0015 oversized, at about mid range up the cylinder wall where the wear is supposed to be most pronounced. Just for reference, the repair manual says +0.003 calls for reboring to the next size up. So I'm only half way there on the usual wear and tear front.

Still, that scoring in the cylinder is the deepest I've seen to date. And it definitely will take a good dressing with the hone to rub them out. For the record, this uncharted territory for my current skill set. I'm also afraid the scoring may go deeper than the +0.010 I'm planning to hone to.

I can't yet tell what's going on with the valves, or seats because they're so crudded up. But I'll be porting that intake, esp. where the casting shows that sharp restriction extending to the right. I've dremeled those before.

Also, do you see those divots along the casting seam of the existing rod? They make me worry about this rod's integrity. (The brand new OEM rod on eBay is $25...) Still, the rod's bearing is relatively clean. The crankshaft's own bearing, and journals, are too.

Thinking about the scoring in the cylinder, I wonder if those missing little bits of connecting rod were culprits...

Some happier news is that the block, sump cover, and head are each quite clean and unmarred at the gasketed surfaces and deck. It'd be a clean little engine, if only the cylinder and piston weren't destroyed.

Btw, the cam is mounted somehow to the sump cover. I'm thinking that's the "bearing" in the model name 6"B"-S. I'm going to be careful with that. Not sure I want to disassemble it.

I'm also thinking I should be careful with the coil. It's the old style with 3 arms and they're hard to find and unique to these double-magnet flywheels. That flywheel is the reason an electronic ignition coil is not an option here.

Not sure where to begin. Hoping I haven't jumped the gun by already ordering that +0.010 piston assembly!
 

Attachments

Last edited:

Minimichael

Well-Known Member
#3
On closer inspection, both the rod and crankshaft bearing surfaces have light pitting of a sort. Almost like galling, but smoothed over. The crankshaft journals show the same but a little bit heavier. Here again, I'm wondering if that disintegrating casting seam from the connecting rod was a contributor.

The Cam lobes are good. the lifters are fine. But I'd better check the valve stems...
 
Last edited:

Broke Joke

Well-Known Member
#4
You can weld up the cam lobes and regrind for more lift and duration, also can mill a few thousands off the head to raise the compression ratio.
 

Minimichael

Well-Known Member
#5
With my welding skills, I'm not so sure. But hell, if it gets much uglier...!

Affirmative on the head. I'll be taking it to my favorite mill for that -- sandpaper, inc.
 

Minimichael

Well-Known Member
#7
Valve stems and lifters. The stem with the most pronounced edge in the middle is the exhaust valve.

One of the lifters faces is pretty chewed, and appears to show the shaft of the lifter's stem eroding into view. That same lifter is also slightly domed at the stem's point, where the other has a dead flat stem end. The dome looks intentional, like maybe it helps keep the valve above turning a tiny bit with each lift. I wanna say I heard about this design reducing uneven valve wear. If that's the case, and I only have one of them, I'll put it under the exhaust valve because that's the one taking the biggest beating.

So, I'm still not seeing anything rejectable but the rod and piston.

At any point, feel free to tell me I'm nuts. But I've put worse back together (and they're running pretty good).
 

Attachments

Minimichael

Well-Known Member
#10
I ported the intake. It turned out that there wasn't much restriction to begin with. The snarl along the back right is actually the edge of a bowl shaped turn along that side. I don't know if I've seen this before. I could swear it's just been a hard-angled ledge. Anyway this time I really tried to keep the grinding to a minimum and just enough to smooth the edges and help that built in bowl shape do it's thing.

And oops, it looks like I let the Dremel get too close to that guide boss. I'll smooth that down with emery cloth....
 

Attachments

Last edited:

Minimichael

Well-Known Member
#12
I wanted to cut a 'fire line' in the head because I've seen it on you tube. I've seen it as a sort of milled trench running across from the spark plug hole. It's supposed to help distribute the burn more quickly to the far side of the cylinder. But I got queezy about how thin the head material appeared, so I just used emery cloth to put a more subtle divot into the top of the head where it suddenly angles into to that lower ceiling shape about half way across the combustion chamber.

Below, I included an earlier pic of the head, to show again the stark line of combustion deposits baked into the head just above the valves and spark plug. It's like somebody turned out the lights!

So, you never know, right? Maybe my new-fangled "fire trough" will help the charge burn more uniformly!

Maybe...
 

Attachments

Last edited:

Minimichael

Well-Known Member
#14
Next big step is to hone.

And it may be a while before that happens. I want to use my drill press, rather than a hand-held drill, BUT my drill press's slowest speed is 900rpm.

Briggs says to go only about 300 to 700.

I'm new to this oversizing thing and don't want to screw it up. This isn't just deglazing for hash marks -- it's removing exactly 0.010" of material, and doing it more or less perfectly from top to bottom of the cylinder.

So anyway my drill press is a Test-Rite brand, and something tells me it was the harbor freight special of the day in the seventies. Not sure if all drill press standards are the same, but I'm now thinking about replacement pulley spindles to allow for greater speed ranges. A quick search brings up many options for such spindles, but so far none describe the center mount hole diameter or other configuration/installation info.

If anybody has any suggestions here, I'd appreciate it about now...
 

Attachments

Last edited:

Mr. Pink

Well-Known Member
#15
Next big step is to hone.
I'm new to this oversizing thing and don't want to screw it up. This isn't just deglazing for hash marks -- it's removing exactly 0.010" of material, and doing it more or less perfectly from top to bottom of the cylinder.
Remember, if you remove 0.010" of material, that will make the cylinder 0.020" oversize.
You only want to remove 0.005".
 

Minimichael

Well-Known Member
#17
The +0.010 piston got here. It's very clean for NOS. The wrist pin hole openings are finished differently, and the top is flat, but everything measures up nicely.

Fingers crossed I only have to hone to +0.010" so this new piston fits.

Hey, look at how worn out that oil ring is on the older piston. The middle ring has lost a lot of it's material, too. The top ring is shown in the cylinder, with a good 1/16" gap.

Gotta get some wrist pin c-clips cuz they're not with the box.
 

Attachments

Minimichael

Well-Known Member
#18
Modifying the drill press to hone the cylinder.

Briggs says honing speed is 300 to 700rpm, but the pulleys on the drill only allowed down to 1000rpm.

So the Ace hardware had these pulley wheels and I got a couple sizes up and down from what the drill already had. The big one was about $17, and the small ones $5. And after a little filing and fitting, I'm shocked I just added two more speeds to this old jalopy for under $30.. :p

The new second lowest speed is 560rpm -- using a small 2" wheel on the drive spindle. And the new lowest speed is now 390rpm!

Now the question of whether any of the hones I have here are up to the challenge...
 

Attachments

Last edited:

Minimichael

Well-Known Member
#19
Here's Another Boring Update!

The challenge here is to resize this cylinder to +0.010". Right now it's only worn to about +0.0015, but it's badly scored. Plus, Briggs says to rebore when you get to +0.003" anyway.

Another of my challenges is to save money, so I'm hoping one of the hones I have already will do the trick (b'cuz $180 for that more proper Lisle hone would be a big buzz kill. Might even have to wait for Christmas...)

So anyway, the cylinder is 2.3125". Both the ball hones are too big. The flimsier 3-stone hone is just that...flimsy.

And then I have this Craftsman "Glaze Breaker" which the internet says is for 2" to 7" cylinders. The stones aren't very abrasive (maybe 180 grit?), but the arms offer a lot of tension...

I'm going to start the boring with the Glaze Breaker.
 

Attachments

Last edited:

Minimichael

Well-Known Member
#20
Okay I'm officially bored, lol. (Yeah that's right I'm laughing at my own jokes now.)

I've completed the cylinder boring. I'm still about a thousandth short of final finish, but the drill press part is done. It went well, and didn't take forever. I posted some pictures...

I'm glad I weighted down the block with those steel coupons and that jar full of screws. That sticky assembly lube squirted on the bench was a good idea too. (Briggs says to weigh down the block while also leaving it free to swim around.)

The hone I used worked great: Craftsman Glaze Breaker (cylinder ranges 2" - 7" Part #9--4633). It had a good medium grit and easily took down all the bad scoring at the bottom and top of the cylinder.

Getting to +0.010" seemed to take no time at all (couple hours, including a dinner break). I don't think I stopped to measure more than 5 or 6 times. Plus I called it quits because the gage at about mid-cylinder was starting to read just a hair short of perfect, and I want to try and sneak up on that with the hand drill and lighter hone because the bottom of the cylinder still has an extra half thou more than the middle.

Once everything's dialed in at +10 from top to bottom I'll stuff the littler ball hone through for those final hash marks...
 

Attachments

Last edited:
Top