
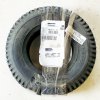
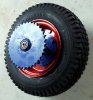
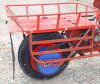
The new Baloney Skin tire showed up for my Trail King and I had just mounted a new Number 50 chain driven sprocket onto the rear axle
I thought I'd post a short article on how to properly mount a new tire on a split rim.
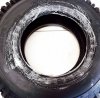
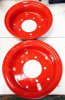
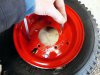
The first thing to be done is to remove the old tire from the two split rim halves after the air has been let out of the inner tube. While you'd think the rim half would just fall off of the tire bead, this is not the case. A Bead Breaker screw driven tool is used to push the bead off of the rim half.
I have seen a 2x4 layed right at the tire bead and a car/truck driven up onto the wood to break the bead from the rim. Use what ever method works for you. I use the tool.
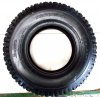
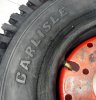
The new tire is a 4 ply diamond tread tire that is non-directional in it's tread pattern.
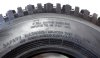
However it is nice to mount the tire so You can easily see the tire info on the sidewalls of the tire for future reference. This tire will take more air pressure than is really needed for the bikes weight and ride control.
I normally run 10 PSI or perhaps a little more depending on how much cargo I may be carrying.
Over inflating the tire for the weigh to be carried will only wear out the center of the tire. Too little tire pressure can under a heavy load allow the tire to slip on the rim and damage the inner tubes air valve stem. This can leave you in the middle of nowhere with a flat tire.
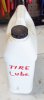
The first thing to do is to inspect your new tire for any manufacturer defects. That being done the new tires beads are lubed with a tire lubricant. Most auto parts stores will sell this liquid or you can obtain some from a tire retailer if you ask nicely.
Never use a petroleum based lube as it will attack the rubber in the tire.
Once you place 1/2 of the split rim onto the tire bead,roll in the inner tube. Always note the position of the air stem valve. I remove the Schrader valve to make sure all air is out of the inner tube. This allows the tube to lay in the rim without it having to be compressed.
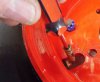
The other half of the rim is now aligned using two center punches to allow the holes to line up and you to visibly see you have not pinched the inner tube between the rim halves.
The schrader valve is then screwed into the valve stem and the tire is inflated to 20 PSI or until the beads are seated onto the rim. I then reduce the tire pressure down to 5 PSI or so and bounce the tire/rim onto a hard surface.
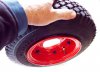
This will allow the inner tube to seek out its natural lay inside of the tire. This is a very important step and should never be forgotten to do.
I then release all the air from the tire and make sure the valve stem is not going to bind in the stem hole.
Once this is done the tire is inflated to the PSI you want to use.
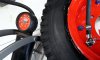
My tire and rim was then mounted to the drive axle using the cross tightening pattern you would use for a car tire. This prevents unwanted wobbling of the tire.
The weld I had to do seems to be holding up well under full load. A trip will show if it will hold up in the long run.
The axle is mounted so the tire runs true and prevents torque steer or unwanted uneven tire wear. My new sprocket meshes up well with the number 50 drive chain as it should.
I hope you found this post helpful if you need to replace your tire(s).
I thought I'd post a short article on how to properly mount a new tire on a split rim.
The first thing to be done is to remove the old tire from the two split rim halves after the air has been let out of the inner tube. While you'd think the rim half would just fall off of the tire bead, this is not the case. A Bead Breaker screw driven tool is used to push the bead off of the rim half.
I have seen a 2x4 layed right at the tire bead and a car/truck driven up onto the wood to break the bead from the rim. Use what ever method works for you. I use the tool.
The new tire is a 4 ply diamond tread tire that is non-directional in it's tread pattern.
However it is nice to mount the tire so You can easily see the tire info on the sidewalls of the tire for future reference. This tire will take more air pressure than is really needed for the bikes weight and ride control.
I normally run 10 PSI or perhaps a little more depending on how much cargo I may be carrying.
Over inflating the tire for the weigh to be carried will only wear out the center of the tire. Too little tire pressure can under a heavy load allow the tire to slip on the rim and damage the inner tubes air valve stem. This can leave you in the middle of nowhere with a flat tire.
The first thing to do is to inspect your new tire for any manufacturer defects. That being done the new tires beads are lubed with a tire lubricant. Most auto parts stores will sell this liquid or you can obtain some from a tire retailer if you ask nicely.
Never use a petroleum based lube as it will attack the rubber in the tire.
Once you place 1/2 of the split rim onto the tire bead,roll in the inner tube. Always note the position of the air stem valve. I remove the Schrader valve to make sure all air is out of the inner tube. This allows the tube to lay in the rim without it having to be compressed.
The other half of the rim is now aligned using two center punches to allow the holes to line up and you to visibly see you have not pinched the inner tube between the rim halves.
The schrader valve is then screwed into the valve stem and the tire is inflated to 20 PSI or until the beads are seated onto the rim. I then reduce the tire pressure down to 5 PSI or so and bounce the tire/rim onto a hard surface.
This will allow the inner tube to seek out its natural lay inside of the tire. This is a very important step and should never be forgotten to do.
I then release all the air from the tire and make sure the valve stem is not going to bind in the stem hole.
Once this is done the tire is inflated to the PSI you want to use.
My tire and rim was then mounted to the drive axle using the cross tightening pattern you would use for a car tire. This prevents unwanted wobbling of the tire.
The weld I had to do seems to be holding up well under full load. A trip will show if it will hold up in the long run.
The axle is mounted so the tire runs true and prevents torque steer or unwanted uneven tire wear. My new sprocket meshes up well with the number 50 drive chain as it should.
I hope you found this post helpful if you need to replace your tire(s).