
A couple of years ago now, I posted on how to add a light system to your mini bike using the "charging system" ( alternator ) on your HF 212 engine.
See below for some of the wiring details on the light switch.
https://www.oldminibikes.com/forum/...system-for-your-minibike.167176/#post-1221799
Now in 2020 the Chinese have made it even easier to do and even do a better job of keeping track of the batteries charging/discharging.
I added the HF LED Spot Light ( 4 lamp) to my Trail King as the same light is on my Hawg Ty and is very bright drawing very little current.
The real change is that I've gone down from four 18650 Li Ion batteries to three. A new electronic control board now monitors both charging and discharging of the batteries and is rated at 60 amps! The circuit board is small,very well made and fits perfectly on top of three 18650 batteries. This make a very neat, tidy package that fits in the step down notch of a 6.5 HP engine ( Greyhound on this bike)
A very common 1PZ rectifier is used to convert AC to DC,send it to the Charger board, out to a switch and then to the head light.
The Headlight is the "built like a tank" Harbor Freight Spot light for off-road vehicles.It can be bought on sale for less than 20 bucks. Water proof and extremely bright
Ebay has the parts I used for very little money. Most parts are from the USA and arrived in three days.
The "battery Box" is water proof and a hole .001 smaller than the electric cable was drilled and then Hot Melt Glue sealed on both sides when built and done.
This box holds the batteries and the electronic battery control board.
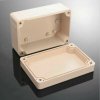
The box fits nicely in the nook of my engines gas tank. It is held in place with 2" wide industrial self-stick Velcro.

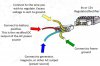
The cable holds four wires. Two for DC Charging points ( from the full wave rectifier ) on the circuit board, and two for the Discharge points ( Headlight when ON )
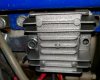
The 1PZ Rectifier ( Ebay..real cheap) bolts onto a plate already pre-drilled and nutted by the Chinese.
The wires go to the AC from the engine,gets converted to DC,then to the battery control board in the battery box.
I DO NOT use Chassis ground and do not recommend you do so. Go back to the battery only ( Ground or Negative). AC ground and Engine stop high voltage goes to chassis ground. You will fry the circuit board instantly.
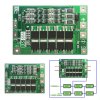
This board is better than the board I used two years ago and is under ten bucks delivered. As the batteries are wired to produce 12.6 VDC, you send to the board,4.2, 8.4 VDC and 12.6 VDC. The board looks at ALL the batters and sees 12.6 VDC total. It also see's the lower voltages and mages sure all single batteries are ballanced when charging or discharging.
Battery Ground ( - ) goes to the ZERO point.
This will greatly increase the life of your 1850 batteries.
The LOAD goes to the headlight via the two Discharge points.
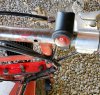
The light switch is water proof and made from aluminum. The lamp LED lamp inside is bright and can be seen in daylight.
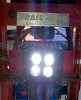
The head light is very bright and throws a beam for over 100 yards at night. It draws very little current compared to a filament bulb.
With the engine OFF, the light should stay only for a couple of hours or more.
Between the three 18650 batteries, and a running engine, you could add a Cell Phone charger with plenty of power to spare to run all sorts of 12 volt DC goodies.
This addition is very easy to do. It will last for a long time and other than the light switch has no moving parts. The system is water proof if you mind you wire connectors.
The whole system was less than 40 bucks off of Ebay,even cheaper if your willing to wait an additional three wekks for parts to come in from China.
Questions? PM me, I will always help.
See below for some of the wiring details on the light switch.
https://www.oldminibikes.com/forum/...system-for-your-minibike.167176/#post-1221799
Now in 2020 the Chinese have made it even easier to do and even do a better job of keeping track of the batteries charging/discharging.
I added the HF LED Spot Light ( 4 lamp) to my Trail King as the same light is on my Hawg Ty and is very bright drawing very little current.
The real change is that I've gone down from four 18650 Li Ion batteries to three. A new electronic control board now monitors both charging and discharging of the batteries and is rated at 60 amps! The circuit board is small,very well made and fits perfectly on top of three 18650 batteries. This make a very neat, tidy package that fits in the step down notch of a 6.5 HP engine ( Greyhound on this bike)
A very common 1PZ rectifier is used to convert AC to DC,send it to the Charger board, out to a switch and then to the head light.
The Headlight is the "built like a tank" Harbor Freight Spot light for off-road vehicles.It can be bought on sale for less than 20 bucks. Water proof and extremely bright
Ebay has the parts I used for very little money. Most parts are from the USA and arrived in three days.
The "battery Box" is water proof and a hole .001 smaller than the electric cable was drilled and then Hot Melt Glue sealed on both sides when built and done.
This box holds the batteries and the electronic battery control board.
The box fits nicely in the nook of my engines gas tank. It is held in place with 2" wide industrial self-stick Velcro.
The cable holds four wires. Two for DC Charging points ( from the full wave rectifier ) on the circuit board, and two for the Discharge points ( Headlight when ON )
The 1PZ Rectifier ( Ebay..real cheap) bolts onto a plate already pre-drilled and nutted by the Chinese.
The wires go to the AC from the engine,gets converted to DC,then to the battery control board in the battery box.
I DO NOT use Chassis ground and do not recommend you do so. Go back to the battery only ( Ground or Negative). AC ground and Engine stop high voltage goes to chassis ground. You will fry the circuit board instantly.
This board is better than the board I used two years ago and is under ten bucks delivered. As the batteries are wired to produce 12.6 VDC, you send to the board,4.2, 8.4 VDC and 12.6 VDC. The board looks at ALL the batters and sees 12.6 VDC total. It also see's the lower voltages and mages sure all single batteries are ballanced when charging or discharging.
Battery Ground ( - ) goes to the ZERO point.
This will greatly increase the life of your 1850 batteries.
The LOAD goes to the headlight via the two Discharge points.
The light switch is water proof and made from aluminum. The lamp LED lamp inside is bright and can be seen in daylight.
The head light is very bright and throws a beam for over 100 yards at night. It draws very little current compared to a filament bulb.
With the engine OFF, the light should stay only for a couple of hours or more.
Between the three 18650 batteries, and a running engine, you could add a Cell Phone charger with plenty of power to spare to run all sorts of 12 volt DC goodies.
This addition is very easy to do. It will last for a long time and other than the light switch has no moving parts. The system is water proof if you mind you wire connectors.
The whole system was less than 40 bucks off of Ebay,even cheaper if your willing to wait an additional three wekks for parts to come in from China.
Questions? PM me, I will always help.