Was able to locate a correct fuel tank for my mini, Tweety Bird. Read up on all the threads here and elsewhere on painting plastic fuel tanks. Invested in Caswell Fuel Tank sealer, followed directions to a tee. Even giving extra drying time before doing any painting. Outside sanded, applied adhesion promoter, and several coats of automotive primer. Let dry for a week. Wet sanded, then a 4 stage coat of paint/clear automotive lacquer, had the lettering airbrushed on, then cleared again.
Looked great, installed and added some fuel. Within a couple of days noticed what looked at first like maybe dirt in the paint, but I didn't remember them before. Another day or so the dirt looked like pimples forming, swelling up to a bean size. Poked a couple of them with a needle and the paint was soft and pushed down easily, but left a crater around them, like the paint around it was hard.
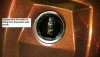
Looked inside the tank and it appears the sealer is lifting off from the plastic.
Well I guess I may have to install the old metal tank back on it.:angry:
Looked great, installed and added some fuel. Within a couple of days noticed what looked at first like maybe dirt in the paint, but I didn't remember them before. Another day or so the dirt looked like pimples forming, swelling up to a bean size. Poked a couple of them with a needle and the paint was soft and pushed down easily, but left a crater around them, like the paint around it was hard.
Looked inside the tank and it appears the sealer is lifting off from the plastic.
Well I guess I may have to install the old metal tank back on it.:angry:
Attachments
-
 148.6 KB Views: 52
 -
 101.3 KB Views: 66
 -
 86.4 KB Views: 52
 -
 127.6 KB Views: 54
