Baja heat "reconstructed"

#1
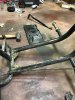
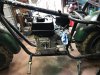
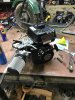
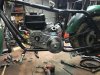
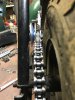
Hey everyone, I have yet another project that I'm starting today. Picked this Baja up last year from CL for $100 near me. I'm going to be putting a hemi 212 on it with the air filter and jet kit, along with a TAV from OldMiniBikes. As you can see someone put the blue greyhound motor on it. So that ones gotta go. Thanks to others on the forum and "noseoil" to help me get back in the groove of playing with these mini bikes!!!!! I haven't technically done a Baja like this yet other than a few things with the others I have. Here is a picture of what I have so far....


IMG_3103.JPG


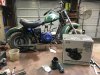
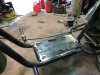
Also the tank that's on it was from a ATC 70. Not my doing
 
#3
One simple suggestion I would make after cutting up and modding 5 different Warrior frames. I would suggest turning it over and checking all the welds thoroughly while the engine is out. Other than that they are a lot of fun.
 
#4
One simple suggestion I would make after cutting up and modding 5 different Warrior frames. I would suggest turning it over and checking all the welds thoroughly while the engine is out. Other than that they are a lot of fun.
Thank you sir, you have a very valid point!!! I had 2 that I cleaned up a while back that I had to grind and re-weld a few of the welds.
 
#5
Got some work done tonight, I looked over the welds as mentioned by FOMOGO, in doing so I decided to cut the old motor plate off and weld in a new one, I made these a few years ago and at the time I was using the jackshaft still on my other bikes so that's why there's a square cut out.

IMG_3159.JPG
IMG_3162.JPG
IMG_3164.JPG
IMG_3166.JPG
IMG_3167.JPG
 
Last edited:
#8
Will do, thanks guys. Waiting on parts to come in so I can get started on fitting up the TAV, exhaust, and air filter. Hopefully everything will be here by the weekend.
 
#9
Nice. I have the same frame and did the exact swap with the 212 and tav. You will need to cut a little off the bottom of the table and the rear oil plug for it to fit the frame. All the bolt holes should line up fine. I didn't have much issue with the chain lining up either. FYI, the boots that come with the tav will not fit the crank or mounting holes on the motor. I went out and bought new ones.

Sent from my Pixel using Tapatalk
 

noseoil

Active Member
#10
"FYI, the boots that come with the tav will not fit the crank or mounting holes on the motor. I went out and bought new ones."

Yep, the bolts don't fit either. Get 4ea 5/16-24 X 1" & 1ea 5/16-24 X 2 1/2" for the crankshaft
 
#11
Sorry for the type-o! Those sizes look exactly what I purchased. The bolt holes sizes for the predator are in the manual as well.

Sent from my Pixel using Tapatalk
 
Last edited:
#12
"FYI, the boots that come with the tav will not fit the crank or mounting holes on the motor. I went out and bought new ones."

Yep, the bolts don't fit either. Get 4ea 5/16-24 X 1" & 1ea 5/16-24 X 2 1/2" for the crankshaft


Thank you sir, I did run into this prob with my Murray build, buts in been a while and forgot. I appreciate the reminder though, I'll stop by the hardware store this week and get some.
 
#14
What size jet did you install? I have been thinking about changing mine since it's so cheap. I do not have a cone filter though and would like to keep the stock air box.

Sent from my Pixel using Tapatalk
 
#16
Aright, I have had a real bad time tonight working on the Baja, I got the TAV from OldMiniBikes today, I cut to fit, fine no biggie. The issue I'm having is the front drive and rear sprockets are not lining up correctly........ it may be that it's ok, but I foresee the sprockets getting ate up and having to buy new ones done the road. Here are some pics..... please give me some input. Thanks

IMG_3182.JPG

IMG_3183.JPG
 
#17
Looks right to me, but it could be the angle of the picture. Worst case you might need to move the motor mounts or play with the spacer on the rear axle. Mine lined up pretty well. I do have a washer on the crank in addition to the spacer that came with the tav kit.

Sent from my Pixel using Tapatalk
 
#18
Looks right to me, but it could be the angle of the picture. Worst case you might need to move the motor mounts or play with the spacer on the rear axle. Mine lined up pretty well. I do have a washer on the crank in addition to the spacer that came with the tav kit.

Sent from my Pixel using Tapatalk

It's the angle of the pic, the chain is at a oddball angle in reference to the motor, I had to use a washer as well on the crank for the belt alignment, the TAV lines up good, just the sprockets don't, as you stated I may have to grind the motor mounts to try to help with the offset.
I suppose I could add a washer where the spacers are to.


Thanks for the help
 

noseoil

Active Member
#19
Are you sure it isn't the back axle being twisted in the frame a little?

If not, take whatever time you need to get the best alignment possible. If it isn't right, use a file & move the motor over on the plate until it is! It shouldn't take much to fix, but you don't need the problems with parasitic drag & worn parts from a bad alignment on a build. Just file the plate holes slightly until the alignment is perfect. A rat tail file & some elbow grease is all you need. You will be time & money ahead when it's right the first time!
 
#20
Are you sure it isn't the back axle being twisted in the frame a little?

If not, take whatever time you need to get the best alignment possible. If it isn't right, use a file & move the motor over on the plate until it is! It shouldn't take much to fix, but you don't need the problems with parasitic drag & worn parts from a bad alignment on a build. Just file the plate holes slightly until the alignment is perfect. A rat tail file & some elbow grease is all you need. You will be time & money ahead when it's right the first time!
That's prob what I'll be doing tmrw, I think te motor mount was off an 1/8" or so when I put it on, but I could of swore I had it right when I tacked it up.

Thanks for the help guys
 
Top