Bird Thunderbird - First minibike build

#1
Hello all,

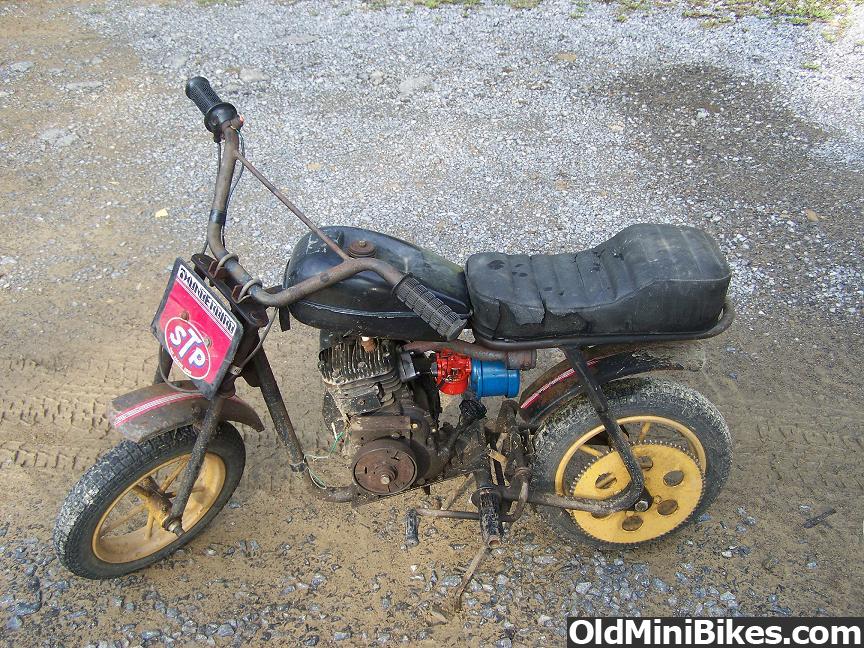
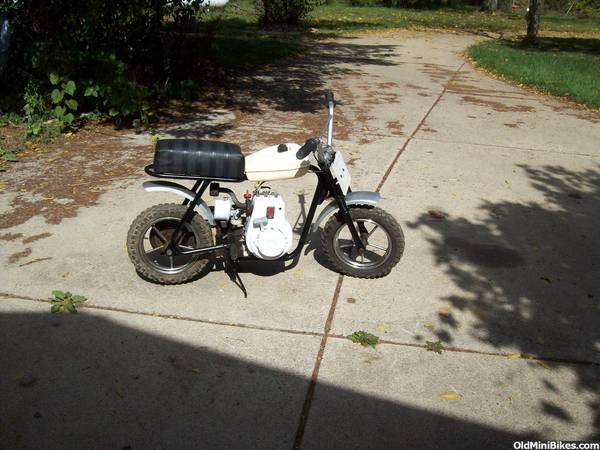
I recently purchased a mid 70's Bird Manufacturing Thunderbird from a CL seller ($100), I have the Tecumseh engine out of it for cleaning, and will be going over the bike to disassemble it for stripping and repainting.

Where can I find manuals for this bike?

How do I break/get the chain off? What size is the chain? How can I identify the chain size?

Any input is greatly appreciated.

Nick
 

WrenchDad

Active Member
#2
Welcome to the site. WE LOVE PICTURES! the chain should be #35chain and it should have a master link in it. If not I would ground down two of the pins flush and pop the link off then slide the chain apart. I dont remember the length but I can measure mine and let you know. If your chain is good clean it and re use it with a master link. The picture is of mine when I got it. My chain had 51 cracks in it so I just replaced it.
 
Last edited:
#3
Thanks for the fast reply WrenchDad.

I am technically Wrench-uncle, as I bought this bike to rehab for my nieces and nephews to play around on. The wife and I have full size bikes that we play with (but I am sure I will at least try out this little mini).

I took pictures before I started the teardown, so I will post them along with the phases of the build.

I will check out the chain when I get home, I just wnt to get it off so I can start taking apart the rest of the frame, forks, wheels, etc. for stripping.

Buy the way, I see you are from Butler PA. I grew up around Youngstown OH before moving to Chicago. I am very familiar with your area.

Thanks again,

Nick
 

WrenchDad

Active Member
#8
Engines worth that. Nice score.:thumbsup:
Yeah good deal for the money.Fork plate is missing but heck mine is just a square piece of plastic, you could make one of those easy enough. Your's is a different model year then mine (spring forks). so your original seat was probably long and smooth an OldMiniBikes wharehouse replacement would probably work. By the way I'm 5'8" and 235lb and that bike is just to small for me to fit on . Unless your short and thin (kid size), with the center located foot pegs you just have to much weight on the back end. They run great,light and spunky. It,ll come off the ground pretty easy.

My forks were bent about the same as yours I put a chain thru the back frame and hooked it to my truck than put a rachet chain binder (2) on either side of the forks (hooks on the flat part of the forks just above the axle) and evenly pulled the forks straight. It worked pretty good. I can post pics of that process if you want.

I grew up in Hermitage / Sharon area So Im sure we Stomped some common ground.
 
#9
My forks were bent about the same as yours I put a chain thru the back frame and hooked it to my truck than put a rachet chain binder (2) on either side of the forks (hooks on the flat part of the forks just above the axle) and evenly pulled the forks straight. It worked pretty good. I can post pics of that process if you want.

I grew up in Hermitage / Sharon area So Im sure we Stomped some common ground.
I would like to see the photos of the fork bending. I was planning on trying to bend the forks back straight, and any type of input as to a good way to do that would be appreciated.

Sharon/Hermitage Area:thumbsup: I moved to Brookfield OH when I was a kid and lived there till I moved to Chicago. We definately stomped some common ground!
 
#11
I had one about that rusty..:laugh: mine turned out alright.. Hell, it just got the clean up and Dollar Store paint and it was alright at ten feet.. I drove it around quite a bit before it went to auction... Pretty nice riding little bikes really...


cxbra

New Member
#14
Nice find! The only thing i'd say is you should either fix the forks or get a rigid fork for it if you plan on riding it soon... I had forks that were just like that on my JC Penney El-Tigre and they looked less bent than that. Eventually after riding it for a while the forks broke in half! Good thing I was at low speed, just be careful with those forks man!
 
#15
Nice find! The only thing i'd say is you should either fix the forks or get a rigid fork for it if you plan on riding it soon... I had forks that were just like that on my JC Penney El-Tigre and they looked less bent than that. Eventually after riding it for a while the forks broke in half! Good thing I was at low speed, just be careful with those forks man!
Thanks for the heads up. I will be checking the forks for any cracks before and after I bend them back into place. I can hit them with a weld if needed.
 
#16
Painting the plastic tank

Just wanted to pick your brains regarding the painting of the plastic tank. As you can see from the photos I posted earlier, the previous owner had painted the tank metallic purple! it was bubbled and scratched up pretty bad, so I stripped it off using the drill and a stripping wheel (fiber, not wire), then sanding witrh a sponge sanding block. I cannot leave it natural (as there are some areas discolored by the old paint, and there are some scratches from the fiber wheel. I will be filling in the scratches with auto body filler (bondo) to smooth it out, but wanted to get some input as to things to watch out for in painting the plastic. I will be priming the tank before painting, but plan on using plain old "rattle can" primer and paint from the hardware store.

Any tips ot tricks?:thumbsup:

thanks,

Nick
 
#17
Just wanted to pick your brains regarding the painting of the plastic tank. Nick

Mothers headlight restoration kit. (Or another MFGR's kit) Use medium grade 3M pad, and graduate to less and less grit paper, then hit it with the power ball and the plastic polish with a drill press at 1500 RPM. You can do quite a bit of restoring like this, and may end up being able to have an original plastic finish.

The other option is SEM paint. It's aerosol, and a recognized leader in plastic paint coatings for dash's etc. From what I hear, it's not fuel resistant though, which is why I like the first option.

Seal the tank with Caswells if you're worried about the integrity.
 

WrenchDad

Active Member
#18
Mothers headlight restoration kit. (Or another MFGR's kit) Use medium grade 3M pad, and graduate to less and less grit paper, then hit it with the power ball and the plastic polish with a drill press at 1500 RPM. You can do quite a bit of restoring like this, and may end up being able to have an original plastic finish.

The other option is SEM paint. It's aerosol, and a recognized leader in plastic paint coatings for dash's etc. From what I hear, it's not fuel resistant though, which is why I like the first option.

Seal the tank with Caswells if you're worried about the integrity.
You can find paints that will stick to plastics but most are not fuel resistant, most fuel resistant paints wont or dont stick to plastics on their own. Most plastics are porus even if you cant see it, and any dirt and especially oil products will penetrate the plastic and reak havok on your paint process. Cleaning them usually only gets the surface and the stuff in the pores comes out later to haunt you.
I work with plastics (PE, PP, EPP )and most use a Corrona treatment for painted surfaces. No you dont dump mexican beer and limes on your tank.

Corrona treating is an electrical process that breaks the surface tention of the plastics and leaves it "treated" and gives something for the paint to stick to. (they do it with aerosol cans and bottles also).

I would agree with Havasu Dave, fine sand it then polish it. It will look nice and last longer than paint plus it is real repeatable.
 
#19
Thanks for the tank input regarding sanding and polishing the tank and keeping it natural. But I just don't like the look of the white tank.

Both my motorcycle and my wife's motorcycle are red & black (mine has cream panels as well), so I am somewhat partial to that color combination.

I love yellow bikes as well, and may do something in yellow.

I have even looked into the "Camo dip" type of products (Water transfer process). At this point it is all experimentation.

This weekend will be the main teardown. The whole frame/forks, wheels, etc. are coming apart. The engine has been cleaned, the oil changed (the oil that came out was HORRIBLE), and the exhaust wire brushed and painted with high temp paint. New exhaust and carb gaskets. Just need to put the pull starter and cowling back on and I should be ready to fire up the engine!

Here's hoping it starts !!!!!:thumbsup::thumbsup::thumbsup:
 
#20
Took the tires off the rims and started painting the engine. Going with red and black for my color scheme.

What size are the tires on this bike? Once I took the tires off, I saw they were pretty cracked and dry rotted. Thinking about replacing them and need the size.

Also, the rims are pretty banged up. A few spots that will need to be bent and hammered out.

Now to start tackling stripping the frame!
 
Top