Dr. Shop Teacher's JFF Gilson Knight Rider
- Thread starter Dr. Shop Teacher
- Start date

 ut:
ut:Wiring harness
So this was a two day ordeal. Making things fit in places never designed for them is just a blast...let me tell you.:doah:I did use the frame tube to run multiple lines from head to tail--there's an inch plus gap on each end and there is no strain on the wires, they just sit there.
Everything is wired in parallel and all starts with the voltage regulator under the seat. The primary lead had to come up from the AC coil through the switch on the control panel, then individually feed the brake light switch to brake light, tail light and back up to the head light (three separate feeds). The ground is also on the front of the engine and it's fed down to the regulator, then tail/brake light and back up to the head light. There's a mini fuse on the AC primary feed and on the DC battery charge side. Every thing is soldered--tedious work--and heat shrink used where possible. I used bullet connectors a lot and they are all soldered. Zip ties and electrical tape had to be used up under the seat because sometimes simpler is better. The engine will pop off with just two simple disconnects.
Several connections are in the headlight bucket to hide the rat's nest.

Bullet connectors are soldered in place, and sealed with tape/heat shrink tubing.

As progress was being made...with the monthly coffee cup.

I used mini fuses. Here's the business end all buttoned up, zip tied and taped so it's hidden.

Cleaned up and zip tied the cables, solenoid wire and primary wire.

Tail light (and brake light works)

Headlight..all tested with a battery.

Fuel tank and lines, throttle cable and seat are next.
Last edited:
The MAD THRASH!
My house looks like a bomb hit it, the rains finally stopped and the swamp (yard) needs to be cut and I'm downstairs hammering out issues with the bike. I'm still waiting for the guards to be welded so I can sand, polish and install, I need to make a heat shield for the muffler and sort out the kill switch which surprisingly didn't work (that was the easiest part of the wiring).
Below, I covered the tank with wax paper so I wouldn't scratch it installing it. Click on the pics for proper orientation.

I added another hole/grommet to feed the throttle cable through since the control panel is so long:

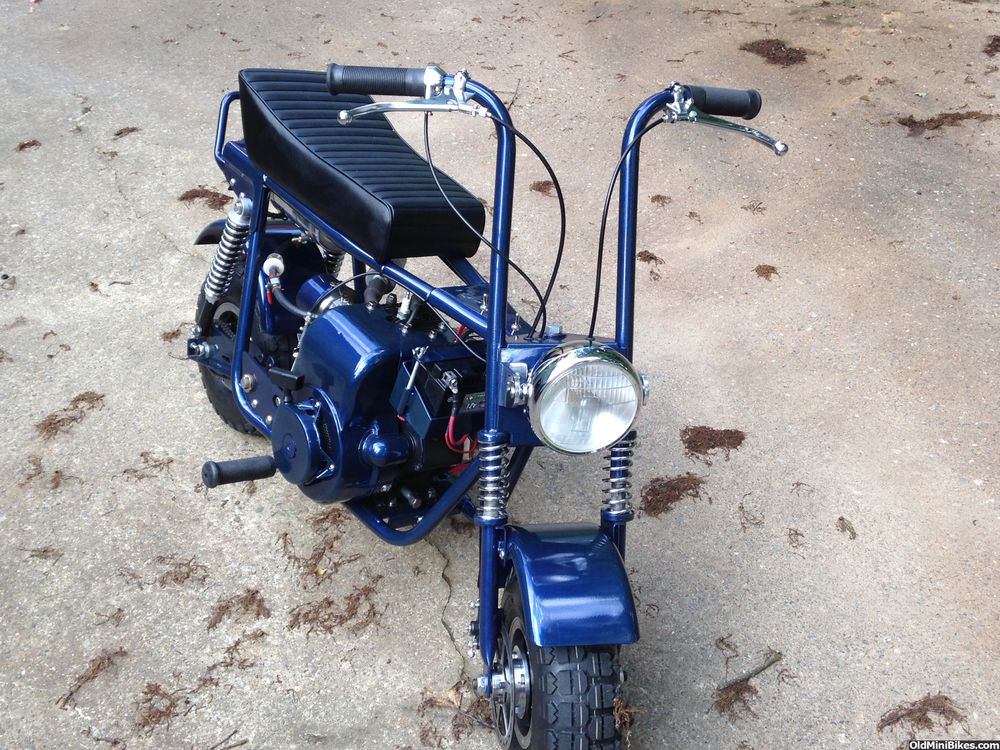
Got the chain installed, ran the fuel lines, fit the seat and rolled her outside. Needed to reset the float lower as the correct factory setting was too much and adjusted the governor. She's ALIVE. I did several shake down laps through the neighborhood and this bike is fast. The Delrin tubes took nearly all the vibration out of the front end and the bike is incredibly smooth.
Here are some pics after the shakedown run:


My house looks like a bomb hit it, the rains finally stopped and the swamp (yard) needs to be cut and I'm downstairs hammering out issues with the bike. I'm still waiting for the guards to be welded so I can sand, polish and install, I need to make a heat shield for the muffler and sort out the kill switch which surprisingly didn't work (that was the easiest part of the wiring).
Below, I covered the tank with wax paper so I wouldn't scratch it installing it. Click on the pics for proper orientation.

I added another hole/grommet to feed the throttle cable through since the control panel is so long:

Got the chain installed, ran the fuel lines, fit the seat and rolled her outside. Needed to reset the float lower as the correct factory setting was too much and adjusted the governor. She's ALIVE. I did several shake down laps through the neighborhood and this bike is fast. The Delrin tubes took nearly all the vibration out of the front end and the bike is incredibly smooth.
Here are some pics after the shakedown run:


Last edited:
Wow...another work of art Pete...:thumbsup:
Way cool stuff , too awesome ! FYI , they sell LED Battery lights on Ebay for like $20 , lol !!
Waiting.... and fine tuning
The machine shop has had the guards for going on 3 weeks and I'm getting anxious. I've been fine tuning a number of things on the bike. The engine wasn't running great and I couldn't seem to get the main jet right. I decided to switch to 100% gasoline and picked up a couple of gallons at Southern States. Made all the difference in the world and was able to get the engine running smooth across the rev range.
I was not happy with the AC lighting coil. Works fine for fixed speed applications but there wasn't enough voltage at low RPM to adequately power the lights. Spent the morning today switching over to the DC side and everything works fine (I had built in blade connectors just in case). Brakes needed a little fine tuning and I had to put a thin shim to clear the frame on the Driven side of the jackshaft. Drive belt needed loosening and the chain needed tightening.
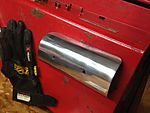
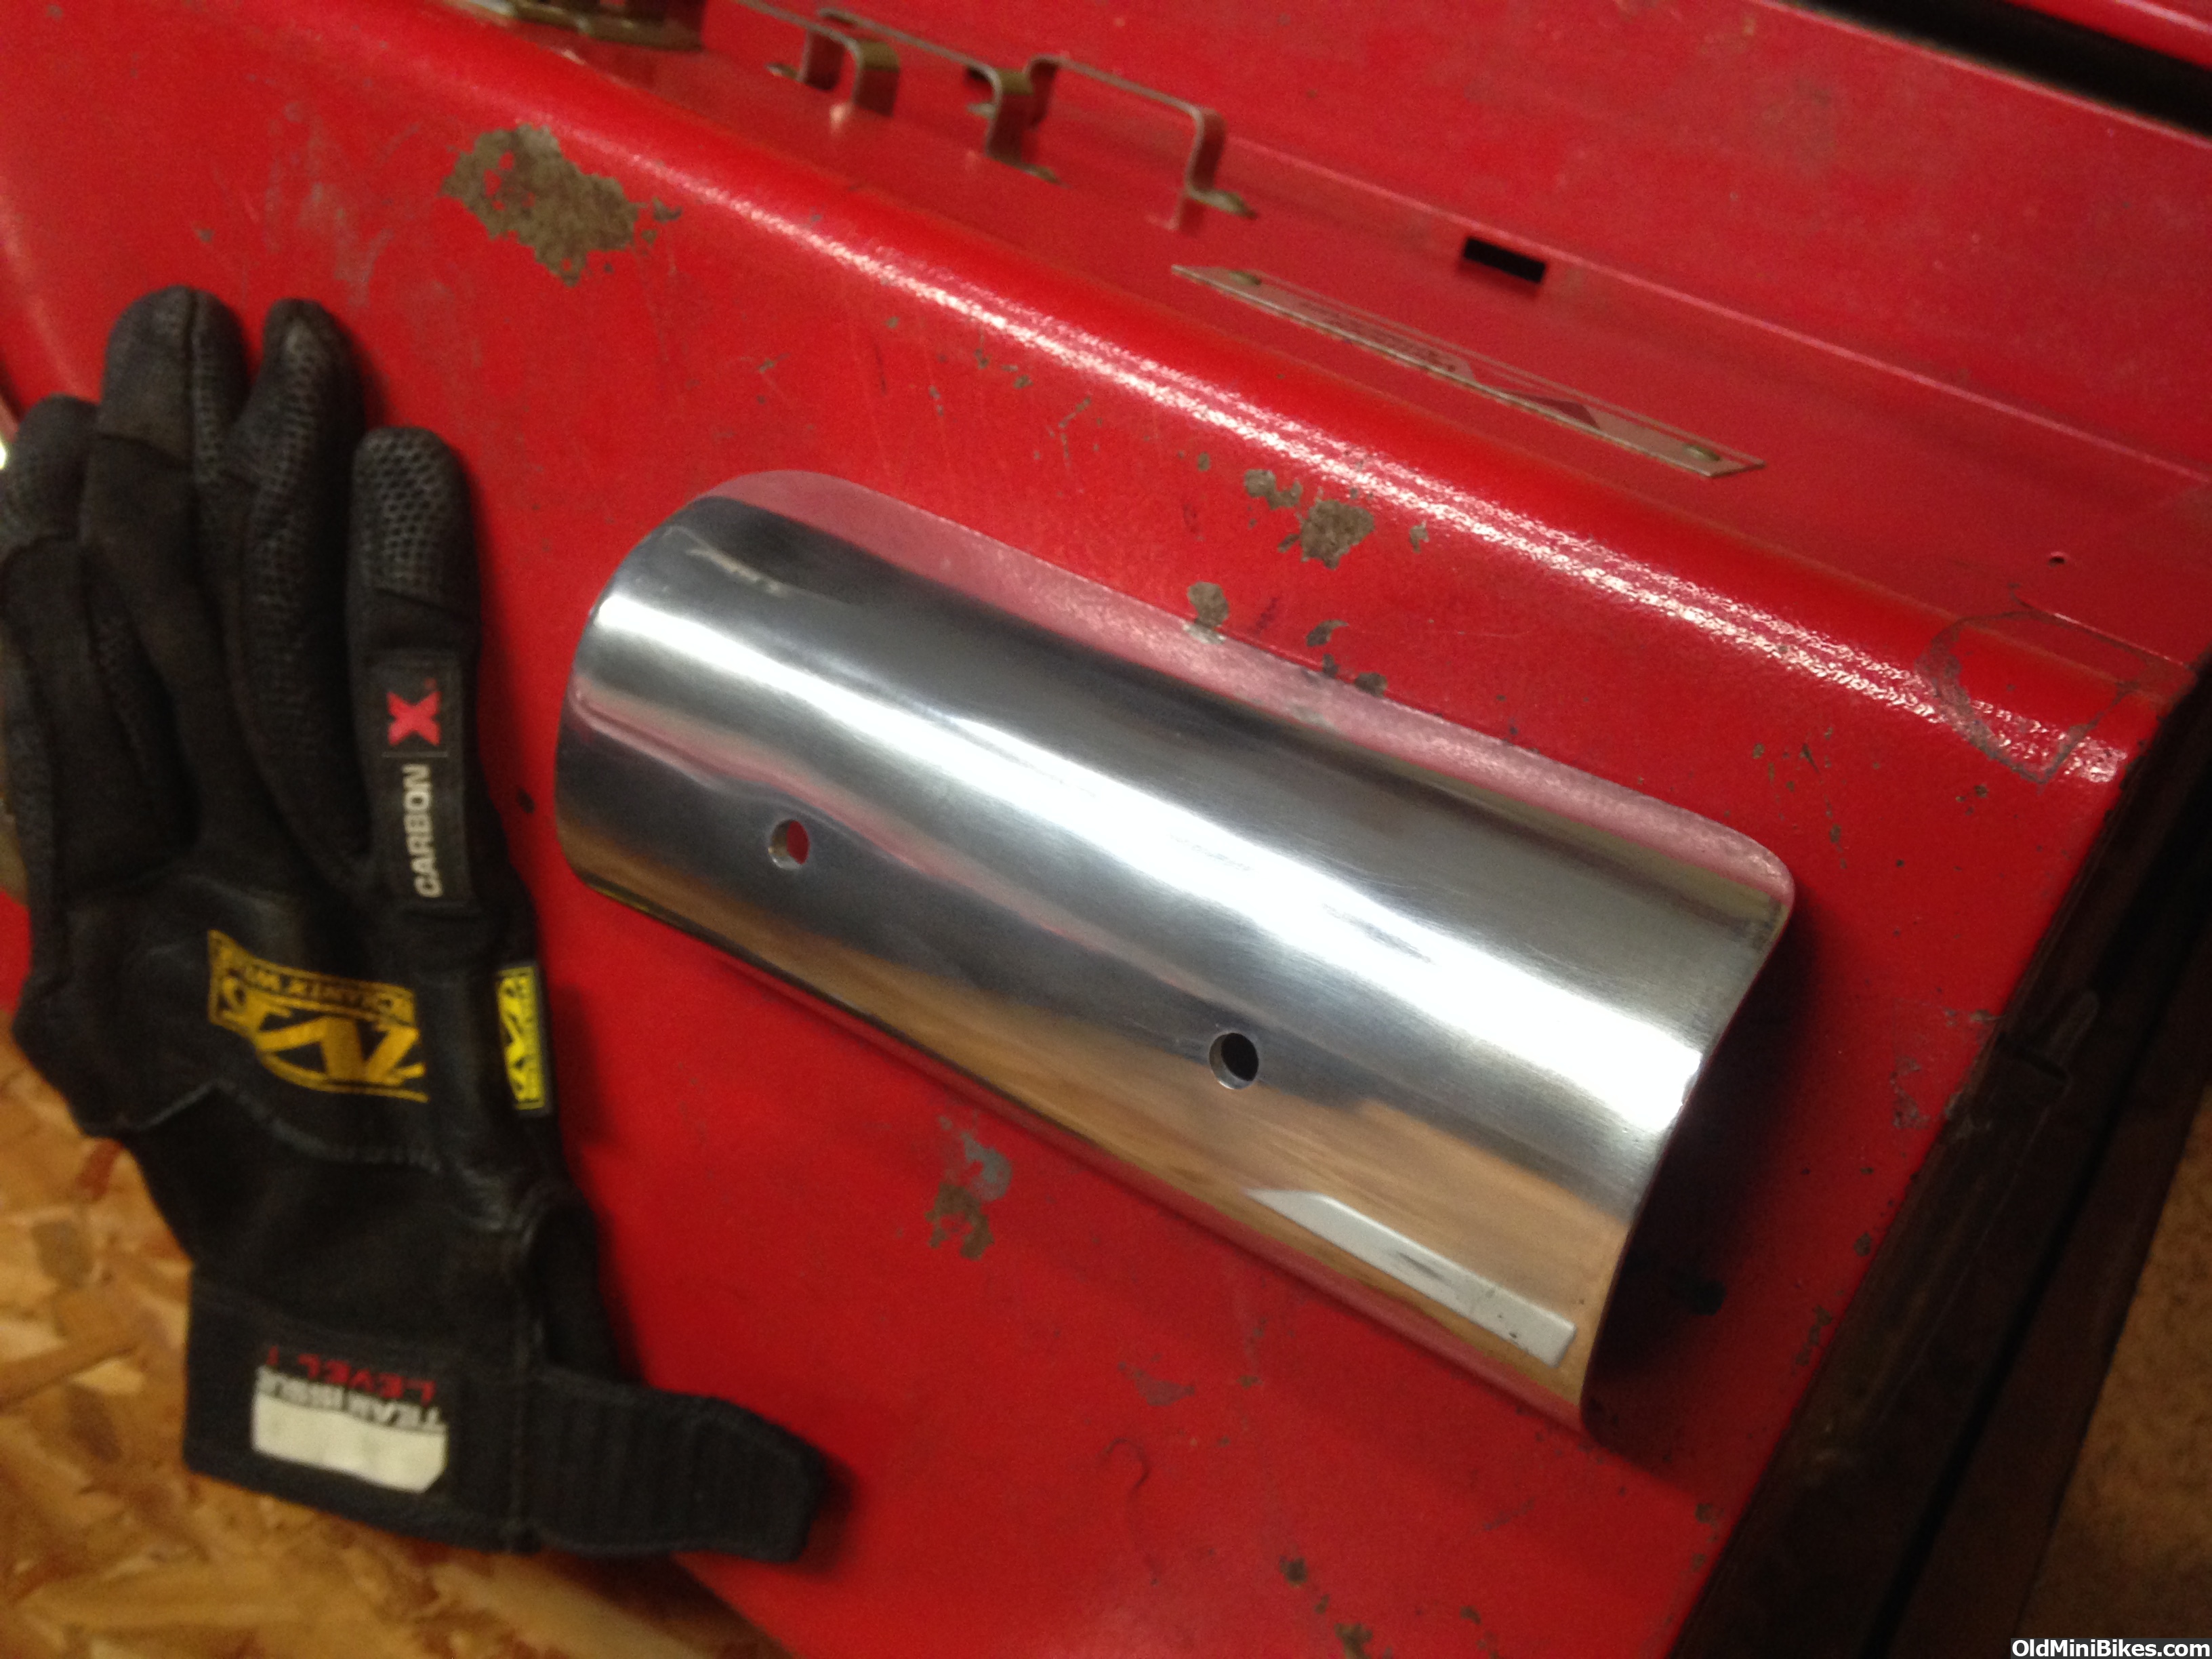
I also made a heat shield for the muffler. I wanted to wrap more of the muffler than what a eBay no-name 6" shield will cover and I wanted to step it off of the muffler by 1/2" to reduce heat transfer. I heated and bent the aluminum around a 2" pipe and then spent a l....o...n...g time sanding to get it smooth. The brackets are 10g sheet metal with 2 1/4" hose clamps.


The machine shop has had the guards for going on 3 weeks and I'm getting anxious. I've been fine tuning a number of things on the bike. The engine wasn't running great and I couldn't seem to get the main jet right. I decided to switch to 100% gasoline and picked up a couple of gallons at Southern States. Made all the difference in the world and was able to get the engine running smooth across the rev range.
I was not happy with the AC lighting coil. Works fine for fixed speed applications but there wasn't enough voltage at low RPM to adequately power the lights. Spent the morning today switching over to the DC side and everything works fine (I had built in blade connectors just in case). Brakes needed a little fine tuning and I had to put a thin shim to clear the frame on the Driven side of the jackshaft. Drive belt needed loosening and the chain needed tightening.
I also made a heat shield for the muffler. I wanted to wrap more of the muffler than what a eBay no-name 6" shield will cover and I wanted to step it off of the muffler by 1/2" to reduce heat transfer. I heated and bent the aluminum around a 2" pipe and then spent a l....o...n...g time sanding to get it smooth. The brackets are 10g sheet metal with 2 1/4" hose clamps.


Build (almost complete)
I await machinists and welders. I still don't have the clutch guard, chain guard or the battery cover...so the judges will have to rule if the project is complete. I am, masters, at your mercy.
I do want to thank @Mr. Pat and [MENTION=9664]cheezy1[/MENTION] for moderating this year's build off. I bit off way more than I could chew given time constraints but I'm pretty happy with this bike. I solved the vibration problem with the front forks, added disc brakes front and rear, and made it a TAV bike. Lighting was a real challenge as were designing the hubs and replica guards. The bike is incredibly smooth and very fast, as you'll see in the video at 1/2 throttle. There is nothing like the sound of huge tappets clicking away on a big block Tecumseh. The engine is a short stroke hybrid and is loaded with torque...I have to bump it to get it to turn over especially when it's warm.
My thanks to John Jewell Architectural Metals for much of the welding (best wishes for a speedy return to health), Advanced Coating Solutions for the beautiful Volks Mag Blue Powder, The Restoration Shop for re-machining hubs and doing the front fork insert machining. OldMiniBikes provided a ton of parts with speedy delivery, BMI supplied the head lamp and BAM Manufacturing the fuel tank. [MENTION=18286]manchester1[/MENTION] went over the top on the seat (as always), Chipper and David Wulf offered a ton of support and input on the brake hubs. John Pardue and Havasu Dave helped immensely with the electrical challenges.
So a few details remain. I hope it's all complete by Windber. I look forward to seeing all my friends at Windber and hearing some of the best "lies" we can tell!
As always, click on the pic for proper orientation.

Here's a link to the video. I bought an Action Camera, so you get to see the 'hood and me running through the radar. On another pass I was at 37 mph and I had calculated top speed at 35.
https://youtu.be/9yo6iain3Hs
I await machinists and welders. I still don't have the clutch guard, chain guard or the battery cover...so the judges will have to rule if the project is complete. I am, masters, at your mercy.
I do want to thank @Mr. Pat and [MENTION=9664]cheezy1[/MENTION] for moderating this year's build off. I bit off way more than I could chew given time constraints but I'm pretty happy with this bike. I solved the vibration problem with the front forks, added disc brakes front and rear, and made it a TAV bike. Lighting was a real challenge as were designing the hubs and replica guards. The bike is incredibly smooth and very fast, as you'll see in the video at 1/2 throttle. There is nothing like the sound of huge tappets clicking away on a big block Tecumseh. The engine is a short stroke hybrid and is loaded with torque...I have to bump it to get it to turn over especially when it's warm.
My thanks to John Jewell Architectural Metals for much of the welding (best wishes for a speedy return to health), Advanced Coating Solutions for the beautiful Volks Mag Blue Powder, The Restoration Shop for re-machining hubs and doing the front fork insert machining. OldMiniBikes provided a ton of parts with speedy delivery, BMI supplied the head lamp and BAM Manufacturing the fuel tank. [MENTION=18286]manchester1[/MENTION] went over the top on the seat (as always), Chipper and David Wulf offered a ton of support and input on the brake hubs. John Pardue and Havasu Dave helped immensely with the electrical challenges.
So a few details remain. I hope it's all complete by Windber. I look forward to seeing all my friends at Windber and hearing some of the best "lies" we can tell!
As always, click on the pic for proper orientation.
Here's a link to the video. I bought an Action Camera, so you get to see the 'hood and me running through the radar. On another pass I was at 37 mph and I had calculated top speed at 35.
https://youtu.be/9yo6iain3Hs