Havasu Dave's - "Mini Bike" - (Just For Fun)

Glad you've discovered the BSA shifter rubbers....I've used them on a pair of bikes. I like the nice simple design. Great job on the pegs!
It took five tries to get the second peg even with the first. Once I finally got it, I moved the frame to weld the bottom side, and the frame slipped, knocking off the tack welds. LOL! Six tries! Two less than the scrub brake. :laugh:
Thanks Pete, the pegs burned through several billion brain cells. (grin) Someone on OldMiniBikes told me about those BSA pegs about five years ago, when I was looking for something for a Cat scrub brake. Since I used an old Cat scrub brake rod, it was a no-brainer! Since I have no real torch, I set my propane torch in a drill press vice and let it flame for two cigarettes-worth of time. Easy to bend then.
It took five tries to get the second peg even with the first. Once I finally got it, I moved the frame to weld the bottom side, and the frame slipped, knocking off the tack welds. LOL! Six tries! Two less than the scrub brake. :laugh:
It took five tries to get the second peg even with the first. Once I finally got it, I moved the frame to weld the bottom side, and the frame slipped, knocking off the tack welds. LOL! Six tries! Two less than the scrub brake. :laugh:
Glad to see a few of your hurdles are cleared Dave , I'm digging the whole bike !
Thanks my friend! I started this with a "plan" and it has morphed into what it needed to be, without me doing anything but following along. This project has been the perfect diversion. Lately, we've started to become more friendly to each other. This bike is kind of an asshole, so I can relate to that. :laugh:
Earlier, I spoke of relieving the crank shaft to make the PTO bearing a slip fit instead of an interference fit to facilitate easier installation of the snap ring which retains the PTO bearing. I found it extremely difficult to insert the snap ring accurately against the roll pin in the bearing bore, as well as get proper seating of the snap ring, due to the crankshaft counter weights being in the way. I found that by doing this, I had placed crankshaft run-out adjustment where it was dependent upon shims in the smaller support plate bearing. I decided to get the best of both words: If you cant visualize this, don't worry, if you ever build this engine, all of that makes sense. (grin)
So what I opted to do is insert piston first, then seat the PTO bearing, cleaned of any oil. Then I inserted the snap ring with miles of room to work with. I then coated the oil free bearing mating surface (where I'd relieved it) with Loctite 620. It is made for this application, is high temp, and the most expensive little bottle of anything I have ever purchased.

Then I inserted the snap ring on the back side, adding additional retaining power to the bearing. I will install a new oil seal.

I received the intake/stuffer from Tom. You can see how it displaces some of the volume within the case. This does magical two stroke stuff having to do with higher pressure on the bottom of the piston, and increased air flow.

The front side of Tom's piece is fitted to accept a West Bend 820 reed cage which is significantly larger that the original 580/700 cage. He forged this to match the 580/700 block of course.

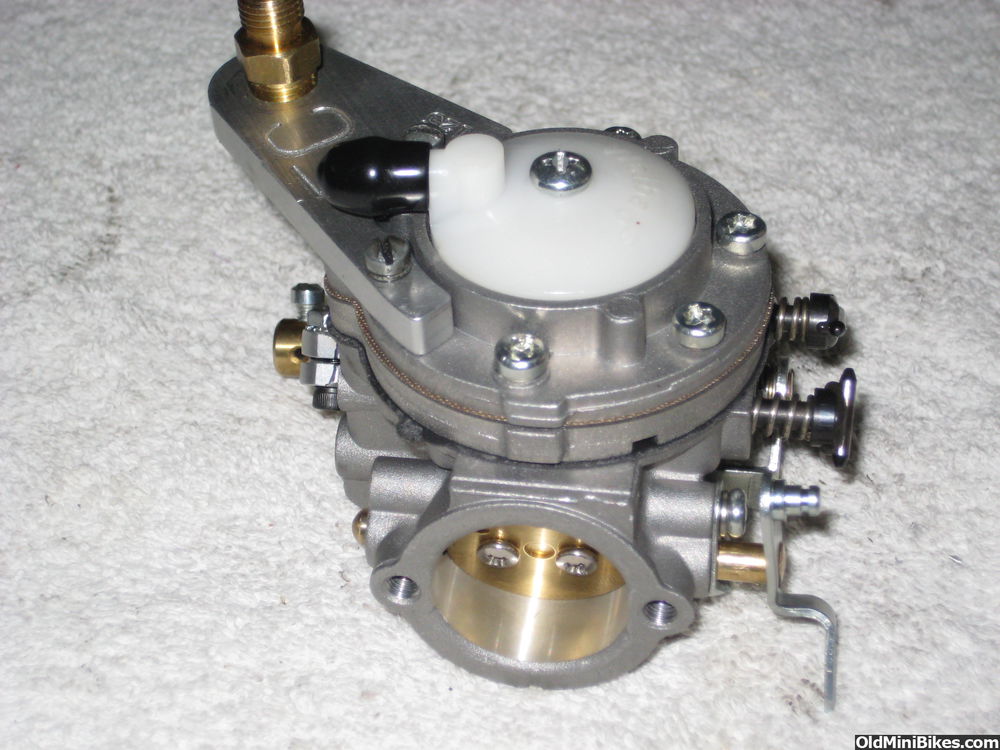
Further taking the advice of vintage karters like Louie, I purchased this "clone" carburetor from Vince at California Vintage Karts. They've done a lot of testing with it on various two strokes and recommend it. It is much larger than my original Tillotson carburetor. I am using a few EC components for throttle. The carb actually "almost" says Walbro, those crafty Chinese!

The carburetor does not come with a choke detent- meaning the choke is designed for a lever/cable actuation system. I drilled out the detent spring boss with a 5/32, and inserted the spring and brass ball from the Tilly, and voila, I have choke.
CarPlayLB is sending me some more gaskets for mounting this stuff, as well as some of his reeds. I am also waiting for the 820 reed cage from US Motor Power.
So what I opted to do is insert piston first, then seat the PTO bearing, cleaned of any oil. Then I inserted the snap ring with miles of room to work with. I then coated the oil free bearing mating surface (where I'd relieved it) with Loctite 620. It is made for this application, is high temp, and the most expensive little bottle of anything I have ever purchased.
Then I inserted the snap ring on the back side, adding additional retaining power to the bearing. I will install a new oil seal.
I received the intake/stuffer from Tom. You can see how it displaces some of the volume within the case. This does magical two stroke stuff having to do with higher pressure on the bottom of the piston, and increased air flow.
The front side of Tom's piece is fitted to accept a West Bend 820 reed cage which is significantly larger that the original 580/700 cage. He forged this to match the 580/700 block of course.
Further taking the advice of vintage karters like Louie, I purchased this "clone" carburetor from Vince at California Vintage Karts. They've done a lot of testing with it on various two strokes and recommend it. It is much larger than my original Tillotson carburetor. I am using a few EC components for throttle. The carb actually "almost" says Walbro, those crafty Chinese!
The carburetor does not come with a choke detent- meaning the choke is designed for a lever/cable actuation system. I drilled out the detent spring boss with a 5/32, and inserted the spring and brass ball from the Tilly, and voila, I have choke.
CarPlayLB is sending me some more gaskets for mounting this stuff, as well as some of his reeds. I am also waiting for the 820 reed cage from US Motor Power.
")
Nice tutorial....don't ya just hate it when a freshly painted engine has to be torn back down???:laugh: Must be the 2017 build off curse.:shrug:
I did not mean to make a tutorial. I don't know enough about anything to make a tutorial. What I was excited about, was that I figured out how to use that camera to zoom in, then auto focus. LMAO! Very little information is available on line for these engines, so everything I am doing is nothing more than puppeting what more experienced guys recommend.
Nice work HD!
In regards to Tom's manifold, it does not appear to have the notches for the pulse that will go through the reed cage to the carb. Once your reed cage arrives , place it to the manifold and make sure the pulse has a clean shot to the crankcase. They usually have a small divot on the cage mounting surface for the pulse. Sorry for the wonky explanation!
In regards to Tom's manifold, it does not appear to have the notches for the pulse that will go through the reed cage to the carb. Once your reed cage arrives , place it to the manifold and make sure the pulse has a clean shot to the crankcase. They usually have a small divot on the cage mounting surface for the pulse. Sorry for the wonky explanation!
Our friend Gerald [MENTION=45064]LSCustoms[/MENTION] fabricated a nice aluminum tank for me. We had to go back and forth getting the measurements down, and I am very pleased with it. I almost hate to put it on a bike.

We discussed some mounting options, and things get kinda weird with a single tube frame as far as the more traditional mounts go. I'm always down for something Unie-Que, so Gerald tossed in some steel bungs. I will admit to being a intimidated by drilling two 3/4" holes in a 1" frame.

I MIG welded them in place. Obviously, this is my weakness. I had to go with extra margin on top, even though I wanted them to end up just above the frame. This is because I needed some decent heat to make the bungs integral to the frame for strength, but not burn into the bungs at the top. Bungs set up for counter-sunk fasteners.

And it mounts just fine, is strong, no hose clamps, or offset stuff. Going for the clean look. I have to keep the foam padding on it until the last, but I do need some longer hardware, allens, as well as a couple of very short spacers.
We discussed some mounting options, and things get kinda weird with a single tube frame as far as the more traditional mounts go. I'm always down for something Unie-Que, so Gerald tossed in some steel bungs. I will admit to being a intimidated by drilling two 3/4" holes in a 1" frame.
I MIG welded them in place. Obviously, this is my weakness. I had to go with extra margin on top, even though I wanted them to end up just above the frame. This is because I needed some decent heat to make the bungs integral to the frame for strength, but not burn into the bungs at the top. Bungs set up for counter-sunk fasteners.
And it mounts just fine, is strong, no hose clamps, or offset stuff. Going for the clean look. I have to keep the foam padding on it until the last, but I do need some longer hardware, allens, as well as a couple of very short spacers.
I got this "see through" aluminum throttle and dummy grips from Karl a few months back. It is designed for one inch bars, which is what I have. I can only guess that the original intent was to allow one to see the chrome bars beneath the grips.
I don't understand how one would move the throttle and not scratch up the chrome beneath it, and especially for an application with paint or powder coat.

I got an Arlen Ness throttle bearing kit for 1" bars to see if centering the throttle better would allow it all to clear. Nope. So I welded on a 7/8" piece to the bars. The throttle clamp itself is at the 1" area. This shows the bearing which sits at the end of the throttle grip.

Here it is assembled. I now have 1/16" clearance all the way around, and the throttle has no resistance.

I don't understand how one would move the throttle and not scratch up the chrome beneath it, and especially for an application with paint or powder coat.
I got an Arlen Ness throttle bearing kit for 1" bars to see if centering the throttle better would allow it all to clear. Nope. So I welded on a 7/8" piece to the bars. The throttle clamp itself is at the 1" area. This shows the bearing which sits at the end of the throttle grip.
Here it is assembled. I now have 1/16" clearance all the way around, and the throttle has no resistance.
Nice touch on the see thru throttle, I'm banking that idea.....
Dave this bike is turning out to be one of my favorites....awesome job so far, I can't wait to see the finished product !