I came across a 1978 KV75 basket case a couple months ago and bought it just for parts for a good price. I sold some of the parts I didn't want or need on eBay and recouped all my money plus a few bucks and still ended-up with the stuff I wanted like the wheels, carb, engine, and seat.
I like the 1978-80 KV75 seats because they had the most foam cushioning of all the years making them the most-comfortable (and most adult-friendly) seats made for 1976-80 KV75s.
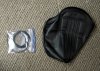
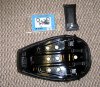
The seat had some rips in the cover and some damage to the foam cushion on one side but the metal pan was solid with minimal rust. A lot of them you see out there are rusted bad.
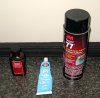
I assembled the necessary parts and supplies to finish the restoration:
• 3M 77 spray adhesive
• JB Weld clear RTV
• JB Weld 2-part epoxy
• Contact cement
• ½” foam sheet
• Motorcycle seat plastic edge channel
• Reproduction seat cover
• Kawasaki NOS latch pins
• Kawasaki NOS latch clips
• Kawasaki NOS latch springs
• Kawasaki NOS rubber bumpers
• Kawasaki NOS tool kit bands
• Bonus Parts: NOS 1978 KV75 owner’s tool kit & manual

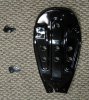
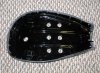
The first step was to take the pan and the two latches down to my local powder coater. He charged me $40 to blast the parts and powder coat everything gloss black. Not too bad considering the amount of work he put into it.
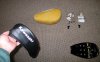
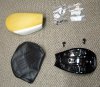
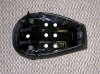
The seat foam was in decent shape except for some damage on one side and some small tears underneath. I used JB Weld RTV to repair the foam and then used the 3M 77 spray adhesive to attach a piece of foam that I purchased at a local arts and craft store for $5. The foam covers the repair work underneath so it won’t be visible with the new cover installed.

Just about every one of these seat covers that I see with rips and tears in them have the plastic edge protector trim either partially removed/damaged or is missing altogether. The sharp metal edge of the seat pan is then exposed which cuts right through the cover. I take the extra step of gluing the trim on with JB Weld so the edge protection doesn’t come off.
After letting the JB Weld cure for a day or two, the next step is to spray the underside of the cushion with 3M 77 spray adhesive. While it is still tacky, I apply the cushion to the seat pan and let it cure overnight. I also put some barbell weights on top of the cushion to fully force it onto the seat pan.
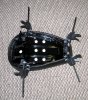
The next day I install the seat cover starting at the front and then moving to the back. The sides are last stretching it tight and keeping it on center. Normally the job would be done at this point but I take an extra step and apply JB Weld epoxy to four critical areas. Two at the rear where the tightest radius in the seat pan is and also at the piping on the sides where the cushion material is stressed the most. These are the four areas where the seat cover would have been most prone to ripping over time.
Four 4” Harbor Freight clamps work quite well holding the fabric in place while gluing. Afterwards the JB Weld will be panted black to match the cover.
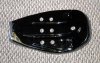
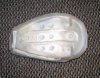
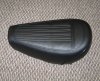
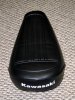
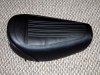
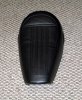
Here’s the completed seat with the NOS latch hardware, rubber bumpers, and tool kit straps installed.
Topside the seat looks very-nice and is plush and soft but firm enough for an adult butt too.
To top it all off I have the NOS owner’s tool kit and manual.
It turned out pretty-good. Now all I need is the rest of the bike.
lol
Seriously though, I have two survivors that I try to keep as factory as possible. This seat will be used on a KV75 I'm building as my primary "rider". It will not be 100% factory-correct but will be an adult-friendly build to take to the car shows and possibly Windber if I can make it this year. :thumbsup:
I like the 1978-80 KV75 seats because they had the most foam cushioning of all the years making them the most-comfortable (and most adult-friendly) seats made for 1976-80 KV75s.
The seat had some rips in the cover and some damage to the foam cushion on one side but the metal pan was solid with minimal rust. A lot of them you see out there are rusted bad.
I assembled the necessary parts and supplies to finish the restoration:
• 3M 77 spray adhesive
• JB Weld clear RTV
• JB Weld 2-part epoxy
• Contact cement
• ½” foam sheet
• Motorcycle seat plastic edge channel
• Reproduction seat cover
• Kawasaki NOS latch pins
• Kawasaki NOS latch clips
• Kawasaki NOS latch springs
• Kawasaki NOS rubber bumpers
• Kawasaki NOS tool kit bands
• Bonus Parts: NOS 1978 KV75 owner’s tool kit & manual
The first step was to take the pan and the two latches down to my local powder coater. He charged me $40 to blast the parts and powder coat everything gloss black. Not too bad considering the amount of work he put into it.
The seat foam was in decent shape except for some damage on one side and some small tears underneath. I used JB Weld RTV to repair the foam and then used the 3M 77 spray adhesive to attach a piece of foam that I purchased at a local arts and craft store for $5. The foam covers the repair work underneath so it won’t be visible with the new cover installed.
Just about every one of these seat covers that I see with rips and tears in them have the plastic edge protector trim either partially removed/damaged or is missing altogether. The sharp metal edge of the seat pan is then exposed which cuts right through the cover. I take the extra step of gluing the trim on with JB Weld so the edge protection doesn’t come off.
After letting the JB Weld cure for a day or two, the next step is to spray the underside of the cushion with 3M 77 spray adhesive. While it is still tacky, I apply the cushion to the seat pan and let it cure overnight. I also put some barbell weights on top of the cushion to fully force it onto the seat pan.
The next day I install the seat cover starting at the front and then moving to the back. The sides are last stretching it tight and keeping it on center. Normally the job would be done at this point but I take an extra step and apply JB Weld epoxy to four critical areas. Two at the rear where the tightest radius in the seat pan is and also at the piping on the sides where the cushion material is stressed the most. These are the four areas where the seat cover would have been most prone to ripping over time.
Four 4” Harbor Freight clamps work quite well holding the fabric in place while gluing. Afterwards the JB Weld will be panted black to match the cover.
Here’s the completed seat with the NOS latch hardware, rubber bumpers, and tool kit straps installed.
Topside the seat looks very-nice and is plush and soft but firm enough for an adult butt too.
To top it all off I have the NOS owner’s tool kit and manual.
It turned out pretty-good. Now all I need is the rest of the bike.
lol
Seriously though, I have two survivors that I try to keep as factory as possible. This seat will be used on a KV75 I'm building as my primary "rider". It will not be 100% factory-correct but will be an adult-friendly build to take to the car shows and possibly Windber if I can make it this year. :thumbsup:
Last edited: