More progress
- Thread starter Fourtogo
- Start date


Didn't mean it to be, I lived in long Beach for 12 years. That was a hot two weeks for sure.
![DHQJ5457[1].JPG](/forum/data/attachments/223/223330-84f9c0eaf3f335e5e7c6dc0796c3695f.jpg)
![AZVX8571[1].JPG](/forum/data/attachments/223/223331-3c402f51c0c37bee2af958b03d2aef95.jpg)
![UJXW0704[1].JPG](/forum/data/attachments/223/223332-3a4ac8d28181d8ef3e1236d5195222e2.jpg)
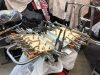
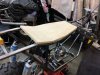
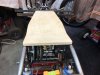
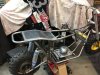
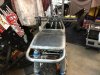
Seat I needed start making the base for the seat . Its six layers of 1/8” ply . I had the ply ripped to 14”X30” bought some stabond glue . It would end up being just over 5/8” thick stack of ply . Did a test run with the ply and no glue , I used some 6” C-Clamps and a few pieces of aluminum bar stock I had laying around. I went with 30” because I could compare that to pictures I have of a original BearKat . So it was wennie roller and a bottle satbond glue . Stacked that out with grain running back to front and bunch of 2” cowboys with dancing shoes >> ie vicegrips with swivel feet << there’s only one angle on the seat base . So I went in first with large flat section with a 1 1/4” angle iron as a stop near forks to help with keeping the ply’s lined up . As I said a lot of cowboys. I will set up a internal hidden seat mount after glue has set up a couple days .
Attachments
-
 1.8 MB Views: 30
 -
 1.9 MB Views: 31
Seat I needed start making the base for the seat . Its six layers of 1/8” ply . I had the ply ripped to 14”X30” bought some stabond glue . It would end up being just over 5/8” thick stack of ply . Did a test run with the ply and no glue , I used some 6” C-Clamps and a few pieces of aluminum bar stock I had laying around. I went with 30” because I could compare that to pictures I have of a original BearKat . So it was wennie roller and a bottle satbond glue . Stacked that out with grain running back to front and bunch of 2” cowboys with dancing shoes >> ie vicegrips with swivel feet << there’s only one angle on the seat base . So I went in first with large flat section with a 1 1/4” angle iron as a stop near forks to help with keeping the ply’s lined up . As I said a lot of cowboys. I will set up a internal hidden seat mount after glue has set up a couple days .
Attachments
-
 1.7 MB Views: 30
 -
 1.8 MB Views: 30
 -
 1.7 MB Views: 30
 -
 2 MB Views: 32
 -
 467.1 KB Views: 31
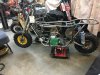
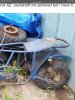
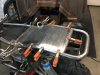
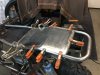
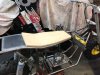
worked a bit more today , this sheet metal section. I believe was a factory chain guard / butt protector . I had some sheet metal that would work for this . Cut a rough shape , and started trimming . This section has two bends/contours , pretty much just clamped piece too frame . For fine adjustments I shoved the sheet in between my roll away drawers and tweaked it till I got the shape I was after. Ground scale off , that was hardest part of this piece . Going to stitch weld this on
Attachments
-
 2.2 MB Views: 32
 -
 2.2 MB Views: 31
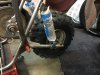
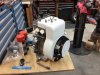
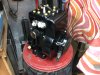
Been using 5/8” all thread for a temporary axle . Bought two short sections of 5/8” rolled steel . What I have found , is most mini bike wheels . That are wheel rim and hub , don’t have a spacer between the bearings of the hub . What that does, is no allow proper clamping of axle . Puts to much internal pressure on bearings . After 50 plus years those bearings where pretty much toast . Visited local bearing house for new ones . Ground down old bearings to use as test fit bearing for center tube spacer . Got that handled >>> I forgot to take pictures <<< sorry guys . The new 5/8” stock needed some threads . The one tool I wish I had is a lathe , kinda needed a lathe for clean threading . Being i don’t have that , I used my drill press . Lower table down and chucked up the 5/8” . Set up my 5/8” fine die , I am doing this in this manner . So get clean square threads . Rotated spindle head down , with die in a handle just below the 5/8” . I used a large bungee cord attached to one handle arm . Stretch down base of drill press . That put constant pressure on die and 5/8” rod . Dropped off the drive belt on pulley system. I used a 1 1/4” socket and ratchet to turn drill spindle . This crud goofy set up works very well . You get nice square cut threads , I also broke down the Homlite to take it a new powder coater . Went in to sticker shock forks /two piece frame / and two seat brackets in tangerine orange $350 WOW .
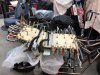
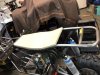
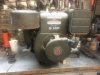
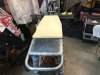
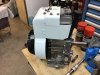
Welded seat pan on , I used Silicone Bronze Rod and stitch welded it . Got both 8hp Briggs done , I am using the White engine as finished unit . The black one got clean up but not a rebuild .
Attachments
-
 2 MB Views: 13
 -
 1.9 MB Views: 12
 -
 1.8 MB Views: 11
 -
 1.7 MB Views: 14
 -
 1.7 MB Views: 14
 -
 1.6 MB Views: 14
 -
 1.6 MB Views: 11