Mtd 750

kayde

Well-Known Member
#21
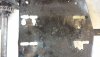
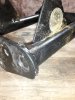
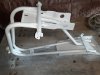
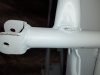
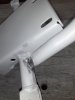
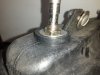
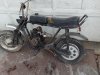
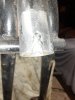
Also had a small crack in the head tube that needed attention, afterwards I saw the the crack was flashed out in the pics.
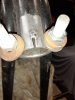
The crack opened up the bottom of the tube too the point the bottom bearing was sloppy.

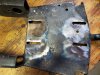
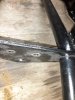
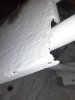
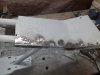
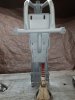
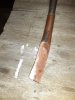
I cut a small slice rite up the crack and filled it with with weld.

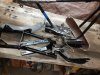
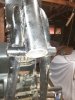
I used a u bolt and some washers too help pull the tube together and a shaped copper pipe too back up the weld with so there wasn't a whole lot clean up inside the tube.

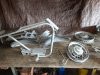
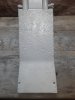
This is a area I'm gonna keep a eye on, I have some pipe I couldve cut a short sleeve for over the tube but saved it in case it's a problem later down the road.
 

Attachments

#22
I’m going to have to fix the head tube on my bike as well. Unfortunately I will most likely have to replace the tube.
mine has a wrinkle in it and looks like a banana. The bike was obviously jumped a lot in its previous life and was also most likely crashed at some point. It’s OK for now but I will have to tackle that at some point.

Nice job on your repair.
 

kayde

Well-Known Member
#23
I’m going to have to fix the head tube on my bike as well. Unfortunately I will most likely have to replace the tube.
mine has a wrinkle in it and looks like a banana. The bike was obviously jumped a lot in its previous life and was also most likely crashed at some point. It’s OK for now but I will have to tackle that at some point.

Nice job on your repair.
Thanks, im lucky mine was not that bad.
By the looks of the brakes and tires on this bike it had little use and must have sat outside alot being neglected.

With that said, its easy life and it still had a cracked head tube tells me that's something too keep a eye on.


(
 

kayde

Well-Known Member
#24
So I finally decided to disassemble clean up and reassemble the hs50 i got with the bike.

It's a points style engine which I kinda prefer. Its basically the same engine I built for my scrambler, that one was a awesome runner

Removed the flywheel too get to those points and that's when I noticed that this engine project is gonna get pushed off for another time rite at the start of it.

Broken threads on the end of the crank for the flywheel nut.
Guess I'll be looking for another crank.
 

Attachments

nightgrider

Well-Known Member
#28
Hard too believe someone thought they were making a "improvement" cutting that plate up like that.

Honestly with all that damage pat yourself on the back for having the patience of undoing it,
Thanks @kayde. It is not perfect but much better than before. My Fox has lived a very very hard life before getting to me. I've mostly been fixing sins of the past and trying not to make too many new sins of my own. Ha ha
 

kayde

Well-Known Member
#29
I should name this bike goober because the weld splatter was terrible all over it.
How about a stick of weld wire poking out on the forks, the worst one was under the seat pan, luckily I saw it before I got pricked by it.

Bike was disassembled and prepped for blasting.
 

Attachments

kayde

Well-Known Member
#30
Seat pan is severely pitted and the front corners of the pan were rusted away.
Blasting cleaned it up ok but also opened more rust holes.

The front rim and the seat pan had the worst rust, not much rust on the rest of the bike but it did have many layers of old dirty paint on it, that was fairly easy too blast off and clean up.

Blasted clean metal is sweet, like a brand new fresh start.

Sprayed some primer too prevent more
rust but man that seat pan needs work.
 

Attachments

kayde

Well-Known Member
#31
I used some small scraps too weld into the corners of the seat pan.
My copper spoons for backing up welds really helped too fill in all the pin holes in the pan.

I'm gonna go out on a limb and say this frame musta been welded on a friday, besides the splatter a few of the factory welds were...bad so I had too clean them up and redo some
 

Attachments

kayde

Well-Known Member
#33
You can see in this pic the left tube musta not been bent right and probably didnt sit in the jig correctly.
Its actually twisted a bit and the joint was beat into position.

Also it's not easy too see but the bottom of the motor plate shows very little of the work I did too the mount slots.
 

Attachments

kayde

Well-Known Member
#34
With the paint work done, we needed wheels and tires too make a roller.

Here is where I got nervous, I know how hard tires can be too get on rims. Now I gotta do it without scratching them up too bad.

I dont have any tire spoons small enough for this size rim so I snuck out a few of "her" utensils too see what would work.

To my surprise with some soapy water and a bit of effort the tires basically slipped rite on.
I only used one of the wooden utensil thingy on the rear wheel and it worked well.

After both tires were on I realized I missed something important....i didnt blast or paint the brake plates
 

Attachments

kayde

Well-Known Member
#35
Examples, cleaned up the axle nuts and bunch of other hardware for it, most of it will get replaced with stainless.

Some of you read about my gas tank.
The bottom of the fuel tank was covered in grime once I pressure washed the bike I saw the putty on the bottom of the fuel tank I thought damn what a bummer.

Few weeks later I washed the tank in some super hot soapy water and noticed some of the glue/putty lifting.

Instantly my OCD kicked in and boom no more putty and actually the tank bottom looked good but it has a nasty rotted grommet.

Could it be that easy....of course not

So I replaced the oe nasty grommet

Still leaked

A great idea was suggested on a tank thread I started and got a metal tire valve stem and installed it many different ways and it still leaked.

That's when my kid saw the cracks I didnt see....bummer
 

Attachments

kayde

Well-Known Member
#36
Anyway, reassembly goes pretty quick once everything is ready to go.
Although there's a few things for future projects like a headlight, plastic welding the tank and a seat cover.


I decided it was about time I try out one of those dollar store engines with the gas tank on top.
A scrap pipe header was made up to fit the bike, and somehow I managed too fit a jet into the carb.

For hand lever drum brakes these work very smooth and well.

I guess these are sorta my before and after pics.
 

Attachments

Top