MTD Trail Bike

#21
Question to the forum.

Should I continue here with the build, or start a new thread in another section?
Totally up to you. It would be nice to title a build thread with the MFGR of the bike, or if you like we can change the title of this particular thread, now that Cheezy ID'd it. Shoot me a PM if you want to edit the title in this thread. I'll be glad to help.
 
#22
We began the tear down process. My son was eager to get this going. I'm hoping it's a start to him wanting to learn more.

The crank turns so there is hope the engine is still good. We will tear it down and look it over.

The rest of the bike came apart fairly easily with only one crusty bolt breaking.

Unknown what the original color was but the paint on it was white covered by red. I honestly think the previous owner used house paint as that paint was THICK. Normal sanding was not working so the grinder with 60 grit was used to cut the top layers prior to media blasting the rest. Overall it came out well for first day. Tomorrow will be primer and prep the frame for media blast.

The tires were beyond gone and cracking so I'll need to find some tires.
 

Attachments

#25
Ebw not sure you realize what your doin here yet as Robert C mentioned, you're building memories that will last a lifetime with your son. He's on it, in it, all over it! Not only that you just insured his fate, he'll be addicted to these things for life! :D Saw this post n all i could do is grin from ear to ear. Love to see shtuff like this! Great thread...:scooter:
Welcome again and yes plz keep us all posted as this comes together. :cool:
 
#26
Ebw not sure you realize what your doin here yet as Robert C mentioned, you're building memories that will last a lifetime with your son. He's on it, in it, all over it! Not only that you just insured his fate, he'll be addicted to these things for life! :D Saw this post n all i could do is grin from ear to ear. Love to see shtuff like this! Great thread...:scooter:
Welcome again and yes plz keep us all posted as this comes together. :cool:

Trust me, this is exactly what I was hoping for. He is at that age where he would rather sit all day playing Video Games. I'm hoping he does get that "bug" and will be out in the shop wrenching more and more.

We will keep this thread going with the progress. I am keeping my fingers crossed the motor will be useable. If so, this should be a fairly quick project that will keep his interests on building another. Yes, I plan on building one ( or more) as I see how fun these can be. The surprising part is how I left this on the side of my parents home for quite a few years ( decades ) and didn't realize its potential.

Thanks again to all on a great forum.
 

Lizardking

Well-Known Member
#27
As long as the engine has good compression it will run with some elbow grease. Carburetor, spark plug and gas tank will be your main things to clean followed by points condenser. Btw that engine has enough power for you and your son to have fun. Some people give up on these vintage engines and the Predator 212 is what gets put on. The 212 is too much power Imo for most people without experience.

There's a bunch of different mini bike build plans on the web if you would like to build one from scratch.

The bug bites hard and hoarding mini bikes and parts is the best thing to do to alleviate it!! :eek:o_O;)
 
#28
As long as the engine has good compression it will run with some elbow grease. Carburetor, spark plug and gas tank will be your main things to clean followed by points condenser. Btw that engine has enough power for you and your son to have fun. Some people give up on these vintage engines and the Predator 212 is what gets put on. The 212 is too much power Imo for most people without experience.

There's a bunch of different mini bike build plans on the web if you would like to build one from scratch.

The bug bites hard and hoarding mini bikes and parts is the best thing to do to alleviate it!! :eek:o_O;)


You nailed it on the head with the motor. I believe its a B&S 3HP but cannot confirm. I have an additional one as a backup ( sons twin sister is watching how this turns out ). :cool::cool::scooter::scooter:
Until they get a hang of the bike I didn't want it terrorizing them and the Neighbors... Key is the Neighbors.

I am looking at a frame setup for myself which would incorporate more suspension that won't shoot vibrations straight up the back. ( that old guy thing ) ;)
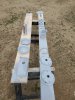
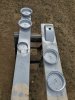
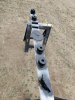
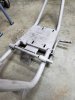
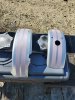
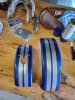
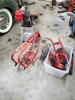
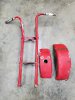
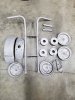
. The swing arms are looking like that might be the way to go.
 
#29
Current update is purchasing new items while the primer and paint dries.

Can anyone give me advise on the situation Im having with the centrifugal clutch.

The motor on the bike has a 5/8 shaft Non Keyed. The clutch has 2 set screws that apparently held it in place.

The backup B&S motor has a 3/4 shaft that is obviously keyed.

Looking online all the 5/8 11 tooth clutches are keyed and do not have set screws. The shaft is threaded at the end.
One possible solution is setting a nut ( if it can fit) on the outside to keep the clutch in place.

Any suggestions? Is that even a B&S motor ?

Also, I'm trying to keep the backup motor for a 2nd mini bike and will only use it if the current one doesn't work out.

Thanks all !
 

Attachments

#30
Wrapped up the day with spraying some paint and finishing blasting the frame.


Is there any advantage/ disadvantage of keeping the "friction" lever?
I assume this is an additional brake ?

One side was replaced with some threaded iron pipe. Im curious how well these work and if it would be ok to cut it out completely.
 

Attachments

Lizardking

Well-Known Member
#31
Current update is purchasing new items while the primer and paint dries.

Can anyone give me advise on the situation Im having with the centrifugal clutch.

The motor on the bike has a 5/8 shaft Non Keyed. The clutch has 2 set screws that apparently held it in place.

The backup B&S motor has a 3/4 shaft that is obviously keyed.

Looking online all the 5/8 11 tooth clutches are keyed and do not have set screws. The shaft is threaded at the end.
One possible solution is setting a nut ( if it can fit) on the outside to keep the clutch in place.

Any suggestions? Is that even a B&S motor ?

Also, I'm trying to keep the backup motor for a 2nd mini bike and will only use it if the current one doesn't work out.

Thanks all !
The white one won't work for your frame because of the space for the tank/carb . The black B&S looks like it was put together to work on your frame. Can't tell if shaft is tapped for a bolt but a nut may work for additional support.

The scrub brake isn't original but since it's already there I would keep it as a backup brake.
 
#32
Looking good y'all.

I'd keep the friction brake. They work okay, and are intuitively easy for new riders to use.

Need to slow down...ease off the gas...and stomp on the friction brake.

:)
 
#33
The white one won't work for your frame because of the space for the tank/carb . The black B&S looks like it was put together to work on your frame. Can't tell if shaft is tapped for a bolt but a nut may work for additional support.
The OD end of the shaft is threaded, but the ID does not have any threads. You gave me an idea to see if I could tap the ID.


The scrub brake isn't original but since it's already there I would keep it as a backup brake.
If it wasn't original I am going to just cut it out. The one side is Iron pipe and the welds are questionable as is. I was able to order a new 4" brake band. If that isn't enough braking for him, I will look into an additional brake setup. Its always a blast until you have to stop fast.... :cool:;)
 
#34
Looking good y'all.

I'd keep the friction brake. They work okay, and are intuitively easy for new riders to use.

Need to slow down...ease off the gas...and stomp on the friction brake.

:)

Thank you RobertC and LizardKing for letting me know about that brake. I think its best to cut it off since its not original. He will learn the days of using your shoes as additional stopping power. :D
That is, until Mama Bear finds out and makes me put additional brakes on it. :(:rolleyes:
 
#35
Couple points here that I hope will help your build. You should be able to fit the white 3hp Briggs with no clearance issues. Might need to trim the rear fender, or you could run an aluminum spacer plate under the engine to raise it 3/4" or so. I've run 5hp Briggs on Trailhorse bikes(same dimension frame) with no issue. The only way to get the other engine to work properly would be to mill a keyway or swap the crank. Now, back to the white 3hp..... the side cover has the standard 4 hole PTO mount. You can purchase a clutch band brake kit from on Ebay or another source. Being that this isn't a speed demon of a build, that should stop the bike very well and not beat up the clutch or chain. Clutch brakes are either loved or hated. I personally love them, but others argue "what if the chain comes off" or it heats up the clutch. I've never had issues with either of these things and they provide the best stopping power in my opinion.
http://rover.ebay.com/rover/1/711-5...0001&campid=5335845805&icep_item=224273793927
 
#36
Today was a decent day in the shop. Removed the Scrub / Friction brake and weld smooth the frame back. Finished cleaning up rest of the frame and sprayed primer on it.

Was able to find a new clutch at the local small engine shop. I ended up drilling into the shaft to allow the 2 grub screws seat. If I have to I will drill through completely and add metal dowel pins. I'm hoping this motor doesn't create that much torque ? Rest of motor tear down has gone well. Been online ordering parts for this. Hoping to have a running motor by next week depending on when UPS delivers.

The forks were sprayed with paint as well as the fenders. My son likes the 60s style and picked the colors for the bike.
This should give an idea of the direction we are going.

Thanks again to all that have helped along the way.
 

Attachments

#37
A little Update while waiting for parts to arrive most likely next week.

I'm getting impatient and want to get this done so I can see how much fun the Rabbit Hole will become.

Painted the frame and spent some time cleaning up the engine and all the surrounding sheetmetal.

Thanks for following this project.
 

Attachments

Lizardking

Well-Known Member
#39
Moving along nicely! You can put white wall tires on since your son likes the old school look . Drilling the shaft for the clutch screws will work great. Perfect time to Lube up the pull start recoil and the ball bearings on the pull start clutch. Light sanding on the coil and flywheel magnets area too. Points and condenser if your spark is weak.
 
Last edited:
Top