Side Car Build for 6 HP Azuza

#1
Howdy All,

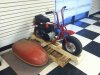
I have an Azuza Mini Bike with a 6 HP OHV Tecumseh with a TAV2. I want to build a side car for my two girls to mess around with. The mini bike has 8" Azuza Tri Star rims with 480/4-8 studded tires on them. This mini bike is way over powered. It is hard to keep the front tire on the ground. It will pull a wheelie even at a speed of 15 MPH! I have added a cable stop to limit throttle movement to about 1/4 travel and it will still go 15mph with me on it! I weigh 180 lbs too! I bought the bike ,as is, knowing I was going to build a side car and figured the extra power would be good. It may be too powerful?:doah:

Here are my plans for the build


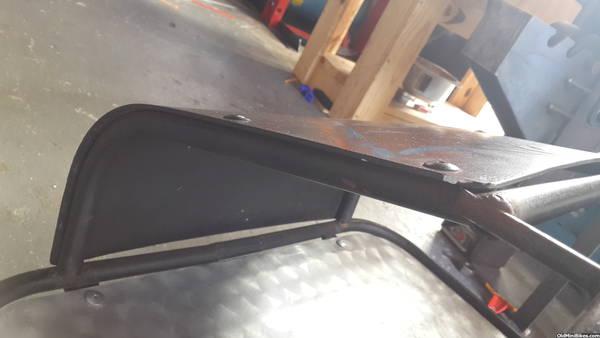
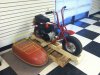
  1. Add front forks and steering head from a Yamaha PW50. Bearings and all.
  2. Bending my own handle bars.
  3. Adding a center kick stand.
  4. Add mono shock seat suspension like chipper and jdogg (thanks for the inspiration!)
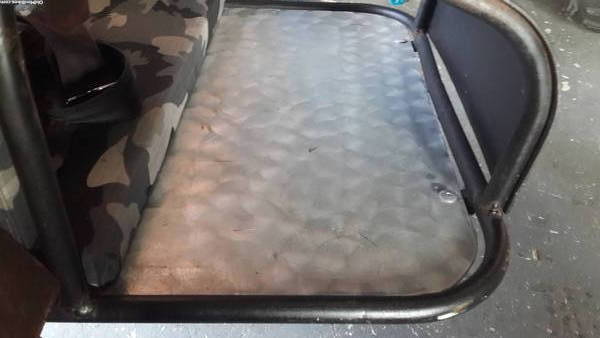
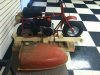
  5. I will be using a Farmall H farm tractor gas tank for the side car body. The metal is pretty thick on this bad boy:thumbsup:. Farm tractor fuel tanks are plentiful here in Nebraska. You can get a good deal on one that is a little flaky inside. My tank is solid and weighs about 40 lbs as is. I will be carpeting the inside or applying bed liner to the inside. I got the idea from this link: MINIBIKES WITH SIDE CAR
  6. Possibly upgrading the brakes. It currently has a 4-1/2" Azuza Drum brake.
  7. Possibly putting small spring to add suspension to the side car wheel assembly.
  8. Mount a fuel tank in front of the seat to replace the stock Tecumseh tank. The stock tank forces you to ride with your right leg opened up. Awkward for me even harder for kids.


Questions for you all:

  1. Where should the side car tire be positioned in relation to the front and rear tires? Should it be closer to the rear? Centered between the front and rear?
  2. Should I use the same size 8" wheel for the side car or something smaller?
  3. What can I do to improve braking?


I have a Harbor Freight Pipe Bender. Lots of sch80 seamless pipe (1/2",3/4", 1", 1-1/4", 1-1/2", 2") and some angle and flat steel. I am working on getting a pipe notcher next. I have access to a mig welder and awesome welders thanks to my work. I want to become a better welder myself. Practice practice.

photo 1.JPG photo 2.JPG

Can a mini bike with a side car still do wheelies? :confused:

Thanks in advance for all suggestions! If you want to me to give updates I will.

:wink:Hec
 
Last edited:
#2
If you are planning on wheelies, set the rear tire on the side car back as far as the rear bike tire. Probably still not a good idea.

Usually the tire on the sidecar is smaller, but you could go the same size.

Most sidecars have the wheel just forward of the bike's rear wheel.

The first two pics of your link a a great example of what you have planned.

Have fun and show us plenty of pics!
 
Last edited:
#3
Hec,
The side car wheel should be the same size as your rear wheel. The wheel should be positioned slightly in front of the rear wheel with a bit of toe in. You can't do wheelies..you might get the wheel of the ground a few inches but I would not recommend more. Sidecars do not handle like cycles..they pull right when your on the gas, they pull left when you back off, there's also a lot of body English involved. One cool thing you can do is "Fly The Chair"...with some weight shifting and gentle power you can put the sidecar in the air and drive like that. I'm no expert, but I have owned sidecar motorcyles for 10 years or so.

mr fishboy
 
#4
Stangrcr1 and Mr fishboy,

Thanks for the input regarding wheel placement for the side car. As for wheelies? I don't want it to be able to do wheelies. At least with my girls on it.:wink: I forgot to mention that I also have a remote control kill switch to install. I can kill the engine from 250 feet out. This is just incase they don't listen to dad!
I am leaning toward using an 8" wheel that way I have a spare for the mini bike when the side car is not being used.

Hec
 
Last edited:
#6
All,
Today my 5 year old daughter Piper and I turned the running Azuza into a "Non-Roller". We took it all apart except for the rear wheel. Piper had fun helping and has found her new favorite tool. My telescoping magnet:smile:. I am rethinking the way the girls will sit in the sidecar. I was originally thinking of using a go-cart style seat mounted to the floor of the sidecar. That would force them to bend their knees to fit within the confines of the sidecar. The girls are growing to fast! I am now thinking I should open up the fuel tank all the way to the rear of the tank and install a seat with a high backrest sitting on a base about 8" tall. This will let them naturally bend their knees and keep their feet inside the nose of the sidecar. I tried to convey this with my marked up picture. Don't laugh!
On a separate note, I was surprised that the fork tube didn't even have bushings in it. Just one big bolt passing through. I can hardly wait till the PW-50 forks with trees and steering head tube arrive. I also picked up a set of PW50 handle bars with hand brake caliper included.. The handlebars were so cheap I couldn't resist.
I am also attaching a picture I found on the net that shows how a Vespa Sidecar is attached. I like the design. I could make a similar plate with a pipe welded to it that could mount just behind the Engine plate. I could shim one side of the sidecar mounting plate to get the bike "lean in" adjusted. The pipe could also be used to add training wheels. Just thinking out loud again.
Well that's all for now. Keep ya posted!

photo 3 (2).JPG

photo 1a.jpg

Vespa Sidecar2.jpg

Vespa Sidecar1.jpg

Hec
 

Attachments

Last edited:
#8
fistfullabar,

That is great to hear! We have a rule that says "You Ride it You Wrench It!":scooter: 
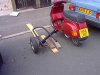
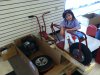
I want my girls to be somewhat mechanically inclined. My wife is more mechanically inclined than all her brothers combined! Don't know how that happened? Notice Mom's pink tool kit in the background! :laugh:

Hec

photo 1 (2).JPG
 

wb4rt

New Member
#9
Hello, Hec.

Great build project. I'm going to follow this.

BTW - where did you get the remote engine switch? I would like to add one to my grandson's go-kart. Can you quote model number and on-line site?
 
#10
wb4rt,

Thanks! I bought the remote control kill switch on EBay as it was cheaper at $61. Here is a link 3Built Remote Kill Switch Products. If you have an engine that has a 12V battery powering the ignition you will need RES12VU. On my 6 HP Tecumseh, that you have to pull start, I needed the RES6VU-B. The battery pack and receiver are pretty small so I am thinking of mounting a small box on the rear of the bike above the fender to house the battery pack. Maybe some kind of moped battery box. That way it will be protected. I can run the antennae out of the box and zip tie it to the frame if need be. I hope this helps. :thumbsup:

Hec
 
#11
All,

I found this on Youtube! It gives me hope for the sidecar body and this builder essentially did what I was thinking of doing. That is, setting a seat on top of a box like the picture I marked up. I wonder what this builder used for a body? It's pretty cool!:thumbsup:

Parts Update as of 01/14/15
the PW50 fork steering head has arrived
the PW50 handle bars arrived
the PW50 forks arrived.

I am in Loganton PA on business and haven't seen them yet. Hopefully this weekend I can start on the front suspension. BTW I am thinking of using Bobber style solo seat springs mounted between the frame and seat bottom for rear cushioning. There would also be a pivot on the front of the seat. I haven't been able to determine if anyone out there has tried this. The springs are cheap and wouldn't need to weld up anything. Hmmm


https://www.youtube.com/watch?v=8Xb10hvmyTg

Hec
 

2SlickNick

Well-Known Member
#12
Nice build, I like it!
I am in the process of building sidecar too. Here is my build thread Just add the http ://www.diygokarts.com/vb/showthread.php?t=27813
On post 44 is a great link to sidecar builds. I will be following this thread.
 
#14
2SlickNick,

Thanks for the link to your build. I learned a lot from the sidecar info you referenced. I learned my sidecar is called "Hack" style or rigidly attached to the car. I considered building a hinged sidecar like yours but our mini bike will be primarily used in backyards and gravel trails, so I was concerned with the handling of a hinged side car. Great job on your build!

Bikebudy,

I wish I could say it was my idea! I got the idea from a builder named Mike Farrell (See initial post). I will say that those farm tanks are very thick. When I got the tank, I was surprised on how it attaches to the tractor. It has 3 studs, 2 in the rear corners and 1 in the front, with castle nuts protruding from the bottom of the tank. There is a heavy spring that is placed between the tank and the tractor on each mounting stud! My tank came with the springs too! Maybe this will serve as some suspension for the passenger as I am planning of using the factory studs for attaching the tank to sidecar frame! I will post a pic of the bottom this weekend.

Hec
 
#15
Awesome build. I made one for my two boys. It's amazing how fast they grow up gonna need to lengthen it for William :laugh:
Tommy still goes mad when we lift the car. Can hold it all the way down the street.

Good luck


#16
Tanksareus,

Schweeeeeet! Flying the car! Smiles on you both sez it all! I hear ya regarding the size of the side car. I am already thinking mine may be too small. I thought of building a side car similar to yours. I would love to see more pics and specs of your side car. Great job!

Hec
 
#18
Tanksareus,


All I can say is Brilliant! Well Done Sir! What did you use as the cover on the front? Man your side car has me rethinking mine now! If you have time please give dimensions.

Hec
 
#20
Ok got some info for ya. One crap sketch as well:laugh:
The car is 26 inches x 26 inches.
The bikes wheels are 40 inches centre to centre wheelbase. And the side car wheel centre sits 4 inches in forward of the rear centre.
Hope the pics help


Last edited:
Top