Side Car Build for 6 HP Azuza

#61
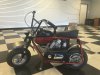
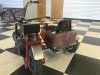
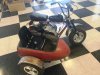
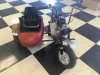
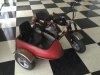
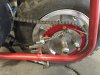
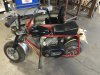
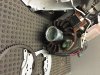
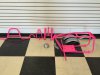
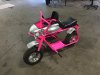
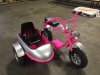
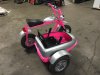
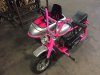
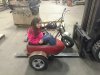
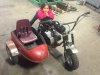
Got some more work on the build today. Today I worked on installing the seat for the side car. It's held in place with four 1/4 x 20 bolts. I also added the Subaru Brat style grab bars. Welded it all up and installed it. I also added the rubber edge trim to the side car opening. Once all that was done, my helper and I went for another test ride!:scooter: Everything worked great! I even flew the car and my helper didn't fly out! It was a cold ride as it was snowing/sleeting! I could of used a pair of snow goggles! I still need to narrow the handle bar grips and grind a little here and there. It's really getting close now! We will be hauling it to Grandmas for Easter. So it's going to get some use then!

Hec

03.19.16a.JPG

03.19.16b.JPG
 
Last edited:

2SlickNick

Well-Known Member
#62
Looking great!
Those grab bars are a great addition.
I noticed your bike has some chrome on it, I know they make chrome door trim. They sell at walmart and auto stores. I use the black one on my side car but it will be upgrading to the chrome, works great too. Keep up the good work.
 
#64
Thanks everyone!

Spent another few hours on the build today. Here is what I got accomplished.

1. Painted purple plastic seat black using Krylon Fusion paint. We'll see how well that stuff works. The seat will get another coat of paint tomorrow.
2. I went ahead and rebuilt the forks with the new bushings, seals, and fork rubber boots.
3. Added another right side fork tube. The right fork tubes on the Honda Z50's don't have brackets for brakes. So my set up uses two right side for tubes. It was actually cheaper to buy a NOS tube instead of grinding off the brackets and having the fork tube rechromed. I paid $25 for the tube.
4. I mounted the handle bar kill switch. I just need to wire it up.
5. Ground the rear tank brackets off the side car body.

Until next time!

Hec

03.20.16a.JPG

03.20.16b.JPG

03.20.16c.JPG

03.20.16d.JPG
 
#65
I had almost forgotten about this build thread. The side car turned out great and I like how it almost looks aged as if it originally came on the bike. I think the aftermarket tractor seats are pretty reasonably priced if you ever feel the desire to change this one out. Great job :thumbsup:
 
#66
Firemarshal71,

Thanks! Yeah it took me forever to get this thing done! So long that the fender on the side car has surface rust! The bike is in the mock up stage. Working out a few details before it all goes to get powder coated pink and silver. Contemplating adding a headlight and tail light now. I am in the process of adding a smaller rear sprocket too. Going from 60T to 53T. Im not doing this for more speed but to reduce torque to tame this wheelie maker! I am trying to make take offs more forgiving! Right now it will wheelie with very little throttle input. It is fun to ride though! I did look at using a tractor seat but they are all too wide. The seat was given to me from my daughters elementary principal. It's a school desk chair! When a chair gets damaged with a broken leg they throw them away. Fits perfect!

Hec

image.jpeg
 
#67
All,

Yesterday I changed out the rear 60T sprocket with a 53T sprocket to reduce the torque at the rear wheel. I did this to reduce the bikes tendency to wheelie upon takeoff. The sprocket has allowed me to decrease the throttle restriction an allow the engine to develop higher RPMS without wheelies. The throttle will still be restricted to keep the kids safe.
I did ride it with the side car removed and all throttle restrictions removed. This bike is fast! :scooter: I estimate I hit the 40's MPH no problem. Good thing the throttle can be restricted!

Hec

03.29.16a.jpg

03.29.16b.jpg
 

2SlickNick

Well-Known Member
#68
Hey Buddy,

Since you are still building I am going to suggest the steering damper idea again- as must have. I deiced to retest my wobble. My back does not have a wobble without sidecar even at 30+ MPH...

I was going approx 20-30 mph when I lifted my hand - tried to control the wobble with my knees, by the time I got my hands back to handle bars, the bike leaned and threw me in sidecar then ---- CRASH... The bike's foot peg hit the - causing the bike and sidecar to endow forward.

I know I would never test that with a passenger in the sidecar, but I had to know... If my hands ever left the handlebars by accident and I have a steering damper I think I would have been able to avoid or save the wobble...

I have the damper on my trike with great results. I just want everyone safe to builds a sidecar. Everyone.

https://www.youtube.com/watch?v=5jG0TCix6QE
 
#70
2SlickNick,

Wow! Glad you weren't hurt! Sure glad you were riding solo! Your leaner sure poses a host of different issues to be solved compared to my hack style set up. Perhaps you need a damper to dampen the bike relative to the car since you don't have wobbles without the car. There is a dynamic happening between your car and bike.
The only way I could ever drag the left foot peg is if I was really flying the car! No way to drag the right foot peg either. Your post's timing is impeccable. I was test riding mine yesterday and let go of the handle bars going about 30 mph,as I am getting more comfortable with it, to test for high speed wobbles. Glad to report that I didn't have any. Whew!

I'll take the steering damper under consideration.

Hec
 
Last edited:
#71
All,

The Mig Welder and grinder has been put away and the bike and side car has been completely disassembled and taken to get powder coated. While the parts are getting powder coated, I will be focusing on the 6HP TEC Power Sport and adding a lighting circuit to it to run a headlight and taillight.

That's all for now.

Hec
 
#72
All,

Got all the parts needed to add lighting to my OHH60.

Parts used:
* Tecumseh 611113 Stator
* Tecumseh Air Baffle Left 36621 & Right 37709 to replace original backing plate
* Tecumseh OHH60 Flywheel with 3 magnets. I removed the ring gear on it. Thanks Bike Buddy for the removal tip.

I will need to make a small square hole on the backside of the backing plate for the insulated plastic mounting plug that the ground from the kill switch and coil mounted to on the old backing plate.

This engine will be installed on Memorial Weekend. Getting all my parts back from powder coating this week. Almost done!

Stator 1.jpg

Stator 2.jpg

Hec
 
#74
Here are the parts back from powder coating. I am still waiting on the side car body, fuel tank, side car seat frame, and side car support frame. They are supposed to be done by Friday. I hope so! All in all looks pretty good!

image.jpeg
Hec
 
#76
Here are some pics from yesterday's assembly progress! Still have a little work ahead of me. Getting real close now! Enjoy!

image.jpeg

image.jpeg

image.jpeg

Hec
 
Last edited:
#80
Thanks everyone!

I got a little more work done on the project in the past couple of days. I installed the engine, brake and throttle controls, Kill switch, and center stand. Put some gas in it over lunch and took a spin. Received a lot of crap from the guys here at the office due the color. Oh well, had to make sure all was good. Still got to wire up the head light and tail light and add 3 decals. Oh yeah and clip that throttle cable to the frame!

Pink 06.01.16.jpg


Hec
 
Last edited:
Top