tecumseh 3.5 engine paint
- Thread starter minibikefever
- Start date

There is a long-standing debate regarding single stage urethane paint (spray gun) and spray paint. Spray paint can look good if you take your time and do your prep work, but it won't be fuel proof like urethane paint. There are solutions to that problem, such as 2 component urethane spray paints (mixes in the can), but they're expensive.
Without getting into the set-up process for urethane paint and the debates that go along with it, I'll just tell you what I know from my experience.
If you don't have a spray gun, then spray paint is your best option. Duplicolor makes a paint called Dover White. It's not quite bright white and is an almost perfect match (again, that's also debated). You don't need high-heat paint since the only thing that gets hot enough to cook the paint is the exhaust header.
PREPARATION and PATIENCE IS KEY.
You'll want to degrease your engine and strip the original paint down or the new paint won't stick. You also don't have to remove all of the paint as long as you remove imperfections and rust. I remove the tins from the engine and wet sand them. Any dents should be remedied at this point. Any dents you can't fix will need to be filled. Filler works best against bare metal, so remove all of the paint in those areas. Once you've sanded those smooth, it's time to prime. It's not necessary to prime the aluminum (block, head, etc) but the tins should be primed. You can wet sand between coats to ensure a nice finish.
Once the primer dries, reassemble your engine. Tape off the parts you don't want paint on. I usually put an old sparkplug in the engine to keep paint out of the hole and tape off the crankshaft. Some prefer to tape off the coil wire but tecumseh never bothered doing this when they made the engines. Then paint your engine. I'm not going to go through the steps to make a nice coat of paint because you should know those things by now, and there are several YouTube videos outlining that process. You can do several light coats until it's satisfactory.
Apply new decals and you're all set -- UNLESS you really want to drop $25 on a 2-stage urethane clear-coat such as the one Eastwood sells. I've used it with great results but it does leave the engine shinier than some would prefer.
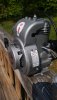
I sprayed this engine with silver Duplicolor paint and clearcoated it with Eastwood afterward. The decals were put on before the clearcoat.
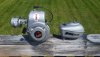
This engine was done with Dover White. Notice how it doesn't shine as brightly.
I wanted it to have a higher sheen, so I cracked open another can of clearcoat and went over it. The finish just looked more professional
This engine was done with Dover White. Notice how it doesn't shine as brightly.
I wanted it to have a higher sheen, so I cracked open another can of clearcoat and went over it. The finish just looked more professional
the duplicolor clear might improve the look of the paint, but it won't be fuel proof. The 2k urethane spray I used is fuel proof. Like I said, it's not a necessary step, but it really does improve the overall result
https://www.eastwood.com/eastwood-s...W5RlkxUhEvSocGN38AKk5A9il_kVF5fEaAjpWEALw_wcB
https://www.eastwood.com/eastwood-s...W5RlkxUhEvSocGN38AKk5A9il_kVF5fEaAjpWEALw_wcB
There is a long-standing debate regarding single stage urethane paint (spray gun) and spray paint. Spray paint can look good if you take your time and do your prep work, but it won't be fuel proof like urethane paint. There are solutions to that problem, such as 2 component urethane spray paints (mixes in the can), but they're expensive.
Without getting into the set-up process for urethane paint and the debates that go along with it, I'll just tell you what I know from my experience.
If you don't have a spray gun, then spray paint is your best option. Duplicolor makes a paint called Dover White. It's not quite bright white and is an almost perfect match (again, that's also debated). You don't need high-heat paint since the only thing that gets hot enough to cook the paint is the exhaust header.
PREPARATION and PATIENCE IS KEY.
You'll want to degrease your engine and strip the original paint down or the new paint won't stick. You also don't have to remove all of the paint as long as you remove imperfections and rust. I remove the tins from the engine and wet sand them. Any dents should be remedied at this point. Any dents you can't fix will need to be filled. Filler works best against bare metal, so remove all of the paint in those areas. Once you've sanded those smooth, it's time to prime. It's not necessary to prime the aluminum (block, head, etc) but the tins should be primed. You can wet sand between coats to ensure a nice finish.
Once the primer dries, reassemble your engine. Tape off the parts you don't want paint on. I usually put an old sparkplug in the engine to keep paint out of the hole and tape off the crankshaft. Some prefer to tape off the coil wire but tecumseh never bothered doing this when they made the engines. Then paint your engine. I'm not going to go through the steps to make a nice coat of paint because you should know those things by now, and there are several YouTube videos outlining that process. You can do several light coats until it's satisfactory.
Apply new decals and you're all set -- UNLESS you really want to drop $25 on a 2-stage urethane clear-coat such as the one Eastwood sells. I've used it with great results but it does leave the engine shinier than some would prefer.
Without getting into the set-up process for urethane paint and the debates that go along with it, I'll just tell you what I know from my experience.
If you don't have a spray gun, then spray paint is your best option. Duplicolor makes a paint called Dover White. It's not quite bright white and is an almost perfect match (again, that's also debated). You don't need high-heat paint since the only thing that gets hot enough to cook the paint is the exhaust header.
PREPARATION and PATIENCE IS KEY.
You'll want to degrease your engine and strip the original paint down or the new paint won't stick. You also don't have to remove all of the paint as long as you remove imperfections and rust. I remove the tins from the engine and wet sand them. Any dents should be remedied at this point. Any dents you can't fix will need to be filled. Filler works best against bare metal, so remove all of the paint in those areas. Once you've sanded those smooth, it's time to prime. It's not necessary to prime the aluminum (block, head, etc) but the tins should be primed. You can wet sand between coats to ensure a nice finish.
Once the primer dries, reassemble your engine. Tape off the parts you don't want paint on. I usually put an old sparkplug in the engine to keep paint out of the hole and tape off the crankshaft. Some prefer to tape off the coil wire but tecumseh never bothered doing this when they made the engines. Then paint your engine. I'm not going to go through the steps to make a nice coat of paint because you should know those things by now, and there are several YouTube videos outlining that process. You can do several light coats until it's satisfactory.
Apply new decals and you're all set -- UNLESS you really want to drop $25 on a 2-stage urethane clear-coat such as the one Eastwood sells. I've used it with great results but it does leave the engine shinier than some would prefer.
the duplicolor clear might improve the look of the paint, but it won't be fuel proof. The 2k urethane spray I used is fuel proof. Like I said, it's not a necessary step, but it really does improve the overall result.
Options:
Rattle Can Spray Paint
Rattle Can Spray Paint with Urethane Clear Enamel Shot Over It.
Single Stage Acrylic Enamel
Single Stage Acrylic Enamel with Urethane Clear Enamel Shot Over It.
Base Coat enamel, water, or acrylic with Urethane Clear Enamel Shot Over It.
Powder Coat.
I agree with everything you said Andy.
Options:
Rattle Can Spray Paint
Rattle Can Spray Paint with Urethane Clear Enamel Shot Over It.
Single Stage Acrylic Enamel
Single Stage Acrylic Enamel with Urethane Clear Enamel Shot Over It.
Base Coat enamel, water, or acrylic with Urethane Clear Enamel Shot Over It.
Powder Coat.
Options:
Rattle Can Spray Paint
Rattle Can Spray Paint with Urethane Clear Enamel Shot Over It.
Single Stage Acrylic Enamel
Single Stage Acrylic Enamel with Urethane Clear Enamel Shot Over It.
Base Coat enamel, water, or acrylic with Urethane Clear Enamel Shot Over It.
Powder Coat.
The decals they used for the oil fill warning and air filter were pretty much the same. They just had a power rating on the blower housing of 4.0 Horsepower. Yours of course would be 3.5 Horsepower. I don't know if anyone is repopping the Sears decals or not. Maybe someone else will? If not, they should be pretty simple to design and have them made up.
Here's a picture from a Sears Catalog showing the original decal.

Here's a picture from a Sears Catalog showing the original decal.