Trail Horse Custom / MX 500
- Thread starter Biffmini
- Start date


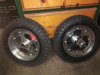
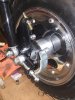
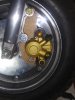
I made up some inner wheel spacers, packed bearings & installed wheels.
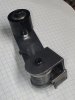
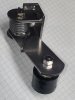
I ran into a problem when installing brake band & testing.
I relined my band using J-B Weld.
The liner let loose while testing. I cleaned with acetone and View attachment 285471 View attachment 285469 View attachment 285470
thought I was done with the band.
Any ideas on adhesive that would be better for my liner?
I made up some inner wheel spacers, packed bearings & installed wheels.
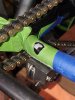
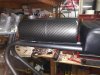
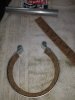
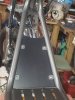
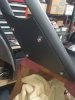
I ran into a problem when installing & testing brake band.
I used J-B Weld to install new liner, cleaned band with acetone.
While testing the band the liner let loose I sure thought I was done with the band. Do over....
Any ideas on a better adhesive to use on the liner
I ran into a problem when installing & testing brake band.
I used J-B Weld to install new liner, cleaned band with acetone.
While testing the band the liner let loose
I sure thought I was done with the band. Do over....Any ideas on a better adhesive to use on the liner

Any ideas on a better adhesive to use on the liner
View attachment 285483
View attachment 285483
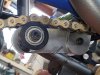
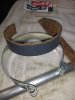
I suspect if you hit the inside of the metal with some 80 grit and really give the JB Weld something to stick to it would hold fine.
Look how smooth the liner is where the JB Weld was, so you'll need to scratch that up to if you reuse the same liner...
So why use a band brake? Wouldn't a disk brake or even drum brake be a better choice.?
So why use a band brake? Wouldn't a disk brake or even drum brake be a better choice.?
They also work quite well especially with new parts.
With that being said, if I don't like the preformance, I'll be upgrading too disc.
I'm working on a front disc now...
So why use a band brake? Wouldn't a disk brake or even drum brake be a better choice.?
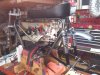
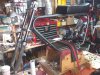
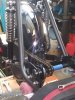
I moved on to to front brake.
I'm determined to get a working hydraulic caliper using the original Speedway disc.
My first attempt was a no go caliper was to small & didn't open up enough to fit disc and vintage wheel wobble....
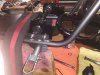
So I got a larger caliper & so far it's looking like its going to work out well.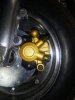

I drilled & taped another hole in the caliper bracket and was able to mount caliper where it needs to be. One bolt is not going to cut it so I'm working on a bracket to solve that.
I'm determined to get a working hydraulic caliper using the original Speedway disc.
My first attempt was a no go caliper was to small & didn't open up enough to fit disc and vintage wheel wobble....
So I got a larger caliper & so far it's looking like its going to work out well.
I drilled & taped another hole in the caliper bracket and was able to mount caliper where it needs to be. One bolt is not going to cut it so I'm working on a bracket to solve that.
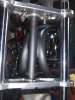
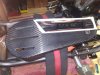
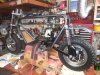
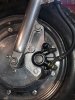
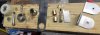
I moved on to to front brake.
I'm determined to get a working hydraulic caliper using the original Speedway disc.
My first attempt was a no go caliper was to small & didn't open up enough to fit disc and vintage wheel wobble....
So I got a larger caliper & so far it's looking like its going to work out well. View attachment 285729
View attachment 285730 View attachment 285732
I drilled & taped another hole in the caliper bracket and was able to mount caliper where it needs to be. One bolt is not going to cut it so I'm working on a bracket to solve that.
Looks like the metal was not roughed up so the JB Weld had nothing to stick to.
I suspect if you hit the inside of the metal with some 80 grit and really give the JB Weld something to stick to it would hold fine.
Look how smooth the liner is where the JB Weld was, so you'll need to scratch that up to if you reuse the same liner...
I suspect if you hit the inside of the metal with some 80 grit and really give the JB Weld something to stick to it would hold fine.
Look how smooth the liner is where the JB Weld was, so you'll need to scratch that up to if you reuse the same liner...
So what model brake caliper are you trying? I have a speedway scorpion missing the brake caliper. If your setup works is it ok if I copy it?
Although I think your application & mine are night & day different.
I'd ask in the vintage thread, about possible replacement for your Speedway or a Speedway group.
I've got days & hrs. Searching. This is my 2nd one & still not sure it will work.
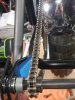
I now have a working hydraulic front brake & cut out my mud guard out of black acrylic sheet. I'm now In the process of moving backwards, just when I thought I was done with the rear end. I've decided to add a chain tensioner to swing arm to make up for the run out in the rear wheel.
I've fabed up a weld on tensioner with the help of Havasu Dave for sharing his tensioner design.
It's now time to to dial in placement. Remove swing arm & grind, weld and repaint. A redo I'll be glad I tackled......
I've fabed up a weld on tensioner with the help of Havasu Dave for sharing his tensioner design.
It's now time to to dial in placement. Remove swing arm & grind, weld and repaint. A redo I'll be glad I tackled......