WLB's Just For Fun 2018 Tote Gote
- Thread starter WLB
- Start date

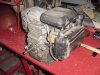
I thought I'd use the Build Off as an incentive to build a proper 5 hp Briggs for the Tote Gote. The Honda engine died last summer.
View attachment 102284
View attachment 102284
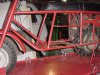
Model 400 was popular for kids and the ladies...
414 was the 4hp 'climber', high gear ratio model, while the 404 was a faster 4hp gote. The 403 was a 3hp version.
The gear ratio difference was due to the large sprocket on the second jackshaft. The 414 had a 48 tooth sprocket and the 404 had 40 teeth.
414 was the 4hp 'climber', high gear ratio model, while the 404 was a faster 4hp gote. The 403 was a 3hp version.
The gear ratio difference was due to the large sprocket on the second jackshaft. The 414 had a 48 tooth sprocket and the 404 had 40 teeth.
Attachments
-
 437.8 KB Views: 110
Last edited:
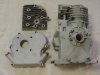
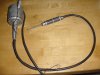
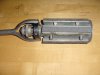
I had some time today so I thought I'd check the gasket surface on the head. To do that, I laid a piece of sandpaper on the machined bed of the mill and rubbed the head back and forth. The gasket surface looks good and flat. Next I bolted the head to the mill and using a ball end mill, cut a fire slot to promote combustion. When I install the spark plug I'll index it so the open end of the tip points toward the valves.
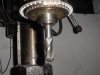
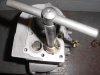
I also put a picture of the light on my mill. I bought one of those LED light rings in a diameter that fits around the spindle. My son wired it up using an old 12 volt charger so I don't have to use batteries. Works great and puts the light right where I need it.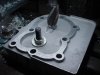
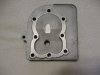
Next I'll install new valve guides and cut the valve seats.
I also put a picture of the light on my mill. I bought one of those LED light rings in a diameter that fits around the spindle. My son wired it up using an old 12 volt charger so I don't have to use batteries. Works great and puts the light right where I need it.
Next I'll install new valve guides and cut the valve seats.
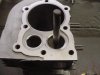
Last night I epoxied up the low spots in the intake port with JB Weld and this morning smoothed out the ports and relieved the area around the valves. I didn't want to clean off a car and drive to the shop to use air tools (minus 3 this morning) so I used my old electric porting tool with flexible shaft. That tool is over 45 years old and still works fine. It was my only porting tool for many years and has probably ported over a 100 two stroke cylinders.
Thanks Richard. I wish I had had all those tools when I was still young enough and energetic enough to use them all.:laugh::laugh:
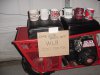
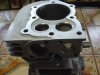
Last night I reamed the block and installed the valve guides using the E Z Bore kit shown. Reaming the block without oversizing the holes is a messy job. I reamed about a sixteenth at a time and flushed the chips away with WD40. The temperature was going back toward zero last night so I put the guides out on the back steps to shrink them a bit and the block on the register to expand it a bit, then used the pilot in the kit to tap them in place. A few strokes with the hone and the guides were sized.
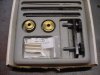
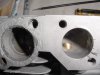
The exhaust port is too large for best performance. Before I put the block together for the final time I'll make a reducing plug for it.
Last night I reamed the block and installed the valve guides using the E Z Bore kit shown. Reaming the block without oversizing the holes is a messy job. I reamed about a sixteenth at a time and flushed the chips away with WD40. The temperature was going back toward zero last night so I put the guides out on the back steps to shrink them a bit and the block on the register to expand it a bit, then used the pilot in the kit to tap them in place. A few strokes with the hone and the guides were sized.
The exhaust port is too large for best performance. Before I put the block together for the final time I'll make a reducing plug for it.
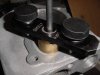
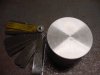
I cut the valve seats by hand using NEWAY seat cutters. For the Briggs engine I used (left to right) a 15 degree cutter for the tops, a 31 degree cutter for the intake seat, a 45 degree cutter for the exhaust seat, and a 60 degree cutter for the throats. I initially cut the 31 or 45 degree seats and then used the 15 and 60 degree cutters to get the seats the proper width and to position them where I wanted them on the valves.
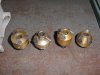
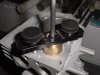
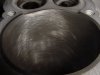
Yesterday I worked on the bore. The original bore had some scratches, a couple of thousandths wear, and about .0015 taper. To get the best bore job possible I would normally want to bore the cylinder on the boring bar to within .0025 of the final size to get a fresh straight hole and then hone the final .0025. To do that would require that I bore the block .020 to have a good chance of cleaning up the original bore. Since these blocks are getting harder to find and it had already worn a couple of thousandths I decided to just go .010 over and hone it to size without boring.
First I honed the tapered area until I had a straight hole and then honed the entire cylinder with coarse stones until I was within .0025 of final diameter, then finished up with fine stones to final diameter. Piston clearance was set at .0035.
First I honed the tapered area until I had a straight hole and then honed the entire cylinder with coarse stones until I was within .0025 of final diameter, then finished up with fine stones to final diameter. Piston clearance was set at .0035.