1969 Rupp Banchi - Build Project
- Thread starter Mark Brown
- Start date
Got my crank back from the machine shop about a week back. A couple more small tweaks and I was quite happy with it. I did make up some hardware to be able to grease the clutch needle bearings. I saw it online somewhere and thought it was an easy way to solve the issue. So after fabbing up the hardware, installing the zerk, and drilling the keyway and sleeve - it seems like it will work.
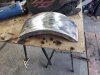
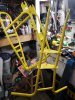
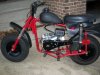
So over the last couple of weekends I managed to prime and paint the frame. Oh yeah, I managed to paint the fenders too. The executive decision here is flat black, as it will hide a lot of the boo-boos. In the pictures, the flat black hasn't "gone off" yet, and still has a bit of a sheen.
The frame paint will need to be scuffed up and second coat applied. This painting process may take a few weeks. I figure it will be a week for the paint to cure.
The colour is John Deere yellow - rattle-can edition.
This bike isn't going to be a garage queen. It will be used and abused. I hope to use it for a rather large car show that I'm very involved with. The spectator parking and the show area is somewhat separated, so I'd like to scoot between the two areas. For this - it will need to look presentable, but I will also be using it in the camping setting where it may get abused a bit - described in this thread.
Attachments
-
 3.9 MB Views: 25
 -
 1.5 MB Views: 30
 -
 1.7 MB Views: 32
 -
 1.6 MB Views: 31
Purists - avert your eyes.
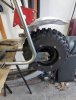
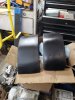
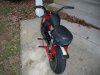
My wife and I made a seat for the Rupp today. I don't have any idea what the original really looked like. Most pictures I found for the Banchi are pretty grainy. I found a video on youtube that I took a couple of frames from to come up with a rough idea. I think it turned out well, given that we've never tried anything like this before. It's thicker than an original, but I think my behind will appreciate that. It's certainly in the RUPP style though.
Tomorrow, the frame will get another coat of JD Yellow, and then the exciting part - putting it all back together!
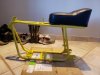
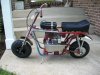
Steady progress.
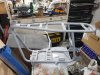
Busy day today. Too tired to say much about it. I still need to get to the front fender and the cables. It's beginning to look like a bike again.
View attachment 286744
Busy day today. Too tired to say much about it. I still need to get to the front fender and the cables. It's beginning to look like a bike again.
View attachment 286744
Steady progress.
Busy day today. Too tired to say much about it. I still need to get to the front fender and the cables. It's beginning to look like a bike again.
View attachment 286744
Busy day today. Too tired to say much about it. I still need to get to the front fender and the cables. It's beginning to look like a bike again.
View attachment 286744
Thanks for the ideas @colt 1911 . I like the one on the Arco - simple and sweet. Covered previously in this thread is the bit about ordering stuff from south of the border (I'm in Canada), the shipping is ludicrous. I'd far rather make something myself (it can be a bit crude) than pay Fedex or UPS their exorbitant rates.
I don't know if I will try to build something in the RUPP style, or if I will just fab up something like the one on the Arco.
I do need something for sure though....
Thanks again for the inspiration!
/Mark
I don't know if I will try to build something in the RUPP style, or if I will just fab up something like the one on the Arco.
I do need something for sure though....
Thanks again for the inspiration!
/Mark

Hey all,
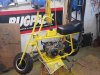
I'm getting close to bringing this one across the finish line. It's a cold one today -8C (or 17F to my southern neighbours). It runs a bit funny, so I may need to spend a bit of time with a jet drill after my air cleaner shows up (hopefully this week). It's supposed to go above freezing so that will help.
Outstanding is the kill switch wiring, some work on the rear brake cable at the lever, and a chain guard. (...and a kickstand, as I won't always have access to my recycling bin for an empty can of beans)
For a 3HP Zongshen, it moves pretty good.
I offer a YouTube video for today's viewing pleasure.
Hey all,
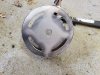
I'm back to doing some more CAD today. This time it's for a RUPP inspired chain guard. Here is what I have come up with. (See pics attached)
I know it won't fool anyone, but I needed a functional chain guard - so why not make something similar to the original. It would be easier to make something without the vents on the face, but I wonder if they were actually functional and assisted in cooling the clutch. That's why I reproduced them. I'll go out to the garage tomorrow and try to make the metal version.
Attachments
-
 23.3 KB Views: 19
 -
 252.1 KB Views: 18
 -
 235.2 KB Views: 17
Last edited:
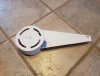
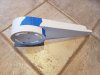
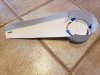
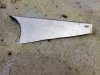
Hey all,
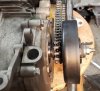
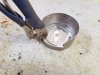
I spent some productive time in the garage today. I turned the CAD (above) into a metal rendition of a RUPP chain guard. I think it turned out ok, but somehow I managed to clock the vents incorrectly - damnit!
I need to add a front lower support bracket to stand off from the engine case. Probably just some flat stock bent into a 90° against the block and tacked to the chain guard will do it. I also need to open the rear bolt slot with my Dremel or a file as it's a little tight. Once I complete the remaining changes, it's time for a bit of fill, prime and paint. Not sure exactly what colour to paint it, (I could do chrome-in-a-can, aluminum or flat black). I'm leaning towards flat black - touch-ups are easy!
Flaws aside, I'm happy with how solid it is and the fact it should save my leg in the case of a high-speed-chain-off situation. If you squint your eyes a bit - it kinda looks like the right thing...
On a side note - I hail from one of those towns that has a rodent weather prognosticator. Knowing that, my wife has just named the RUPP for me -
"The Ground HOG".
I can accept that!
/Mark
Attachments
-
 2.6 MB Views: 12
 -
 1.1 MB Views: 14
 -
 986.1 KB Views: 26
 -
 1.1 MB Views: 28