Alsport RTS 340

#1
Well, It's been a while in the making but the first part of acquiring the Alsports from @mcole67 has happened. I want to thank mcole67 for the opportunity to begin working on these trikes. While staying down here at my parents place helping them around their lot cleaning up the landscape I was also able to pick up the first trike. This is the RTS 340 SL that mcole67 put up for sale with an RTS 290 a while ago. We're still working together to get the rest of the parts and other trike collected together, but that is just a matter of time I'm sure. Until then there is still a lot of work to get it back to running condition again by rebuilding the Kohler 340cc engine and putting brakes on it before getting into a full restoration.

Anyway, some pictures from it's trip across states to where it's currently residing until it goes back to MN with me this coming weekend. It made a brief stop at a Waffle House for a late lunch on the 3 1/2 hour trip back.

2023-09-12_Trike Pick Up.jpg 2023-09-12_Trike Waffle House.jpg 2023-09-12_Trike Barn Parked.jpg
 
#2
Well, got home to MN yesterday. This morning was spent rearranging the garage a bit and getting the Trike out of the trailer and into said garage. The leaves have been picked up, so ignore them. Soon the work begins to detach the engine and rebuild it. I want to get the engine running and have the basic ignition setup completed before beginning a full teardown and restoration. Maybe even take it around the block a time or two. The people in the neighborhood are pretty cool with some mild shenanigans outside of one person that even the cops and city compliance inspecter ignore these days. The only time I can think of everyone getting annoyed was that guy that liked to run around on a gokart with an open exhaust at 40+ mph...

2023-09-17 Trike Home.jpg
 

wjustice

Well-Known Member
#5
Well pistons Can be had, along with rings. The "L" rings are available but if it has dual rings the lower square one is hard to find. Important is the crank. Verify the low compression issue. Maybe pull the exhaust and get a look at the pistons. There isn't a lot to these engines
 
#6
Well pistons Can be had, along with rings. The "L" rings are available but if it has dual rings the lower square one is hard to find. Important is the crank. Verify the low compression issue. Maybe pull the exhaust and get a look at the pistons. There isn't a lot to these engines
I honestly haven't looked into engine parts yet. I was going to assess the internals after tear down before getting into what was needed. It's going to be a couple weeks before I get to that since I managed to get Covid for the 4th time.
 
#7
Well, cabin fever took hold hard enough that I spent some time this afternoon and did a thing. Didn't break any bolts holding it down and after detaching the muffler it sort of snuck out via the roll bar. I'm wiped out now and ready for a nap. Swear I've been sleeping the better part of 12-14 hours a day thanks to this disease.

2023-09-24 Engine Out.jpg
 
#8
It's raining today so that means my 1954 built garage is doing annoying things like flooding. I still found a bit of time to start tearing down the 340. At the moment I've gotten the cover off over the head and jugs and taken off the head to take a peak into the cylinder jugs. I also took pictures of all this for documentation and have them included. While things aren't cranked down nearly as hard as the engine was to its mounting plate, for a rather sick person it was still somewhat tiring. I also managed to get this far without snapping any bolts or studs thus far. Something I largely credit to the large amounts of oil lubing everything.

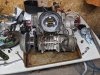
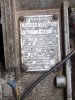
As can be seen, we have a Walbro WD-36 diaphragm carb, which would be the correct carb for the engine. Although according to documentation it could have also come with a Tillotson. Either way, the carb is going to get a rebuild and the kits for it are ~$10. I noticed nothing in the high adjustment slot but the pictures I've managed to find of a WD-36 also show there being nothing in that spot. Further research will have to be done on this carb to fully understand how adjustments are done.

2023-09-25 Carb.jpg

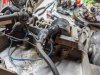
Getting to the coils shows that they are both in very good condition and aside from avoiding the oil caking the rest of the engine they have also largely avoided corrosion and rust. They'll be reused in the rebuild since they are fine as they are and are in working order. I snapped a couple pics to keep record of the wiring order.

2023-09-25 Coils 1.jpg
2023-09-25 Coils 2.jpg

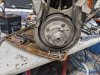
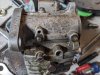
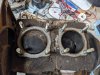
Last that I got is the head and what's hiding underneath. I pulled most of the added natural insulation out that I could get my grubby fingers on. Not terribly surprising considering the trike had been primarily used around a farm for its entire life and probably never even saw a dirt road. Cracking the head open to see into the jugs shows a pair of really nice cylinders and hemispherical pistons. There's a touch of rust on one of them but that isn't terribly surprising considering it's been sitting for a couple decades. However, what is very noticeable is that gas and oil were getting past the gaskets and I got a lot of work ahead of me cleaning this up. The cylinders themselves look like they are in great shape for their age and how much the engine was run. No crosshatch, but neither is there any obvious scoring that can even be seen with ye olden eyeballs.

2023-09-25 Heads.jpg
2023-09-25 Cyl 1.jpg
2023-09-25 Cyl 2.jpg

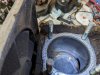
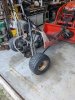
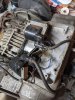
Moving forward, I'm going to have to do a bit of work to get that side cover piece off that holds the fan. I'm not sure if it shows in any of the pictures but the engine recoil start is MIA and the engine was modified to use an electric kart starter to fire it up by welding a plate on. I'm going to have to get the plate welds ground off to get that side taken apart. I also have to get into taking off the driver for the torque converter in a way that doesn't harm the plate that locks the nut from rotating. I don't particularly want to hunt down a locking plate for a Salsbury 700 series torque converter, I can't imagine there's very many floating around anymore.

Anyway, that does it for me for today with this engine. I'm going to do some research on pulling the jugs. I'm pretty sure I see how to do it but it's better to be armed going into a fight than come out breaking something irreversibly.
 

wjustice

Well-Known Member
#9
The convertor is on a tapered shaft. Remove the outer cover and then there is a puller to remove the main inside assembly. It threads into the convertor and pushes on the center of the crank. Do NOT pull on the edges to try to remove it, it will break. There are rebuild kits for the 780. Sometimes the springs can break but most times the rollers are bad.
That carb can be rebuilt but most kits are not complete, as the "leaf" for the pump is impossible to find. I worked with walbros and tillotson for a while and then switched to a mikuni. You have to modify the shock crossbar to use one but for me it was worth it.
You can add a tach and complete the charging system fairly easily if you find it needed.
 
#10
The convertor is on a tapered shaft. Remove the outer cover and then there is a puller to remove the main inside assembly. It threads into the convertor and pushes on the center of the crank. Do NOT pull on the edges to try to remove it, it will break. There are rebuild kits for the 780. Sometimes the springs can break but most times the rollers are bad.
That carb can be rebuilt but most kits are not complete, as the "leaf" for the pump is impossible to find. I worked with walbros and tillotson for a while and then switched to a mikuni. You have to modify the shock crossbar to use one but for me it was worth it.
You can add a tach and complete the charging system fairly easily if you find it needed.
Good to know info. I mostly want to check in on the springs and rollers on the TC so I may just leave the inner piece on the PTO. As for a charging system, it should have one. I sort of assume that is what the taped up wires coming out are for but I have yet to get under the fan side to be absolutely sure. The kill switch circuit has a plug on it and there is a couple other wires that can be seen on Sundays post I'm not entirely sure of.

As for the carb, I'm hoping I can get away with just the gaskets. Full rebuild kits with new springs for the WD-36 can be had for $65-$100. Research shows the WD-36 was replaced with the WD-6 redesign later and initial research says the rebuild kits should work.

The only other weird thing I've found is the supposed HP rating on the engine. My documentation says 28-34hp for the 2ax. I've seen people claim 50hp online, but that seems to actually be the 2 carb 2as from what I can tell.
 

wjustice

Well-Known Member
#11
If the springs and rollers are ok dont mess with it. Pulling the clamp plate off can be a pain to get it back on correctly.
It does have a charge coil on the stator plate but need a rectifier to charge. You really only need it if you want lighting or to add electric start. Message me if you need the info on those.
The kill switch is 2 wires coming from the mag plate that go to the points. They simply short them together to kill the engine. Shorting 1 to ground will kill that cylinder but the other will keep trying to run.
Like I said, I messed with the walbro and tillotson carbs for a while before I switched but havent looked back since switching.
That engine should be 28hp stock with a muffler. With pipes it'll make around 40. The AS was listed as 55+ in the Alsport brochure but that was with the pipes. The AX was a standard utility engine, while the AS was the sport/performance choice.
 

Cuda54

Active Member
#12
Once you get it all cleaned up and running again you will have some fun with it. The twin carb engines always ran the best just make sure the fuel bowls are deep enough. Too shallow and they run out of fuel fast we found that out on snowmobiles. If it is not enough power you could put a bigger liquid cool 500 engine on it. I like the Rotax engines myself they seamed to start and run hard for their size. I had a 377 twin carb fan cooled that would pull the skis my kids loved it.
 
#13
Got back to work on this a bit while I was tinkering in the garage. I got a picture of what's going on on the starter side. I didn't need to grind off the welded plate but probably still will with an angle grinder. Very carefully. Anyway, got the pulley plate unbolted and the nut underneath for the other side of the pulley. I now need to come up with or make a puller for this thing to take off the stator. I don't want to try other more invasive methods of getting it off.

2023-10-07 Starter.jpg
 

Cuda54

Active Member
#14
I you can list the brand of engine type and size because you can read the tag better. I know a guy that has some old engines that might fit for the parts you need. And he was really close to you today too. He had to pick up a combine rear steering up there. I would try to tap it to unspin it first and look inside to see if it is threaded on.
 
#15
I you can list the brand of engine type and size because you can read the tag better. I know a guy that has some old engines that might fit for the parts you need. And he was really close to you today too. He had to pick up a combine rear steering up there. I would try to tap it to unspin it first and look inside to see if it is threaded on.
I did not think that it might be threaded on. I'll give it a try with some light tapping when I get out to the garage. I'll keep your contact in mind when I get the engine further apart. Right now I don't know the full extent of what it needs beyond gaskets and likely oil seals.

Edit: It's not screwed on it's pressed. Tapping it around doesn't move it off the shaft at all. A puller will be needed.

Also, looking at the rings they appear to have about a slightly larger than .010 gap, possibly as large as .015.
 
Last edited:
#19
I cant remember but I think its just a steering wheel puller that you can use.
Steering wheel puller. Kohler made a specific puller for this. There's also universal pullers for snowmobiles that would work in this case. People have fashioned pullers out of 1/4" plate from what I've read. I don't really have the materials or a puller that would work in this application unfortunately.
 
#20
Took a better picture of the plate while I was out in the garage today. Numbers as follows:
Model No.: K3402AX
Serial No.: 733201788
Spec No.: 113022
CC: 338

2023-10-09 Plate.jpg

Edit: I also got the jug off on the PTO side and measured ring gap while it was in the jug. Rings will need to be replaced as they are getting close to the gap requiring replacement. Conn rod has no side to side play in it or so little my micrometer isn't measuring it. The needle bearings on the one conn rod at the crank and piston are both in great condition with no visible wear.
 
Last edited:
Top