Azuza 4.5" Drum Brake Question

#1
Howdy all,

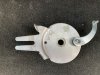
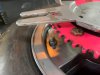
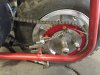
Long time no post. I have a question for those with experience regarding Azuza 4.5" drum brakes. Which way do you install the brake actuator lever? Do you install it so that it rotates counter-clockwise or clockwise? For Counterclockwise rotation the curved actuator lever would point upward. For clockwise rotation the curved actuator lever would point downward. Currently my brake actuator lever is pointed upward. Does it matter?
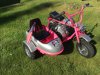
The brakes on my Side Car build have never really been stellar. Unfortunately the previous owner of the mini bike has cut off the lower tab that secures the brake cable and allow the brake lever arm to be installed pointed downward giving it clockwise rotation. I have always wondered if the brake would work better if the brake lever arm pointed down?
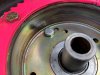
Another thing I have discovered is that the steel backing plate for the brake assembly is drilled for a 3/4" axle. My axle is 5/8". So it has been a challenge to keep the backing plate perfectly centered. I have ordered the correct steel backing plate brake assembly drilled for a 5/8" axle. This may be causing most of my problems.

As always, all comments are greatly appreciated!

Hec

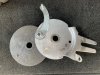
Here is a pic of the orientation of the brake actuator lever. Note the lower bake cable securing tab has been cut off.
03.29.16a.jpg
We have had a lot of fun with it. Just wish the brakes were better!
Pipes Bike.jpg
 

Doc1976

Active Member
#2
From my experience is doesn't matter which direction it is installed. They work half assed both directions. These brakes are just not that good, they slow you down that's about it. You do want to get the correct backing plate in there though. As they wear they work a little better. There are post on here about a few tricks to get them working a little better but still not a lock the wheel up kind of brake.
 
#3
There is something you can do to make that brake work better. Remove the shoe on the bottom half of the backing plate and use a hacksaw to cut about 20 equally spaced slits across the brake material, make them at a 45 degree angle and saw about 1/2 way through the brake material. When you put it back together have a helper hold the brake handle tight to center the shoes as you tighten the axle, this will center the shoes to the drum. This will help overcome the uneven wear of the shoes that is common with this style brake. While you have the brake apart clean the drum and both shoes with brake cleaner to remove any oil or finger prints that can contaminate the friction factor of the brake. Don't cut any slits on the top brake shoe, leave it as is!
 
#5
One other suggestion that I have not tried but may help would be to sand away all the plating on the brake drum surface so the shoes push against bare steel. The electroplated surface may be more slippery than bare steel or as it wears off it could be contaminating the brake shoe lining.
 
#6
I would just use oven cleaner to remove the coating an then use a Scotch bright to give it fine scratches to give the brake something to grab an just brake clean the pad an wipe it also a couple time with the Scotch pad.. That worked on a honda spree I had... I'm no eggspert... Just ideas
 
#7
Thanks everyone for your suggestions and comments! Mariah, I will definitely try your suggestions!

This weekend I removed the rear wheel and did some inspecting of the brakes. I had used an 1-5/8" spacer between the bearing and steel backing plate. I needed this spacer to bring the steel backing plate out in order for the heads of the bolts on my rear sprocket to clear the steel backing plate anchoring bracket. You can see in the pic in my first post that the backing plate is out a bit. Well that wasn't such a good idea. The result using the 1-5/8" spacer was that the brake shoes weren't fully inserted into the drum. See wear marks on inside of drum pic. I have ordered and received a new brake shoe assembly with steel backing plate. This backing plate does not have the anchoring and brake cable bracket. I installed it using an 1-1/4" spacer and the shoes are now inserted fully into the drum. My original thought was to make my own anchoring and brake cable brackets and weld it to the new backing plate. I decided to remove the old steel backing plate with brackets and install it right over the top of the new backing plate. I had to open up the hole where the actuator arm is on the old backing plate. The old backing plate slid right over the new backing plate now. The result was the added thickness of the old backing plate added just enough clearance to clear the bolt heads on the rear sprocket with the 1-1/4" spacer installed. I don't think I will need to add any spacers between the two backing plates. I will do a mock up and see if it looks like it will work. If it does, I will weld the two backing plates together and reinstall. I am also thinking of making a longer brake lever to give more braking force. One step at a time.

Here is a link of the build if anyone is interested!
https://www.oldminibikes.com/forums/index.php?threads/side-car-build-for-6-hp-azuza.106308/

Brake Drum.jpg

Brake Backing Plates 1.jpg

Brake Backing Plates 2.jpg

Brake Backing Plates 3.jpg
 
#8
I am also thinking of making a longer brake lever to give more braking force.
Don't go by a longer lever equals more applied force. I have measured numerous aftermarket brake levers and the biggest difference is in the distance between the handle pivot point and the cable pull point. That ratio of pivot to cable distance to handle length is what you need to figure out. And yes a longer handle will let you apply more pull at the handle but a long handle 5 to 1 ratio wont apply more force to the cable than a short lever with a 6 to 1 ratio.
 
#9
FOMOGO,

I should of been more clear, I am thinking of making the actuating lever on the brake assembly longer not the actual brake lever on the handle bar longer. I hope this makes sense.

Hec
 
#10
I worked on the brakes this week and did the following:

  1. Cut the 45 degree slices into the bottom brake shoe.
  2. Removed the electro plating from the brake drum.
  3. Welded the old steel backing plate to the new backing plate. This gave me the clearance I needed and allowed the brake shoes to be inserted further into the brake drum. I am now using the recommend 1-1/4" spacer between the bearing and brake backing plate.
  4. I installed the brakes, held the brake lever down while tightened the axle nuts to make sure the brakes centered themselves on the drum.
The result is that the brake is definitely grabbing better! I will report back after I take it for a ride.


Thanks everyone!

Hec
 
#12
All,

SUCCESS! The brakes work better than ever! My 10 year old daughter can now stop it within a very reasonable distance and still be able to squeeze the brake lever. If I adjust the brake cable tighter it stops even better but then my 10 yr old daughter can't squeeze the brake lever. I have a longer brake actuating lever that I made for the brake assembly. I will give that a try to see if I can make the brakes even better.. All in all, it stops way better now. I hope this post will help others with Azuza drum brakes in the future.

Thanks Again!

Hec
 
Top