First Mini Bike

#21
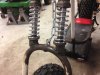
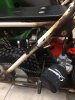
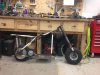
Whoa. I'm no expert but it looks like the trial is the wrong way. I think you need the axle behind the tubes not in front of it. You now have negative trail. That could be Very dangerous at high speeds.
I'll let someone more knowledgeable chime in on that.

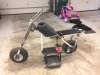
Side to side steering... Probably about 45 degrees for maneuvering around a garage etc. To little and it is takes more forward and back twisting and turning to get it turned around in a tight space. You don't want the handle bars to flop to the side either...

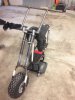
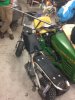
Also, your gearing as is without the torque converter is 7:1. Figure in the torque converter engagement torque and you are at like 19:1 !!!
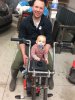
With your seat placement over the rear axle that thing WILL wheelie easily, maybe to easily. My suggestion to switch the two jack shaft sprockets. That reduces the 7:1 portion to 4.28 then when you factor in the torque convert you are about 11.5:1. That is much more ride-able in my opinion.
Danford1


rake and trail
 
Last edited:
#22
Dan, thanks for the math again. I will switch the jackshaft sprockets to reflect the latter gearing you talked about. In your opinion, what size sprockets on the jackshaft will get me the best gearing?

Also, you are correct about my trail. I had it backwards. Thanks so much for pointing it out. However, easy fix for me was to switch the front fork around. Initially it looked a little strange to me but now I kind of like it. I went ahead and sat her on the ground and rolled around my garage on it....I guess I can say I have a rolling frame now?!?! Pretty Excited.... next update I post should be the handle bars.

IMG_0253.JPG
 
#23
The trail looks much better now.
For now, go with the sprockets you have. Swap them so you have the 14 tooth going to the 60 tooth rear. Ride it first and then you will know if something needs to be changed or not. You may end up buying a 16 or 18 tooth sprocket for the jack shaft later. Where you ride and how you ride along with what you expect from it will determine gearing.
You need to start somewhere and what you have on hand will get you riding.
The Briggs Intek with a torque converter coupled to a final gearing of 4.28 is a good starting point in my opinion.
Are you riding on flat hard surfaces like street, roads etc? Are you riding off road in hills and over rocks and tree roots etc?
A concern for you is where your butt is placed is relation to the rear axle. If you are sitting in front of the axle, your design could be OK. If you are over it or behind it, not OK unless you install a wheelie bar, you need to ride it first though. How long is your seat going to be? Is it going to go all the way to the rear of your frame or are you leaving the frame open so you have a rear grab or lift handle?
You may have to relocate your rear axle 6" further back or on the other side of your frame rails but you really need to ride it first. Then you will know. Ride it before you paint it in case you need to modify something.

When you install your foot pegs, think about leaning into turns and if they will hit the ground or not. It looks like you have plenty of room to mount them off of your upright bar. I would mount them up a few inches so you can lean into turns or side hill without them contacting the ground or obstacles.
I saw a Redbeard video once and he mounted some foot pegs on an angle sort of forward off where your bar is. So your feet would be in the area between your vertical bar and your front tire. It is hard to tell what size your minibike is with you in the picture sitting on it.
I'll see if I can find the video and link it here.
Danford1
 
#24
I found the video. He was building a Chopper style from a bicycle frame. His foot pegs are an extreme example of what I meant. You decide
what you want but this can give you a idea or two.
Danford1
[video=youtube;QuqpPIh0AqY]https://www.youtube.com/watch?v=QuqpPIh0AqY&t=826s[/video]
 
#25
Here is a fuzzy top view of the bike. The seat isn't going all the back, you can see where it stops. The frame will act as a nice little handle... but my butt still sits right on top of the rear axle. I really don't want to relocate the rear axle, but like danford said, I want to ride it first and see how it acts. Oh, and the handle bars are tacked up.

IMG_0266.JPG
 

Steve73

Well-Known Member
#28
Looks like a fun project. Nothing beats cutting, welding, solving issues and headaches just to give way to lots of smiles and fun ahead... great job on your mini. It’s looking awesome..:thumbsup:
 
#29
Quick update from my phone. Welded in some larger pipe to the bottom of the springs so when they get compressed it will sit evenly across the cup.
IMG_0306.JPG

Also. Got this idea from my brother. He said the trucks that ride at Silver Lake (a sand dune type playground for all the non-Michiganders here) that people will weld a chain from the frame to the suspension so it doesn't shoot off after a launch. I'm not saying I'm gonna launch my mini bike. But I don't want the front tire to become disconnected from the bike. Plus, it adds a little bad ass factor...
IMG_0305.JPG

I'm getting so close! I just want to slap the motor on and go for a ride. But I'm there's a couple more things to wrap up.
IMG_0307.JPG
IMG_0308.JPG
 
#30
I need to weld on a steering stop yet and drill and tap some grease zerts into the steering column and front shocks. Then it will be hooking Up throttle and brakes. Then test drive. Maybe in the snow.
 
#32
My brother-in-laws kindly carved a phallis on the bottom my frame with a dremel early on and affectionately called it a "Swamp Donkey". Think I'm gonna stay with that... haha
 
#34
First Ride complete....and I'm in love. Still need to get the foot pegs welded on and brakes hooked up, but it was too tempting not to ride.

[video=youtube;aUkyW6EyMZo]https://www.youtube.com/watch?v=aUkyW6EyMZo[/video]

[video=youtube;ma21pMs2iA0]https://www.youtube.com/watch?v=ma21pMs2iA0[/video]
 
#36
Did get some things wrapped up on the minibike the last couple of weekends. Engine Breather filter installed...

IMG_5230.JPG

Welded on the foot pegs to the frame. The pegs do fold back, nice feature if they catch the ground.

IMG_5249.JPG

Next focus will be getting the seat upholstered. I'm thinking black with orange tubing (same orange as the chevy engine orange I've been slapping on the briggs). Also before powder coating: light brackets and lights, battery box, and engine starter. Been doing a lot of research about getting a 12v starter on the Briggs 206. So far so good! Been going on a lot of rides even though it has been freezing cold in Michigan the last couple weeks.

IMG_5248.JPG
 
#39
I tried a couple different brands of chrome spray paint. They looked fine when sprayed but after it was dry, any place you touched it would dull it. It didn't stay "shiny". I tried clear coating it but that just made it look like silver paint... It didn't work out for me. Oh, the chrome didn't like to get wet either. It would "water spot" pretty bad.
I hope you have better luck.
I know they make a chrome powder coat that will hold up much better than paint.
Good luck and keep us posted.

Danford1
 
#40
I have two wood and aluminum rocket-halves for our Eshelman project that have to be silver/chrome painted. Then clear-coated for scuff and UV light resistance.
I’m looking forward to some reports on this topic.
Nice project going here,
Steve
 
Top