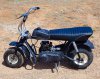
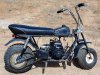
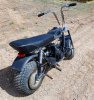
Heathkit Hilltopper find and build
- Thread starter Rapidrob
- Start date

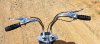
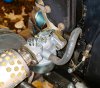
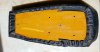
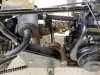
I bought two break handles from Biffmini here, and installed them today. The look good . I got the rear brake working well but the front brake is missing a link for the cable I do not have.
I will ask here if anyone has or knows where to find one?
View attachment 260058
I will ask here if anyone has or knows where to find one?
View attachment 260058
If I knew what you were looking for I'd look through my stash.
Waiting on parts. I'm replacing the carb as it will not idle as it should. Going with a H50 type carb.
I removed the priming pump and filled the hole with a secondary RUN/STOP switch in the hole. I turned a washer out of aluminum and bolted the washer to the engine shroud. I use a SPST switch and a rubber boot. I have enough slack in the wiring to allow the blower cover to come off but not tangle in the flywheel.
I removed the priming pump and filled the hole with a secondary RUN/STOP switch in the hole. I turned a washer out of aluminum and bolted the washer to the engine shroud. I use a SPST switch and a rubber boot. I have enough slack in the wiring to allow the blower cover to come off but not tangle in the flywheel.
Another ten hour day today doing many things to the Hilltopper.
I installed the *Alternator to the blower housing and ran the AC cable to the front of the bike.
A new STOP wire was added to be used with the new KILL switch
Installed a New "Lucas" Type rear LED rear/running light. It is an exact match for the original Lucas light.
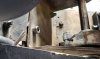
The main drive chain, a number 40, was not in line with the jack shaft drive cog. This took hours to correct as I had to machine special spacers to adjust the chain properly and get a straight run between the driven rear sprocket and the drive cog gear.
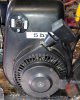
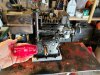
The biggest thing was install the new carb. This is NOT the carb I wanted but the seller really dropped the ball on the one I wanted and I ended up buying the long lever carb to use until the correct one shows up in a few weeks,
I installed a new throttle assemble I had on hand. The new return spring is very heavy and takes more effort to open the throttle than you'd think.
It runs OK,not great. The idle is still higher than I like but is does run at idle.
The engine/TAV drive has a vibration it 1/2-full throttle I do not like. I have not installed the drive belt yet. If the vibration does not stop I will mount the engine on GarLoc Rubber to isolate the vibrations.
* the alternator puts out 8 VAC at idle and 28 VAC at full throttle. (unloaded )This is way too much for most 12 VDC applications. I will be installing a voltage regulator/rectifier and a small 18650 battery pack. No big deal So many folks have destroyed lights and other devices not ever checking the output of the Alternator. The faster the engine spins, the more voltage you will get.
I did a test fit of the new made seat. The holes for three of the seven holes line up. The others are not even close to being right. So much for sending dimensions and hole centers.
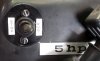
A new handlebar switch came in. It a minibike builders perfect device. It has only the switches you need for lights and a kill button. HI/LOW/ OFF for the headlight and a thumb located kill button. The switch is CNC Aluminum with all wires sealed and has male slip connectors installed.
I'm still several hours from a test ride. Still lots to do.
Alternator
Chain after alignment
New temp carb and throttle.
I installed the *Alternator to the blower housing and ran the AC cable to the front of the bike.
A new STOP wire was added to be used with the new KILL switch
Installed a New "Lucas" Type rear LED rear/running light. It is an exact match for the original Lucas light.
The main drive chain, a number 40, was not in line with the jack shaft drive cog. This took hours to correct as I had to machine special spacers to adjust the chain properly and get a straight run between the driven rear sprocket and the drive cog gear.
The biggest thing was install the new carb. This is NOT the carb I wanted but the seller really dropped the ball on the one I wanted and I ended up buying the long lever carb to use until the correct one shows up in a few weeks,
I installed a new throttle assemble I had on hand. The new return spring is very heavy and takes more effort to open the throttle than you'd think.
It runs OK,not great. The idle is still higher than I like but is does run at idle.
The engine/TAV drive has a vibration it 1/2-full throttle I do not like. I have not installed the drive belt yet. If the vibration does not stop I will mount the engine on GarLoc Rubber to isolate the vibrations.
* the alternator puts out 8 VAC at idle and 28 VAC at full throttle. (unloaded )This is way too much for most 12 VDC applications. I will be installing a voltage regulator/rectifier and a small 18650 battery pack. No big deal So many folks have destroyed lights and other devices not ever checking the output of the Alternator. The faster the engine spins, the more voltage you will get.
I did a test fit of the new made seat. The holes for three of the seven holes line up. The others are not even close to being right. So much for sending dimensions and hole centers.
A new handlebar switch came in. It a minibike builders perfect device. It has only the switches you need for lights and a kill button. HI/LOW/ OFF for the headlight and a thumb located kill button. The switch is CNC Aluminum with all wires sealed and has male slip connectors installed.
I'm still several hours from a test ride. Still lots to do.
Alternator
Chain after alignment
New temp carb and throttle.

Well Biffmini, you nailed it. I found one of the rear axle bearings was in pieces. By chance, I had one the correct size.
It also turns out the drive belt I bought was the wrong type. It needed to be a true V-belt. I had to drive into town ( first time in five weeks now) and buy one from NAPA. I was the only customer in the store.
After seven hours of playing with the bike and working on the hard throttle I was finely ready for a short test ride.
The engine is running very well with no load. But with me on it, it bogs right down. No get up and go at all as a 5 HP engine should have.
I posted the compression is low. This proves there is something wrong with the engine.
Looks like I'll have to pull the engine off of the bike and tear it down. Valves may be bad or a bent push rod as I hear a knocking sound when the engine is running.
In my other post I'm dealing with the ticking engine.
Still, I had to move along and do essential things before I forgot to do them.
The seat was custom made. And the seat securing bolt holes were put into the wrong place with one of the blind fasteners missing from the center hole. ( one that did line up as requested)
Giving it a lot of thought, I tapped in an old fashioned lead floor cement anchor. This worked perfectly and much stronger than the new plastic ones.
I then had to have a center support,but with the holes way off where I asked them to be, I instead cut a shoe-horn fitting piece of FINN-FORM material.
This stuff is many layers of Arctic Birch laminated between two pieces of very tough plastic on the outsides. It is not only weather-proof, it will never rot in our lifetimes.
It is mounted so there is no chance of any sideways movement of the seat in the roughest conditions while riding.
The foam is top drawer and absorbs shocks very well. The ride is very pleasant on my dirt/rock back road which is far from smooth.
The sitting position is a little strange as the folding foot pegs I think are for a passenger? Using them has your legs bent backwards and the heat from the exhaust is not pleasant. on my left calf.
The front Nerf -bars have the paint worn off off them from the previous owner, and putting your feet there does not feel normal to me.
Their may be another set of pegs missing, but there are no signs of any ever being used up front.
I had to learn how to steer this bike as the really wide tires have a mind of their own where they want to go.
I took a ride on my property which has been left in a wild High Desert. condition. The bike even with the engine not being 100% up to par, had no trouble plowing through the sage brush and dead Buffalo grasses.
Once I get all the bugs worked out, This should be a fun mountain trail riding minibike.
Last edited:
I had a really nice conversation with Owend last night and there may be a Tecumseh H70 or 80 engine in the bikes future.
Their not common out here as we don't get a lot of snow or green fields of grass as most of the country does.
Of the engines I have seen for sale they would make a nice door stop.
Their not common out here as we don't get a lot of snow or green fields of grass as most of the country does.
Of the engines I have seen for sale they would make a nice door stop.
Waiting on parts.
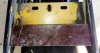
Today was check out the front end. Every nut an bolt. I found another trashed bearing in the front axle. And, one of the front brake shoes shed its lining. I JB Welded the lining back on. I've done this before on another mini and it is still going strong.
I also made several exhaust flanges for my new exhaust muffler I just got. I had to machine an adapter for the slightly larger input from the exhaust pipe to the muffler. I have to braze on the flange and the adapter.
The gasket set showed up this morning. I reassembled the engine and test ran it. It is running a whole lot better now that the rings are no longer in line with each other and the decompression hump has been ground off of the cam.
After about one hour of running the new CHICOM carb started to leak like a sieve around the bowl rubber seal. I removed the bowel and the seal swelled up so large it cannot be put back onto the carb. Just a crap carb.
I put the old snowblower carb back on and it is really running well.
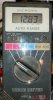
I did a load test on the alternator with just the tail light and a full wave rectifier. It is working well though there is a pretty good drop in voltage while under the LED tail light load. A battery will have to used when the head light LED d bulbs show up.
After about one hour of running the new CHICOM carb started to leak like a sieve around the bowl rubber seal. I removed the bowel and the seal swelled up so large it cannot be put back onto the carb. Just a crap carb.
I put the old snowblower carb back on and it is really running well.
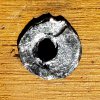
I just ordered 10 new bearings for the wheels. 3-out-of-4 bearings were trashed. The retention clips were torn off, cracking the edges off of the bearings and the sealing shields were open to the air/dust. Whom ever owned the bike before me must have really ridden the bike hard in order to break the bearings. Proper spacers were used as well on the axles.
No big deal, just more lost time waiting on parts.
No big deal, just more lost time waiting on parts.
I did a small thread on new bearings and to beware what you can find on a new bearing.
https://www.oldminibikes.com/forum/index.php?threads/bearings.163867/
https://www.oldminibikes.com/forum/index.php?threads/bearings.163867/
I made a complete exhaust system today. Using a Cub Cadet type muffler. I turned down two 3/4" pipe unions to fit the input side of the muffler 1 1/4" inch and exit pipe 1 1/8" and brazed them onto the header pipe and the tail pipe.
The muffler will be supported by a strap bracket under the top bar frame support. There will be no strain on the muffler or head of the engine.
I wanted a low restriction back pressure and quite exhaust note to keep the Forrest Rangers happy.

The muffler will be supported by a strap bracket under the top bar frame support. There will be no strain on the muffler or head of the engine.
I wanted a low restriction back pressure and quite exhaust note to keep the Forrest Rangers happy.
I made a complete exhaust system today. Using a Cub Cadet type muffler. I turned down two 3/4" pipe unions to fit the input side of the muffler 1 1/4" inch and exit pipe 1 1/8" and brazed them onto the header pipe and the tail pipe.
The muffler will be supported by a strap bracket under the top bar frame support. There will be no strain on the muffler or head of the engine.
I wanted a low restriction back pressure and quite exhaust note to keep the Forrest Rangers happy.
The muffler will be supported by a strap bracket under the top bar frame support. There will be no strain on the muffler or head of the engine.
I wanted a low restriction back pressure and quite exhaust note to keep the Forrest Rangers happy.
That turned out great!
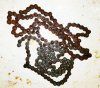
I was given ten feet of number 40 roller chain. It had some surface rust on the outside links.
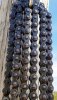
Two hours in my ultrasonic cleaner with 6 oz of citric acid crystals and a squirt of Dawn and all of the rust was gone.
A good wipe down to remove the residue and a good dunking in chain oil and the chain is ready for work.
White specks are the sun reflected in the oil.
Before:
After:
Two hours in my ultrasonic cleaner with 6 oz of citric acid crystals and a squirt of Dawn and all of the rust was gone.
A good wipe down to remove the residue and a good dunking in chain oil and the chain is ready for work.
White specks are the sun reflected in the oil.
Before:
After:
Still waiting on the new bearings for the front end of the bike.
I thought I would just do some checks as to how parts are lining up with one another. good thing I checked as I found the jack shaft assembly was four degrees out of 90 degree alignment with the drive chain,although the rear axle was perpendicular with the frame of the bike.
This may have been the reason the bearings were physically broken, the bike had had a serious impact with something in it's past life.
Using a machinist square and a laser beam I found that it would only take two large "pac-man" shaped automotive door shims of 1/8" thick to correct the alignment problem. By using the two shims only on one side of the jack shaft support frame, the addition of only 1/8" really moved the assembly forward enough to correct the alignment problem.
Now the drive chain lines up with the sprocket teeth perfectly. Rolling the bike frame back and forth, there is no longer a chain noise as there was when I started. This will greatly increase the life of the chain and drive sprocket.
Screw driver tip is pointing to one of the new shims:
I then installed the new exhaust system and every part clears the bikes engine and frame with just enough clearance to take the worse frame flexing under full load.
The new bullet connectors for electrical wiring showed up today so I now can start to make the bikes wiring harness for the lights and battery pack/charger system.