New member Fox Frankenstein

#21
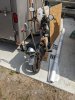
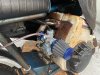
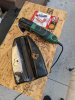
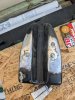
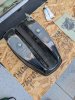
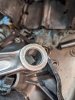
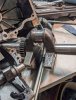
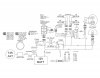
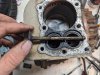
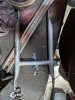
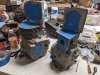
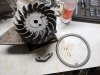
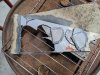
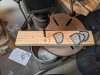
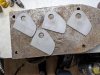
Well, it's been a number of days. Took a bit longer than I expected. The wiring is done and the carb bracket has been fixed. Carb bracket was just a matter of getting the old studs out, then drilling it for machine screws to reattach the carb. Simple fix. The big one was the wiring. I ended up mounting the battery box to the bottom of the seat. You can see in the pictures below it just hugs in there between the frame tubes. The last pic was testing the wiring before beginning wrapping the main run from front to back.


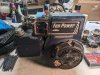
Finally, I got around to taking a short video showing the final lights working and firing it up. As noted in the video, I have to finish wrapping the wires up in electrical tape and clean up the wiring in the headlight, but it's all there and working. Also, apologies for the fingers, I rarely take videos with my phone.


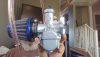
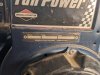
The carb just needs some final adjustments when you give it the gas as it seems to bog down a bit. But that's just a matter of riding it and adjusting as I go.
 
#23
Heya all, It's been a while since I updated this. Not much happened with the bike last month as I blew my money on a 3/4 helmet and OTG goggles. Really the only other thing that happened was a NOS Fox sissy bar was tracked down for it and put on at the end of February. Bar had a crack in it but the guy it was bought from is a professional welder and he happily filled the crack and cleaned the location it was filled.

That brings me to this month and the new stuff that came in. That cheesy $3 control hub had something break inside and no longer reliably turns on the left signal. It's being replaced with a higher quality one that uses mechanical push switches with a really nice feedback on the click for the lights and signals. I picked up a Mikuni clone carb (it still has the Mikuni stampings for some reason, possibly a licensed 3rd party manufacture?). I got a kit of jets for the carb too since I have no idea how the Tecumseh is going to react to this.

I grabbed a speedo setup that tracks speed, tach from the coil pulse, it does other things like tracking signals/lights/hi beams/gas gauge/trip/odometer and other things that I don't care about. Speedo tracks speed by putting in the tire circumference and reading magnets placed on the hub, so that's gonna be a job for gorilla glue I'm thinking. It's really meant to be used on a full on motorcycle but shouldn't have a problem working on a minibike.

You'll have to excuse my fat head in some of the pics. My phone has gone on the fritz and I took the pics with my computer camera. I'll do my best to document things as I go forward with these.

Sissy Bar.jpg WIN_20230301_17_41_49_Pro.jpg WIN_20230301_17_42_10_Pro.jpg WIN_20230301_17_42_39_Pro.jpg
 
#25
Haven't had much time to really work on the bike. I did, however, get the new carb on it. The connection at the adapter fits perfectly with #10 bolts so a couple of those with nylock nuts got that on the original intake pipe. I like this because it let me use the adapter to get the carb as close to perfectly flat as possible with a level. Hook up the new throttle cable because the old one was a hack-job to make it work with the old throttle assembly and it's done.

The gas tank is currently off because I have to fix a pinhole leak between the tank and where the bolts thread into the bottom of the tank. Also because the area is just easier to work in with the tank off.

Carb.jpg
 
#26
Today saw some gas tank work after some running about to get my phone fixed. Hopefully this will resolve the gas tank issue. I started with a multitool and sander attachment to clean off the paint and rust, as well as clean up some of this...interesting...brazing job that is likely causing the leak. Doing this I found out what the rough patch on the side opposite the petcock is, appears to be a tacky bondo job with air bubbles in it. After smoothing out the brazing and bondo somewhat it was time to apply the hopeful fix. To do this, I stuffed some 1/4-20's into the bolt locations and used 2 part cold weld JB weld that is gas resistant. Applying around 3/32" of this to blend the bottom and seal the brazing locations I will then have to hand sand it smooth and finish the blending after it sets fully. Seems like that is going to be a Monday project when it's raining.

Tank Bottom start.jpg Tank Bottom Mid.jpg Tank Bottom End.jpg
 
#28
Gotta do whatcha gotta do, right? Just noting also that I've had great success with that internal POR-15 tank sealer.
Yea, this is a fix it apparently was going to need anyway to smooth out the bottom of the tank a bit. But back at the shop before coming down the tank spent a week with rust remover in it and getting a shake down with nuts a couple times a day before a coat of tank sealer was put in. Once back at the shop in a month or so it will get another coat or two of tank sealer.

Either way, this is about the best that can be done for the moment without having the ability to completely strip the brazing and redoing it properly as all the tools to do that are sitting a few states away.

Gotta say, when I started on this thing I didn't expect the level of mission creep that I've been allowing to get in.
 
#29
Got the new carb actually running on the bike and took it for a ride today. The bike seems to breathe much better than it did on the cheapo carb as well as reacts MUCH better/faster while riding. There is also a definite improvement in overall performance of the engine. Anyway, I made a video for your viewing pleasure.

 
Top