Bride of Frankenstein - a cure for leftover parts cluttering the workshop.

I didn't buy another engine, but @DaddyJohn did convince me to "substitute something better" than the stock crank, rather than go back to stock engine innards. I ordered a GX clone crank from 0MB Warehouse for about $50 including crank shims (that I won't need). Not only will I now be able to use the ARC billet rod and Tillotson flat-top piston, but I won’t have to spend extra shop time fabricating the bolt-on replacement oil dipper I planned to make.

After too many weeks without making progress, I was able to get into the shop this morning and check out my new crank. The Plastigauge now reads between .002″ and .003″ — right in the sweet spot — and I verified that the crank mains fit the crank bearings in the cases. I’m now eager to find a few hours to get the engine assembled.

View attachment 304393
You are 100% correct on your Plastigauge measurements- PERFECT!!
Michael
 

Tanshanomi

Well-Known Member
This morning I checked the ring gaps and assembled the crankcase, torquing everything to spec. In the end, I guess it's worth the extra time and expense to know that I’ve got suitably robust components inside and probably won’t have to open it back up again anytime soon.

IMG_6118.jpg

IMG_6119.jpg
 

Tanshanomi

Well-Known Member
Getting close! The engine has been buttoned-up and mounted back in the bike. I checked that everything is re-wired properly, and the electric starter works! The carb mounting needs a bit of tweaking before I can try to start it up, and I have not installed the exhaust or torque converter.

IMG_6203-XGA.jpg

I removed the dipstick from the extremely long upper oil filler cap and shortened the tube so that it is usable with the tank in place, not to mention a lot less awkward looking. I initially tried to weld the two parts together with my hot-air plastic welder, but none of the plastic welding rods I have would adhere properly. In the end, I simply used two-part epoxy and covered it with some plastic-friendly black spray paint.

Upper-oil-filler-720x1280.jpg
 
Last edited:

Tanshanomi

Well-Known Member
IT FINALLY HAPPENED! I rode “The Bride” on a short 2-1/2 mile loop through the neighborhood this morning. There’s still a lot to work to do, but I can now officially say I have designed and built a ridable motorcycle, pretty much from scratch. The exhaust is too loud, the carb jetting needs serious work, and I have no instruments yet. Plus, there are plenty of cosmetic touches needed.

The electric start does work, but the battery is fairly small and doesn’t have a lot of cranking amps. I ran down the battery futzing with it before I got it running.


Tanshanomi

Well-Known Member
Congratulations! It looks and sounds great. How did it handle?
It actually handled well. It has a lot of trail so it's slow-steering, but not high effort or truckish. Just a secure and predictable cruiser. There was some vibration through the pegs, but the handlebars didn't buzz. The brakes are good, but I think I need heavier fork oil; it dove a bit under braking. And I kept trying to brake with my right foot, which made me chuckle.
 

Tanshanomi

Well-Known Member
Looking forward to your carb tuning..

Thanks for keeping us updated through your build. This has been a great thread to watch.
Thanks for the encouragement and kind words.

Acting on the theory that the Nibbi 24mm carb might be on the large side for my motor, I picked up the same carb in 19mm (Nibbi PE19FL) to play around with how the throat size affects jetting and rideability. I also suspect that my long intake runner probably contributes to a bit of boggy-ness off-idle with the larger carb. If nothing else, the ability to compare the two venturi sizes side-by-side will help educate me on carb tuning.

However, my next step on the punch list is pulling the guts out of the muffler and figuring out how to make it quieter.

According to the two cheap electronic bathroom scales I bought off Amazon, it weighs 232 lbs. with a mostly empty fuel tank. That’s virtually identical to a Honda Navi, which is my benchmark for this bike, so I am very happy with that.
 
Last edited:

Tanshanomi

Well-Known Member
But a longer wheelbase than the Navi, I'm guessing.
Actually, I don't think so. The overall lengths of the the two bikes is virtually the same (71.4"), but because of the Navi's smaller diameter wheels, it actually has a 2-inch longer wheelbase (50.6", compared to The Bride's 48.5").

The big difference is seat height. The specs for the Navi say 30", by my measurement, The Bride is 33".
Another thing to point out on the weight is that the Navi has a 0.9 gal capacity, The Bride 3.0 gal. So, with a full tank my bike has the potential to carry 13 lbs more fuel weight.
 

Tanshanomi

Well-Known Member
On the first couple of test rides, the Bride’s exhaust was clearly too loud—even at low speeds—and had a very sharp, unpleasant bark. The muffler was from an old Bultaco roadracer I had in the mid-80s, and the straight glass-pack design was simply not the right choice for a neighborhood runabout. So, I clipped the safety wire that I’d put on in 1986, and pulled it apart.

IMG_6215-HD-1024x768.jpg

I removed the fiberglass batting and made up an alloy stopper plug to fit inside the perforated metal core. With this, the exhaust gases now had to travel through the holes in the mesh tube, around the plug, and then back into the tube to exit.

IMG_6221-cropped-1024x768.jpg

The aluminum plug didn’t block the tube completely. It was made out of a leftover core from using a hole saw, so there was a small hole in the center.

IMG_6222-cropped-1024x768.jpg

I re-mounted the muffler and started the bike. It was definitely quieter than the original straight-through design, but still objectionable.

I spent some time reading up on muffler theory and talking with an engineer at work. I don’t have the engineering know-how to attempt a tuned system, so I decided to make a simple labyrinth baffle. It’s not the most efficient way to cut the decibels, creating more back-pressure than a reverse-flow chamber, but it would be easy to adapt to what I had, and not prone to creating unwanted resonant waves at the wrong engine speed.

I designed an alloy spool that would fit around the muffler core with a series of offset 7/16″ holes, six per side. Given the close spacing of the holes, I was pleased that I managed not to siamese any of them.

IMG_6256-HD-1024x768.jpg

I then drilled a hole down through the center to screw the spool and center plug together.

IMG_6257-HD-1024x768.jpg

I took the bike for a quick spin and, while the exhaust isn’t whisper-quiet, the overall volume is certainly acceptable now. Just as importantly, the tone is deeper and mellower. In fact, it was quiet enough that I could hear for the first time how much mechanical noise was coming from the engine and torque converter. Also —now, I might be imagining things— the bike seemed to come off the choke quicker and the off-idle stumble wasn’t there. Perhaps a bit of extra back-pressure was all it needed?
 
Last edited:

Tanshanomi

Well-Known Member
I finally fabricated a permanent instrument panel, something I had been struggling to make both functional and reasonably attractive. The process required a number of iterations, and what I ended up with is overly convoluted, yet crude. In other words, it’s perfectly in keeping with this bike’s mojo.

Since the original CT70 knockoff speedometer I’d bought off Amazon was so horrendously inaccurate, I tossed it and mounted a used Suzuki GZ250 speedometer that I had originally purchased for Bultakenstein about 2-1/2 years ago. It should share the same 2240:60 ratio with the Honda VTR250 Interceptor front wheel, so I expect it to be at least acceptably accurate. (But I expected the CT70 gauge to work, too.) Fortunately, I have a suction-mount GPS speedo I can use for verification.

I added a “wing” outboard of the key switch to hold my velco-backed battery-operated tach. If I am able to get the CVT tuning and gearing set so that the engine doesn’t exceed ≈4000 RPM in normal operation, I can then remove the tach and cut off that extra section of plate to the right of the key switch. Or I’ll just leave it.

IMG_6281-1024x576.jpg

The ignition switch is an automotive style unit, with the starter motor wired to a turn-to-start momentary key position, rather than a separate handlebar button. It’s very large, with big terminal posts sticking out the back. You can see in the inset photo below what it looked like when it was temporarily mounted without the cover. It’s so big that there was no way to tuck it discreetly behind the headlight shell, where it should logically go. The least objectionable placement I could find for it still left the whole ugly mess in full view.

I rolled a round cover out of flat alloy to hide most of it. There’s a flange around the bottom of the switch body, so I rolled a bead in my cover for clearance. That worked well, locking it nicely into place once I tighten the hose clamp. It’s not beautiful, but it’s better than nothing. I might polish it up at some point in the future, but I’m okay if that never happens.

IMG_6282-1024x768.jpg

The only remaining step left now is re-wiring the speedometer light and indicator lights into the electrical harness. The old Trail 70 speedometer housing had two indicators for the turn signals, but this one does not. I cannibalized the separate Suzuki turn signal indicator and mounted it in the panel that holds the key switch. Since I will now have only one indicator, an inline diode kit is required to keep the LED turn signals functioning properly.
 

Li'l Popeye

Well-Known Member
On the first couple of test rides...
I removed the fiberglass batting and made up ...
View attachment 305857

I took the bike for a quick spin and, while the exhaust isn’t whisper-quiet, the overall volume is certainly acceptable now. Just as importantly, the tone is deeper and mellower. In fact, it was quiet enough that I could hear for the first time how much mechanical noise was coming from the engine and torque converter. Also —now, I might be imagining things— the bike seemed to come off the choke quicker and the off-idle stumble wasn’t there. Perhaps a bit of extra back-pressure was all it needed?
Do you still stuff it with the fiberglass?
 

Tanshanomi

Well-Known Member
Do you still stuff it with the fiberglass?
No fiberglass. No longer necessary because there is now mechanical barriers to dissipate the sound waves, and it would not be advisable anyway, as there is nowhere to put it. All the space inside the can is now part of the exhaust pressure's active route of escape.
 
Last edited:

Tanshanomi

Well-Known Member
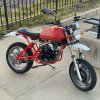
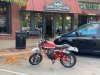
I am happy to report that I have been able to put some miles on The Bride, and I feel it’s fundamentally a success.

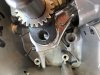
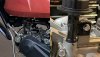
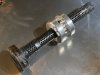
I traced the CVT’s erratic behavior to excessive end play in the driven pulley shaft. A little shim washer was all it took to set it up properly; it is now working smoothly. I checked the Suzuki GN250 speedometer against my GPS, and it’s pretty much spot on. So, with those two last issues checked off, the Bride is essentially complete. There are a still a few cosmetic issues—the scarred sides of the tank being the most notable—but nothing that affects the function of the bike.

IMG_6327.jpeg

So, how 
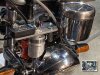
does it function? Well, about as well as I dared to hope it might when I started this project. The overall riding experience is peculiar, but easy and fun. It took a few miles to get a feel for pulling away from a stop, and remember that the rear brake is on the left handlebar instead of under my right foot. Once underway, the steering is easy and predictable—neither truckish nor squirrelly. I paid a lot of attention to the steering geometry early on, and despite the odd look of the trailing-axle fork, it works. The bike doesn’t nosedive under braking and the rear suspension is better than its limited travel and bargain-basement damper units would suggest. The heat shields kept my leg from frying at stoplights and all the electrical equipment worked as designed. The mirrors are high and wide, but very functional.

Fueling is good, too. For someone who has limited carb tuning experience, I got it at least in the ballpark. The engine starts from cold with just a moment of choke, idles nicely, and pulls through the rev range without hesitation. I credit a lot of that to the Nibbi carb. This is my third, and they’re a hell of a bargain for the price. I’ll definitely watch for a sooty exhaust and read the plug at some point, but for now I don’t see a pressing need to mess with it.

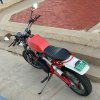
There are few niggles. The $35 seat feels exactly as comfortable as you’d expect from a $35 seat. The super-wide, non-folding ATC footpegs aren’t optimal. Their width not only complicates getting the bike in and out of the garage, but they also vibrate quite a bit on the road. Surprisingly, I didn’t feel much vibration through rest of the bike and the mirrors stayed clear.

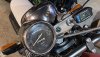
Acceleration requires an eye on the tach. Whack open the throttle with abandon and the engine can exceed my self-imposed 4000 RPM redline by several hundred revs before the CVT’s gearing can catch up. The tach’s “max” memory function currently reads 4310 RPM—not alarming, but definitely approaching iffy territory for a cast flywheel. A little bit slower roll-on is all it takes to keep things in the safe zone.

My design goal for this bike was 50+ MPH. It gets up to 40 MPH effortlessly, and 45 is a bit more leisurely. I saw a GPS-indicated 47.5 MPH on my last ride. I’ve only ridden the bike in town so far; on a longer stretch of two-lane, I expect that 50 MPH is do-able.

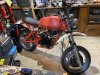
Given the motley collection of components I started with, I’m thoroughly tickled with the result. I knew it would be a novel curiosity and a rewarding project. But it’s actually a genuinely usable, thoroughly street-worthy means of transportation, which I wasn’t too sure I could pull off.

IMG_6328.jpeg
 
Last edited:
Read through the entire thread this morning. Great build. When you made the baffle for your muffler did you keep the same plug with the center hole?
 
Top