Once upon a time I flocked to this site to ask questions and show off my Aggie 97 mini bike. Well it's been 5 years and the stuff I did not do to it that I should have are eating away at my soul.
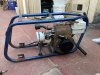
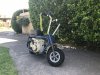
Here is the beginning, the completion of my restoration in high school. The white/blue color palette actually worked really well, if not a little garish (not to mention incorrect...). The white paint did NOT last long. Note the rear gas tank and Honda motor (the original HS40 on this bike was left without a spark plug for twenty plus years!!! )
)
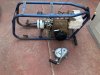
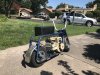
 The Honda that went into it when I first rebuilt it has long since passed on. It was too noisy and feisty for the tiny little frame and was honestly rather hard to handle. I swapped it out for a Briggs 3 HP flathead I got from a King O Lawn mower that was going to the dump. Despite its grungy appearance, the engine runs really well. I also leaned into the "mini" effect by getting tricycle tassels and squeezie horn (things I later removed). Genuinely considering keeping them on the complete bike because they were so silly!!!
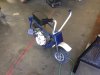
Going through my grandparent's house I also found the original fender set from this bike (something I could not find during my original rebuild!). Those went on to the bike, too. The chrome was failing but this was the height of the pandemic and I had no way to paint them properly. I don't remember what happened to the throttle, but I think it was just unsuitable and I couldnt buy any new parts so I replaced it with a bicycle brake cable and handle. Hey, if it works!
The bike was otherwise fine until about a week ago, when my yearly expedition out onto the street with my bike made me discover one of the rear wheel bearings was seized. Well, time to rebuild the whole bike...!
Wait, that's not how its supposed to go. Well the issue is I didn't have the means in high school to get this bike right. I did what I could (repairing leaks in the tires, cleaning up the frame, giving it a new engine) but a lot of stuff (bent forks, bad bearings, stuck rusty pins) I couldn't fix. I work for a shop that's significantly more capable than my high school shop ever was, so I want to go through and get this right. Proper engine, new hardware to replace the falling apart bits, and a paint job that would last longer than five minutes.
Unfortunately as I started this project I had phone troubles and couldn't take pictures. Let's just say I had a field day with a hammer and some penetrating oil...
Here is the beginning, the completion of my restoration in high school. The white/blue color palette actually worked really well, if not a little garish (not to mention incorrect...). The white paint did NOT last long. Note the rear gas tank and Honda motor (the original HS40 on this bike was left without a spark plug for twenty plus years!!!
)
The Honda that went into it when I first rebuilt it has long since passed on. It was too noisy and feisty for the tiny little frame and was honestly rather hard to handle. I swapped it out for a Briggs 3 HP flathead I got from a King O Lawn mower that was going to the dump. Despite its grungy appearance, the engine runs really well. I also leaned into the "mini" effect by getting tricycle tassels and squeezie horn (things I later removed). Genuinely considering keeping them on the complete bike because they were so silly!!!
Going through my grandparent's house I also found the original fender set from this bike (something I could not find during my original rebuild!). Those went on to the bike, too. The chrome was failing but this was the height of the pandemic and I had no way to paint them properly. I don't remember what happened to the throttle, but I think it was just unsuitable and I couldnt buy any new parts so I replaced it with a bicycle brake cable and handle. Hey, if it works!
The bike was otherwise fine until about a week ago, when my yearly expedition out onto the street with my bike made me discover one of the rear wheel bearings was seized. Well, time to rebuild the whole bike...!
Wait, that's not how its supposed to go. Well the issue is I didn't have the means in high school to get this bike right. I did what I could (repairing leaks in the tires, cleaning up the frame, giving it a new engine) but a lot of stuff (bent forks, bad bearings, stuck rusty pins) I couldn't fix. I work for a shop that's significantly more capable than my high school shop ever was, so I want to go through and get this right. Proper engine, new hardware to replace the falling apart bits, and a paint job that would last longer than five minutes.
Unfortunately as I started this project I had phone troubles and couldn't take pictures. Let's just say I had a field day with a hammer and some penetrating oil...