Hey Y'all,
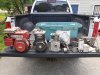
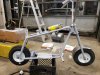
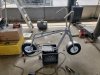
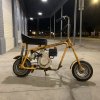
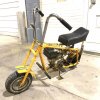
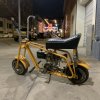
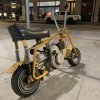
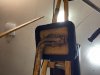
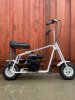
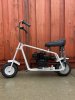
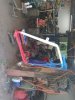
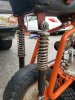
Wanted to share my new project with you (and ask a plethora of questions to some of the seasoned vets on here). I've been scouring this site since the purchase and have gotten a lot of good info! This is my first true minibike, although I grew up of all sizes of jap bikes & racing MX through childhood. A couple of friends have various modern Chinese bikes with clone swaps, and while browsing FB marketplace about 10 days ago I spotted (what I believe to be) a '69-'72ish Sears/Bird Engineering Drover in Knotts Island, NC, close to home. I am not entirely sure that it is indeed a Drover, I am going to post the build progress in this thread and will point out some conflicting equipment that I just can't match up 100% to one model. It original color is what I'll call challenger green, the frame and bars are 1" tube and the foot pegs are 7/8" tube.
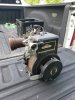
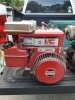
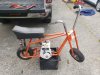
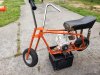
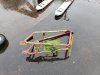
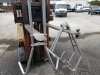
This is the bike. It was mostly complete, with a 3hp flathead, I believe off of a tiller, of incorrect year. When I went to look at the bike, The frame and forks were straight as an arrow, there was no real rust, the engine was running (poorly, idle circuit only), and the tires were flat/dry rotted/bald. The handlebars and comfortable riding position (for a 6'3 230lb dude such as myself) are what sold me on the project, so with a crisp $100 bill we were off. My intent was to restore it while maintaining as much proper vintage equipment as possible, although I have only given myself memorial day weekend to complete the project and a $500 total budget, so there are some constraints. We are already in the middle of drag race season, and I want to have this at the track next weekend for motoring around the pits. This is not a strictly original restoration, so if you are a purist, prepare to be disappointed. HOWEVER, I wont hang a clone on it or any other silliness like that.
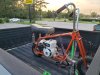
I tinkered with the carb a bit (a flojet model) and could not get it to run on the mains at all. However, even with flat tires and a poorly running 3 horse I could still hand throttle around the yard, albeit slowly.
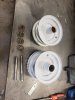
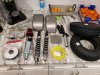
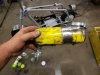
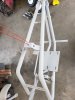
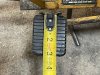
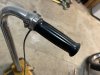
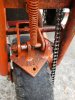
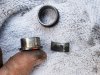
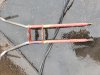
I stripped the bike down to a box of parts, and got my bill of materials together. The wheel bearings were a non sealed 1 3/8 flanged type, and shot. The steering neck had prior repairs done (web repaired, tube rewelded (cracked), some sort of additional bushing brazed in) and the bushings were shot. The scrub brake appears to either have been modified, is missing the wear pad, or is possibly correct and I have yet to find a duplicate on the web. The footpegs were straight, but worn from some asphalt slides. Throttle missing, kill switch not wired. Chrome rusty. Seat shot. Motor plate welds cracking. Missing the fenders. Missing chain guard.
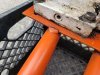
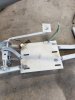
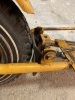
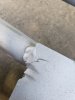
The scrub brake is actually a very nice aluminum casting with clean parting lines, and stainless rod, hardware, springs. Almost too nice to not be OEM 60's American made stuff.
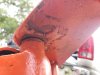
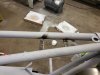
The bottom of the neck tube was also wallered out, and had a "shim" shoved in it to tighten up the bushing. The bushings are 3/8x5/8/3/4 steel rather than bronze.

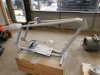
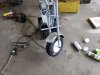
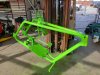
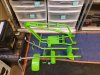
With all this in mind I decided to sandblast everything down bare and identify any other possible frame issues. I did not find anything else than what is mentioned above. Before blasting, I steam cleaned the frame and found under 4-5 coats of paint the original "challenger green". In the spirit of bringing this back to its former glory, I decided to stick with the original color.
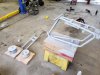
Here the bike is blasted down to bare metal and prepped for fabrication.

Out of attachment space - To be continued
Wanted to share my new project with you (and ask a plethora of questions to some of the seasoned vets on here). I've been scouring this site since the purchase and have gotten a lot of good info! This is my first true minibike, although I grew up of all sizes of jap bikes & racing MX through childhood. A couple of friends have various modern Chinese bikes with clone swaps, and while browsing FB marketplace about 10 days ago I spotted (what I believe to be) a '69-'72ish Sears/Bird Engineering Drover in Knotts Island, NC, close to home. I am not entirely sure that it is indeed a Drover, I am going to post the build progress in this thread and will point out some conflicting equipment that I just can't match up 100% to one model. It original color is what I'll call challenger green, the frame and bars are 1" tube and the foot pegs are 7/8" tube.
This is the bike. It was mostly complete, with a 3hp flathead, I believe off of a tiller, of incorrect year. When I went to look at the bike, The frame and forks were straight as an arrow, there was no real rust, the engine was running (poorly, idle circuit only), and the tires were flat/dry rotted/bald. The handlebars and comfortable riding position (for a 6'3 230lb dude such as myself) are what sold me on the project, so with a crisp $100 bill we were off. My intent was to restore it while maintaining as much proper vintage equipment as possible, although I have only given myself memorial day weekend to complete the project and a $500 total budget, so there are some constraints. We are already in the middle of drag race season, and I want to have this at the track next weekend for motoring around the pits. This is not a strictly original restoration, so if you are a purist, prepare to be disappointed. HOWEVER, I wont hang a clone on it or any other silliness like that.
I tinkered with the carb a bit (a flojet model) and could not get it to run on the mains at all. However, even with flat tires and a poorly running 3 horse I could still hand throttle around the yard, albeit slowly.
I stripped the bike down to a box of parts, and got my bill of materials together. The wheel bearings were a non sealed 1 3/8 flanged type, and shot. The steering neck had prior repairs done (web repaired, tube rewelded (cracked), some sort of additional bushing brazed in) and the bushings were shot. The scrub brake appears to either have been modified, is missing the wear pad, or is possibly correct and I have yet to find a duplicate on the web. The footpegs were straight, but worn from some asphalt slides. Throttle missing, kill switch not wired. Chrome rusty. Seat shot. Motor plate welds cracking. Missing the fenders. Missing chain guard.
The scrub brake is actually a very nice aluminum casting with clean parting lines, and stainless rod, hardware, springs. Almost too nice to not be OEM 60's American made stuff.
The bottom of the neck tube was also wallered out, and had a "shim" shoved in it to tighten up the bushing. The bushings are 3/8x5/8/3/4 steel rather than bronze.
With all this in mind I decided to sandblast everything down bare and identify any other possible frame issues. I did not find anything else than what is mentioned above. Before blasting, I steam cleaned the frame and found under 4-5 coats of paint the original "challenger green". In the spirit of bringing this back to its former glory, I decided to stick with the original color.
Here the bike is blasted down to bare metal and prepped for fabrication.
Out of attachment space - To be continued
Last edited: