Cat Endura MX
- Thread starter Havasu Dave
- Start date
- Tags endura
That should help answer my question. Also did you say you are using a Comet 20 series driver? If so I will just slip one on a crank and do the math-
http://www.oldminibikes.com/forum/general-minibike-talk/13799-cat-endura-mx-r4015-4.html#post818884
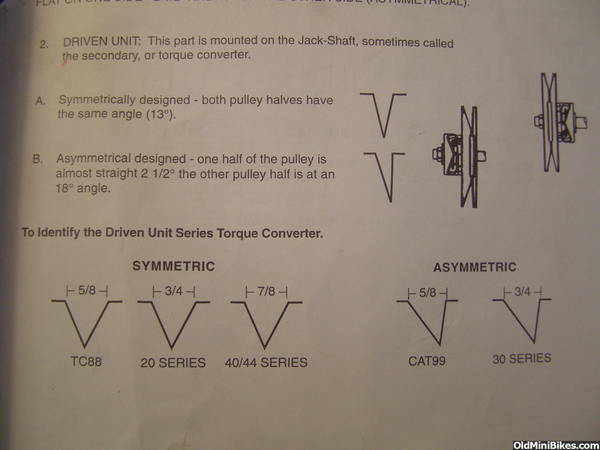
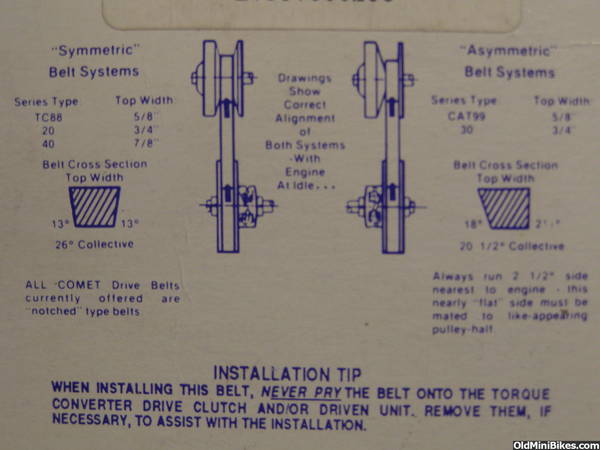
I seem to rememebr those TAVs used a symetrical belt, 5/8 wide like obsolete Comet TC88 and the V-Plex...
You can still find the 5/8 symetrical belts on the Comet website but you have to dig deep.
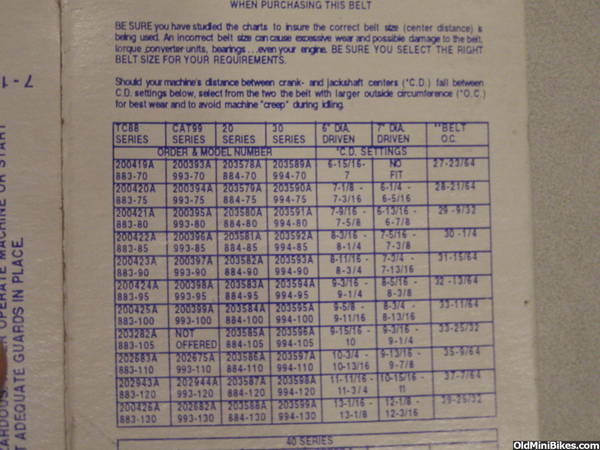
Part numbers are on the 2nd chart down, left hand column...
http://www.gokartsupply.com/beltchart.htm
for some reason they are not listed on the belt order page but they do have them I have purchased them in the past.
Of course if it's not 5/8 symetrical, ignore everything I said........
.
You can still find the 5/8 symetrical belts on the Comet website but you have to dig deep.
Part numbers are on the 2nd chart down, left hand column...
http://www.gokartsupply.com/beltchart.htm
for some reason they are not listed on the belt order page but they do have them I have purchased them in the past.
Of course if it's not 5/8 symetrical, ignore everything I said........
.
Last edited:
I seem to rememebr those TAVs used a symetrical belt, 5/8 wide like obsolete Comet TC88 and the V-Plex...
You can still find the 5/8 symetrical belts on the Comet website but you have to dig deep.
You can still find the 5/8 symetrical belts on the Comet website but you have to dig deep.
Thanks Gerry. Will a Comet 20 handle a 5/8 belt? Would I get a smaller brass bushing to do that? I'm clueless on these systems.
Series 20 takes a 3/4" symentrical belt....you might be better off trying to fit a 3/4" symetrical driven pulley if you can't find a 5/8 driver.
Lots of good info on that site...here is another helpful page:
Comet Drive Belts | Belts for Comet Torque Converters
Once you get the belt dimensions check the OldMiniBikes you'd be surprised what they have in stock :thumbsup:
Lots of good info on that site...here is another helpful page:
Comet Drive Belts | Belts for Comet Torque Converters
Once you get the belt dimensions check the OldMiniBikes you'd be surprised what they have in stock :thumbsup:

I buy everything from OldMiniBikes, unless they don't have it. :thumbsup: For example, they don't have that bronze bushing for a Comet 20. lol...

The crank on my Endura is a standard 2 3/4" long, and it still has the Horstman setup. I can't read the belt though, no numbers. The CTC (center to center) distance is 8". I don't know if the engine was all the way forward or not when I measured that, but according to the chart you would need either a 200421A or a 200422A (both TC88 belts).
Here's a thousand words...
Here's a thousand words...
The crank on my Endura is a standard 2 3/4" long, and it still has the Horstman setup. I can't read the belt though, no numbers. The CTC (center to center) distance is 8". I don't know if the engine was all the way forward or not when I measured that, but according to the chart you would need either a 200421A or a 200422A (both TC88 belts).
If you need a 5/8 wide belt I got the one for my MTD(with the TC88 unit)from here...
Comet 200423 (A-DF) Go Kart Belt, Comet TC88 Series Belt #883-90, Used in People Movers, Golf Carts, Mini-Bikes, and ATV's.
Comet 200423 (A-DF) Go Kart Belt, Comet TC88 Series Belt #883-90, Used in People Movers, Golf Carts, Mini-Bikes, and ATV's.
The original plastic seat bases are almost impossible to find. Even if I did find one, I could never use it, because they were not very robust in the first place, and 42 years old in the second place.
Using the drawings and some photos Derek sent me, I made a plug out of green wet foam. Very easy to work, almost too easy. It's phenolic however and wont dissolve in any of the solvents I tried. I suspect gasoline or other petrochemical would work, but that's a bad idea given that I will be glassing the inside of the form once the foam is removed.
Shown with one layer of matt. Structurally, I should have used more layers, but I have to control the outside dimensions. I will fair the outside before digging out the foam. This was my second attempt- first was balsa and it was a dismal failure as far as getting the right shape.
looks good dave. couldn't you put more underneath after the foams removed for strength
I'll also have to do some build up to it sits level on the bike. I put the same slant in it as original.
Then, I'll build up a fiberglass seat pan that fits inside it, and have it upholstered, glue style. Of course all of this is 20 sanding hours later. :hammer:
Noting ATKRIDERr's valve job on Fistfull's bike, I sent him a block for the same treatment. It was too far gone to be economically repaired, so ATK put this HS40 together. New crank, valves, etc with one of his awesome valve jobs. Also took .0010 off the head and hogged out the flow areas beneath the valves. I've installed a lighting coil and flywheel, lapped it, got it together, just waiting for a carb kit.
When ATK sent me the engine back, he'd included all gaskets, even labeled which ones to use, he sent one of his hogged out intake manifolds for a tilt install, hogged out the intake and exhaust areas, and included a bunch of new and reconditioned hardware, even a new governor spring. Thanks Bill, and thanks for the subsequent advice!

When ATK sent me the engine back, he'd included all gaskets, even labeled which ones to use, he sent one of his hogged out intake manifolds for a tilt install, hogged out the intake and exhaust areas, and included a bunch of new and reconditioned hardware, even a new governor spring. Thanks Bill, and thanks for the subsequent advice!
As expected, the seat pan is requiring a lot of work. Sticking with the West System instead of auto bondo. It's stronger, sands easier, and with less porosity.
Also glassed inside of this thing for strength and alignment. More to do, but getting there.
The actual seat will be a fiberglass affair matching the internal sloped contours, studs glassed in, and foam and upholstery applied with glue. (No wood)

Also glassed inside of this thing for strength and alignment. More to do, but getting there.
The actual seat will be a fiberglass affair matching the internal sloped contours, studs glassed in, and foam and upholstery applied with glue. (No wood)