Fox Campus Minibike Build

#1
Originally, I intended to part out the Fox Campus Minibike and posted said parts here on the forum. Alas, since no sale on the parts I decided to just continue with the build.

I've been accumulating parts for a few years now. The Fox minibike is one that I owned in 1965 at the tender age of 13. After custom building several Honda Dreams, I thought to wrap up my love of restoring cycles with one last build of my youth. Hard to imagine and hard to explain that during the accumulation of the Fox Campus parts I hit a brick wall Sunami health wise and rapid retirement downsize multistate move.

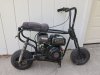
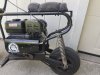
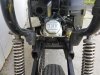
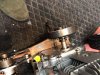
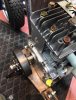
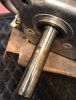
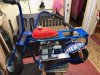
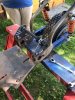
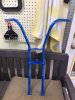
But now, calm waters. I'm going to attach a pic of the frame on wheels as I previously posted for sale. The second pic shows a weld on jackshaft mount as the original jackshaft bearing mount on the frame was worn and out of alignment. Additionally, I rebuilt the front suspension with new rod and bushings. Regrets about no before and after pics of the front forks.
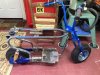
 minibike whole.jpeg
 

Attachments

#2
I wanted to add this comment from Charles. He posted this advice from my parts listing in Classifieds.
Charles S said:
On a swingarm bike, a jackshaft needs to be as close to the swingarm pivot as possible (ideally, the jackshaft would be the swingarm pivot). You should be able to draw a straight line through the jackshaft, swingarm pivot and the rear axle when the suspension is in the middle of its travel. With your jackshaft being so high, chain slack will vary greatly with suspension travel, the chain will become slack when the suspension is compressed and will tighten when the suspension is extended. With this geometry, you will need a spring-loaded chain tensioner on the bottom run of the chain at the very least but it would need a lot of range to compensate for the varying distance between the jackshaft and axle. Before you go further, I suggest you put a chain on it and move the swingarm through its range of motion (remove the shocks to make it easy), and decide if the chain slack problem is something you can deal with. If you don't yet have a chain, measure the distance between the jackshaft and the axle with the suspension compressed and extended.

Many thanks for your advice! Once I get the chain I will report back as to the slack or lack thereof as indicated. I need to move this topic to projects and rides section.
 
#6
Two questions.
1. Jackshaft alignment. Are you using two bearings or four bearings?
2. I bought and returned the Predator engine as it would not fit OVC forward. I see yours is reverse?

I bought two frames, tried all tricks before giving up and doing weld on jackshaft mounts. I'm only an engine away from having a functional scoot.
 

nightgrider

Well-Known Member
#7
Two questions.
1. Jackshaft alignment. Are you using two bearings or four bearings?
2. I bought and returned the Predator engine as it would not fit OVC forward. I see yours is reverse?

I bought two frames, tried all tricks before giving up and doing weld on jackshaft mounts. I'm only an engine away from having a functional scoot.
1. I'm still using the original jackshaft bearing hangers on the frame. I am only using 2 bearings for the jackshaft.
2. The direction my predator is mounted is the only way it will mount and function with the bike moving forward. If you mount it with the piston forward it would spin the tire in the wrong direction making the bike run in reverse. The only way I've seen it work like you mentioned is to make a system of chain and sprockets to make the tire spin the right way.
 
#9
Both of my frames had worn jackshaft mounts. I tried my best to use them to no avail. One would think the engine shaft rotation would be counterclockwise when the OVC was forward, alas not! Very encouraging news! I have been looking for an old Briggs engine, but now I plan to take a trip to Harbor Freight. I appreciate your input!
 
#11
Oblong and telltale signs of chain wear from losing the chain. My first frame was "experimental" as I chopped the frame and reversed the sides. After that failure I decided to weld in the bearings (knowing that would ruin the bearing) with the intent of retaining the outer cup as the new "round". I sourced alternative bearings to fit the smaller dimension when I walked away from the frame and bought another beat up frame.
I told my wife: you witnessed me rebuilding many Honda Dreams and others, but this little scoot is breaking my backside!

The modified frame and a set of beat up forks (partial forks will be listed soon for low money)
 

nightgrider

Well-Known Member
#12
Yes, that is the catch 22 of this frame. It needs a jackshaft to work. The only way I can think to fix it is to weld up the oblong bearing hanger and recut the hole for the bearing. Or you lap weld a new bearing hangers in place of the old bearing hangers. Though it looks like it would get close to where the swing arm bolts to the frame.
 

nightgrider

Well-Known Member
#15
@Spokes Another thought is you could fabricate some a solid tubes in place of the rear shocks. Essential converting it to a hardtail. Then you can run the aftermarket jackshaft bearing hangers where you have them welded. I've considered this on mine. Because the chain adjustment is awful. But I am riding the bike off road, which it was never really intended for.
 
Last edited:
#17
my advice would be to stick with suspension use nightgriders suggestion and use bearing hangers over the shot out holes ,or weld or mount some flat stock as a doubler .You may be able to use the jack shaft mounts you welded on.Cut them off and Just flip them over trim to fit and use them as a doubler on the outside .When i got my fox it had a solid pipe in place of shocks- horrible, plus I was afraid the stress wound break the frame where it welded to the motor pan.
 
#18
All,
Regrets for not responding sooner. My wife and I wanted a walk-in shower. So I stripped out one bathroom to studs and rebuilt it with a walk in shower. I did all tasks, plumbing, modify studs, drywall, electrical, paint and flooring. This ate up my time.

Ok back to the little scoot. Two friends found Briggs engines for me, one is only 2 hp and the other is a 5 hp. I plan to pick up my minibike project sometime mid-July.

I agree that I should have welded new jackshaft bearing mounts over the worn original jackshaft holes and used two bearings. My thinking at the time was to fit 4 bearings. This proved impossible as the frames are slightly bent and twisted. All of my tricks failed. I confess that I over think some projects.

I retro fitted external spring shocks. Not as stiff as pipes, but they don't compress easily. So, just to satisfy myself, I will probably mount the 5 hp Briggs engine. Chain her up and go for a ride.

Push come to shove, if my jackshaft mounts don't pan out, I will just fix my errors.

I appreciate all input! This forum is indeed a pleasure.

Thanks,

Chip
 
#19
Minor project update.

Bought a centrifugal clutch. 1st clutch purchased since The Beatles song "Help" was top 10 list of songs. I noticed the clutch has a dedicated key formed in the bore. Unfortunately, the new 5hp Briggs was a surplus snow thrower engine from MTD. I say unfortunately because the keyway in the crankshaft terminates about 1-1/4 from the block. (see attached pics)

Sourced a clutch with a keyway rather than a "dedicated key". I will extend the crankshaft keyway and install the new clutch. Might have to trim back the crankshaft.
 

Attachments

Last edited:
#20
It's been a while since I last posted. I wanted to share the latest progress on the little scoot. I shortened the crankshaft and removed the internal governor and retrofitted a Chinese carb. I installed an aftermarket throttle assembly and soon wire the kill button. Clutch fitted; chain guard installed. Lots of small "tweeks"

The minibike never had a frame mounted gas tank. Since the snowblower engine does not have a mounted tank, I needed to weld a bar and mount a tank then run fuel lines.

I grew tired of sourcing fenders, so a modified Ohio license will do for now.

Brake cable next, muffler, carb air filter and a seat then the bike will be fueled up. Not sure how she will run, so I hope to have an update soon with that answer.


minibike 11 22 23.jpg minibike 11 22 23 1.jpg
 
Top