"New Baja"

noseoil

Active Member
#21
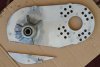
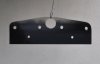
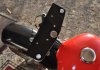
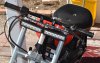
Installed the new brakes (Honda type, slotted shoe material) & took it for a ride.

Guess what? The brakes still suck big time! I cleaned up the inside of the drum with some 400 grit paper, carb cleaner & a clean rag, but they are just terrible. Guess I'll just have to live with them. A disc brake setup would be better, but I'm not wanting to go to the time & trouble on this one. Anyone have any ideas other than not using the brakes at all?
 

noseoil

Active Member
#22
OK, got some work done today, but not as much as I would have liked. Managed to slice open my thumb while removing the exhaust pipe bolt from the frame (exhaust sheet metal, fastener was pretty tight & rusted, OOPS). Had to wake up my wife for the repair, but the work must continue. She said stitches, I said work. I finally won one!

Got the old 196cc motor off & all the other stuff. Installed the new hemi predator & a TAV 30. Had to make a trip out for 5/16" fine thread (24 tpi) bolts, since the ones with the kit are metric & the block & crank are standard threads. If you get a kit, the block takes 4 - 5/16" fine thread X 1" bolts to hold the casting in place. For the crank I used a 5/16 X 2 1/2" bolt, which fit perfectly.

Fender & tank hanging.
Fender-Tank.jpg

The TAV
Tav-Cut.jpg

TAV in place
Tav.jpg

So far, so good
Partial.jpg

Question, forgot to ask, when riding the turns feel like they are "pulling" into a corner & I need to steer out of a turn, or it feels like it will "hook" on me if I'm not careful. Is it the knobby tires grabbing at the pavement, it wouldn't feel like that in dirt maybe?

Also, does anyone know how to wire up some lights with this type of motor? The old one has an extra wire for a head lamp, but this one just has the oil kill-switch & on-off switch.

Will post more progress tomorrow.
 

noseoil

Active Member
#23
OK, found a link to the wiring setup I need to think about. Basically, it's just taking the old stuff off my original motor & then adding it to the Predator to make some juice. Here's the link if anyone is interested.

OK, the link doesn't want to attach. Just google "predator engine wire for lights" & look at the first youtube video.

As bought look
As-s.jpg

Finished look now
Fin-1.JPG

TAV clearance at frame
Tav-clear.JPG

Really appreciate the help from members & links to other mods people have posted on the site. Makes it a lot easier to work on this stuff with some help from friends....
 
Last edited:

SAS289

Well-Known Member
#25
You really took a lot off of that TAV. But hey, as long as it works. Nice bike. And I like the plain painted tank better than the original look.
 
#26
Just a heads up re: a headlight. You can't run the stock headlight with the Pred engines unless you do some modding (see youtube). You could put on a rechargeable on like this. This is what I'm doing with mine. Other than this issue, the pred and tav seem to be a great upgrade for the warrior.
 
#27
I took the charge coils straight from the engine it came with, and they fit perfect on the predator.
I also pulled the predator flywheel and replaced that as well with the one from the original engine.
Works just fine.
I don't care what people say about the flywheels not fitting, they do.
I've got lots of hours on the engine with no problems.
 
#28
I took the charge coils straight from the engine it came with, and they fit perfect on the predator.
I also pulled the predator flywheel and replaced that as well with the one from the original engine.
Works just fine.
I don't care what people say about the flywheels not fitting, they do.
I've got lots of hours on the engine with no problems.
Let's be clear here for safety. Some people care. The taper is not the same. Can you bolt the flywheel on? Yes. However it only seats on a fraction of the crank. The Kohler flywheel and coils are a direct bolt on for the 60363 hemi. I believe it's a model CT270? Double check though.


Sent from my iPhone using Tapatalk
 

noseoil

Active Member
#29
Thanks for the "heads up" on a flywheel swap. It looks like a billet flywheel would be in order, then a rod & governor removal would most likely follow. I guess it never ends. Does anyone know about using the old generator setup with a new Kohler type of flywheel? It sounds like it isn't possible to use the old style generator parts-swap with the new configuration flywheel, or am I missing something here? Is it the inside clearance issue which is the problem?

I like the idea of a rechargeable headlight for now, to deal with that issue. Modding is fun, but it can be a can of worms as well....

P.S. Note to self, check tire pressure for erratic cornering issues. They had leaked down in the last few weeks & I didn't catch it since I was working on the motor swap. It must have been run in the desert & had some very small punctures due to thorns & stickers. Hmmm, new tires next???
 
#30
The deal with the standard billet flywheel is that there is absolutely no room for magnets nor coils.
I believe I may have seen a billet flywheel somewhere made for charging coils.
 

noseoil

Active Member
#31
I've decided to keep the stock flywheel for now & run a battery pack for the headlight. Here's what I'm thinking. The LED lights I found were the 6 LED horizontal type & should mount up to the existing bracket OK. No generator, so I'm going to run a battery pack for now. Found a rechargeable 9.8 amp hour (9,800 MAH) lithium battery pack with charger for about $20. It's 5" X 2 1/2" X 1" so it should fit up inside the fake gas tank & supply enough juice for plenty of light. The numbers say approximately 9.8 amps / 18 watts = 6.5 hours, give or take a few. It should work for a run or two at night & charge up on 110 volts.

Lights.jpg

BatteryPack.jpg

Has anyone tried this system yet?

Here's my "power supply" for charging. Group 27 AGM battery & 100 watt solar panel with inverter power for the 110 volt stuff. 9' X 5' X 4'
Joshua2.JPG
 

noseoil

Active Member
#34
OK, got a mounting plate made & attached. It's 1/8" aluminum 12" X 4"

Plate
Plate2.JPG

On forks
PlateMount.JPG

With lights mounted. Is this overkill? Figured I had them, so why not use them? Still waiting for the battery pack to arrive. Go big or go home!
Light-Mounted.JPG
 

noseoil

Active Member
#36
Anyone know how fast a stock motor with the TAV 30 runs? Finally took it out to the desert yesterday to do a break-in on the motor & it's a lot faster than I thought. Much faster than the old motor & clutch setup was. Had a great time but don't like the soft sand in some spots I was riding, pretty squirrely when I hit that stuff. I'm a bit rusty on riding, but it went really well & the motor pulls like a champ at higher speeds. Never did get it up to full speed really, but kept up with the smaller dirt bikes I rode with. This thing is a blast to ride with the new motor!

Wondering about a better fuel tank setup for this thing. The factory "fake tank" makes it impossible to add gas without removing it first with this motor, since the frame rail sits right on top of the Predator tank filler cap. Thought a bit about the motorized bike tanks, but I still need to do the battery pack for the lights & was going to bury it inside the fake tank. Hmmm.....
 

SAS289

Well-Known Member
#37
Yeah they say the TAV makes a big difference like night and day. You would probably top out around 40 mph. It's all in the gearing.
 
#38
Anyone know how fast a stock motor with the TAV 30 runs? Finally took it out to the desert yesterday to do a break-in on the motor & it's a lot faster than I thought. Much faster than the old motor & clutch setup was. Had a great time but don't like the soft sand in some spots I was riding, pretty squirrely when I hit that stuff. I'm a bit rusty on riding, but it went really well & the motor pulls like a champ at higher speeds. Never did get it up to full speed really, but kept up with the smaller dirt bikes I rode with. This thing is a blast to ride with the new motor!

Wondering about a better fuel tank setup for this thing. The factory "fake tank" makes it impossible to add gas without removing it first with this motor, since the frame rail sits right on top of the Predator tank filler cap. Thought a bit about the motorized bike tanks, but I still need to do the battery pack for the lights & was going to bury it inside the fake tank. Hmmm.....
Put the battery box on the engine plate behind the TC.

As for a "real" tank the Honda Rebel tank is a good fit. The rear mount is a little tricky as it wants to share the same spot as the forward seat mount. I have one on my build off bike and like it. It is very close to the size of the fake tank. You can also use a HD Sportster tank but they are a little tall to me.. Also buy an original Honda tank and not the aftermarket large capacity tank. It is very different from an original in size and shape.

Here are some comparison pics of the stock fake tank and the Honda Rebel tank. The Baja tank on top of the Honda tank.


Doug
 
Last edited:
#39
heres where I put mine, I put on a top plate where the gast tank used to be, and 3d printed a battery box for a small starter battery.
The real tank I put on is one of those $70 ebay deals - looks a little small, but fits well.
NvkjAmJ.jpg
 

noseoil

Active Member
#40
Thanks for the ideas on a battery box & better tank. I put in a call to a local wrecking yard for a Rebel tank, so I'm waiting to see if they have one at a good price.

Koz, that bike look really nice now! I like the idea of a battery box set behind the engine. I'd be worried about heat with the battery sitting on the aluminum motor plate. An AGM battery can fry & should never be charged at above 120f, from what I've read about them. A regular lead-acid car type battery is cycled in a 165f water bath to test it (under hood temps), an AGM would never take that heat. The plate behind the motor might be a better idea for me, but I'm still mulling it over to see what else might work.

Moved the throttle cable last night. The clamps on the throttle control plate don't hold well enough with just the phillips screw. Took the stud & cable fitting off of the old motor & drilled out a threaded hole on the new one, then set it back in place so it's much better now. It's more positive & won't wiggle loose like the "factory" clamps will when running. Plus, it has the 10mm lock nut to adjust slack if necessary. Always something to do!
 
Last edited:
Top