Oldsalt's Caper Cycle. Custom Modified Class.

Oldsalt

Well-Known Member
#41
oldsalt, on my first build i use threaded rod ends with heim joints. work good for adjusting the length correct.
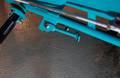
I really like your brake level under the frame.(slick):thumbsup:
another first(design) at oldminibikes.com:thumbsup:
looks alot better under the frame then on the out side of the bike:doah:
I had planned to use a pull rod, above the lower frame rail, to accuate the scrub plate very much like yours. Far superior to the common "long lever type". But after I got the engine in the frame it became patently evident that the Intec engine was much wider than the little Caper Cycle frame. So wide that there was no way to run a push rod back to the scrub brake plate. Considered a Bowden cable because one is hanging on the wall. But a hightech cable attached to a lowtech scrub plate somehow seemd wrong.
 
#42
Your bike is looking good and it seems like you are having a great time building it. :thumbsup: We can tell that retirement life is hard on you. :wink:
 

Oldsalt

Well-Known Member
#43
Your bike is looking good and it seems like you are having a great time building it. :thumbsup: We can tell that retirement life is hard on you. :wink:
Ya. It's rough. Had to get up at 10 AM thismorning because I got hungry. Then had to visit a friend and watch him restore his 66 Vette. If that wasn't difficult enough I then had to browse through a local junk yard to make sure nothing new didn't get past me. Bought a air cooled 7.5 HP outboard engine for 15 bucks. The rest of the day has been work on the Caper Cycle. Now its about 8 PM and I gotta shower and go to Fat Cats pub and heist a few. I just don't get no rest and relaxation.
 

Oldsalt

Well-Known Member
#44
Finially got to assemble most of the parts and get the chains cut to length. One attached pic shows the alum. chain guard. In savvy biker lingo its a "open primary" type. Other picture shows the completed kick stand. The fenders are next. Probably will require removable of the original mounts and then reattach them so they are not so crooked. This frame is the worst assembly job on any weldment I have ever seen. Was welded with arc rod and has undercut all over. Every stock bracket, because of slight misplacement or crookedness, has me wondering if Den Hunt even had jigs to put them together. The other surviving Caper Cycle here in Walla Walla is just as bad.
 

Oldsalt

Well-Known Member
#45
Today was fender day. Found that the front fender was too wide to fit inside the fork legs. The fix for this was to cut a block of material that has the proper recesses and contour across the width of the fender. I used a block of Delrin [ascetal plastic] because that's what was laying in a drawer. Could have used a dense wood like oak. Anyways the block was inserted in the fender. A vice was used to press a 1" round bar into the recesses which made the fender narrower at the fork leg area. See picture. The last pic shows the fender in place. There is other ways of getting the recesses in the steel fender but it pleased me to do it like this because I had done such things before.

Finially got a throttle cable to work so my last excuse for not fireing up the engine was gone. In a previous thread the engine modifications were talked about. The head was milled [about 10.5 to 1 now] and the valves unshrouded inside the combustion chamber. Both ports cleaned up; removed much of the really big lumps and protrusions. The valve springs were packed by adding another spring inside the stock springs which gave about 27 inch pounds spring rate. The crank and flwheel and mag coil were replaced with Animal parts. The stock Intec carb was replaced with a 22mm [in Americian that's 7/8"]. The valve rockers were altered to increase the valve lift to about .300 and increase the duration 50-60 degrees. Boy what a difference from stock! That little motor is loud with the megaphone exhaust. Suppose the higher compression and the fatter cam also has something to do with the noise. My neighbors are going to love it. The engine was pull roap started without too much trouble. The jetting I won't know about until it is on the road.
 

Oldsalt

Well-Known Member
#46
It appears that the only way the upper valve gear on an OHV Intec engine gets lubrication is for there to be a light vacuum in the valve cover to carry a mist to the upper end. The stock set-up has a hose from the valve cover to the intake of the carb. The resistance of the filter causes a small negative pressure. I notice, from a occational picture of a hopped up Intec, that a hose from the valve cover to a filter is sometimes used. No added assist from the intake air. Without experience with this system it was decided that it's best to play it safe and route the hose to the velosity stack. As there is no filter on the velosity stack the only sure fire way to get some vacuum is to put a tube into the air stream. See attached picture. The inserted tube is cut at a 45 degree angle.

I have run out of time for this mini bike build project. Another project, a competition vehicle, that has been on hold has now got hot. All my time will have to be dedicated to it so the Caper Cycle build will have to be shelved for a couple of months which means it will not be completed by the shut off date.
 

Oldsalt

Well-Known Member
#47
Found a couple of hours this afternoon to do some nickel plating on a few Caper Cycle parts. Too hell with chrome...nickel look good and is a lot less trouble. These are all small parts that fit in my 3 gal. tanks. Did not bother to polish the steel parts to a high luster before plating [as is necessary for a really shinny suface]. They were all just "burnished" to a very fine brushed finish. If anyone is interested in how this is done PM me.

The first picture shows a number of parts, wired to gether with copper wire, being put into a degreaser. The degreaser comes in a powdered form and is mixed with water and heated. I use an old french fry cooker to get about 150 degrees.

The second picture is the parts being put into a "pickle". A solution of weak acid. A current is passed through the solution to "deplate" any suface oxidation. The power is about what you'd use to charge your cell phone. Output is 1.5 V. DC at 300mA.

Next picture is of the tree of parts being put in the nickel tank. A very low current is used to plate with nickel. About .05 amps per sq. in. of suface area. Note the aquarium heater that is used to keep the solution at the proper temperature. If you look closely you can see a small white hose that leads into the tank. It supplies bubbles [from an aquarum air pump] that remove hydrogen gas bubbles that are generated by the plating operation. If this is not done the gas bubbles will prevent plating in that area and the part will come out with lots of little dots not plated. The parts can be plated from 30 to 60 minutes. This set-up deposits about 1/1000 of an inch in an hour.

Last picture shows the parts being removed from the solution. If a brighter finish is wanted a very fine polish [white or blue polish] can be used with a buffing wheel. I didn't bother, they look good enough and they will revent rust which is my main goal.

Longer items, such as axle bolts were plated only on the ends. That was done by submerging only the ends.
 

Oldsalt

Well-Known Member
#48
Got some time to work on the Caper. Made a trial assembly of almost all the pieces and gave it a test ride. The thing is dangerous for a new rider or one that thinks all mini bikes have got to be slow. Not a good idea to jack the throttle unless one is ready for things to happen. I am entirely satisfied with the low-buck hop up of the engine. It worked better than expected. Glad its got an Animal crank and flywheel and etc. Had to drill out the main jet to get it fat enough on the upper end. The 10 to 1 compression, 20 degrees advance, and the increased duration and lift of the cam made a heck of a difference in engine performance. The only safe way to start the engine is to have the front wheel against a tree or like item.

The bike is now painted. Quickly found out that the megaphone exhaust will burn a hole in my pants if I lean my leg against it. Not a problem as long as I'm sitting on it. So a heat shield was chatter-broke out of a scrap of aluminum sheet, then sanded and polished. Threaded standoffs were welded to the megaphone and the shield attached with button head screws. See attached picture.

I'm going to try to finish it by the deadline.
 

Oldsalt

Well-Known Member
#51
Finished the finial assembly today. The class is Custom Modified. Started with a very badly abused Caper Cycle frame. The build was done with an eye to what a "Cafe Racer" mini might look like. However traditional parts, such as old style wheels and clutch were used. Used a scrub brake because it was more traditional that a disk. The clutch guard was made to look like an open primary on a racing motorcycle. The new fuel tank was positioned behind the seat as was the original. It has an internal filter and a shut-off valve. All mild steel fasteners, and a lot of other parts, were plated by me in the basement. The engine hop-up was done in my little machine shop. The seat, paint and everything else was also done here. This has been a lot of fun. Didn't think it would be finished in time...but the other project that I was commited to slowed down because of lack of components.
 
#52
The bike looks good. :thumbsup: I especially like the gas tank and the pipe. Is this what retirement is all about, turning junk into treasures or do you just putt around? :scooter:
 
Last edited:
#55
WOW!!! Salt you do great work! the tank, the megaphone, and the nickel plating looks so good, how much gas does the tank hold?:thumbsup::thumbsup::thumbsup::thumbsup::thumbsup::thumbsup::thumbsup::thumbsup::thumbsup::thumbsup::thumbsup:
dave
 

Oldsalt

Well-Known Member
#56
can we get a picture of the left side of the bike?
Hayden

Here is a pic of the left side. Let my youngest son ride it but that is all. I have a story for guys that come in the shop and see it and then ask: "Does it run?" My answer is yes it runs but it has a fuel leak and should be looked at before it is ridden. So much weight is on the rear wheel that it's dangerous so that "story" keeps them safe.
 

Oldsalt

Well-Known Member
#57
WOW!!! Salt you do great work! the tank, the megaphone, and the nickel plating looks so good, how much gas does the tank hold?:thumbsup::thumbsup::thumbsup::thumbsup::thumbsup::thumbsup::thumbsup::thumbsup::thumbsup::thumbsup::thumbsup:
dave
The plating is nice because it prevents rust. Nickel is easy and the set-up is cheap considering what it costs to get even a couple of parts done at a plate shop. That little fuel tank holds approx. 1-1/2 quarts.
 
Top