The “Rare” CAT Twister Trike

#1
Well ya it’s “rare”…only one in existence as a matter of fact...... cause I dreamed it up !......:rolleyes:……

I love trikes…but I don’t own one nor have I ever owned one…but I’ve always secretly admired them.

I love CAT mini-bikes, but I don’t own one nor have I ever owned one …but I’ve always secretly admired them too.

I’ve had this idea kickin around it my head for some time now for a three-wheeler build. Not a big knobby-tire-high-suspension trike, but a simple, clean looking low slung street machine… a trike that still looks like a mini-bike if you know what I mean….
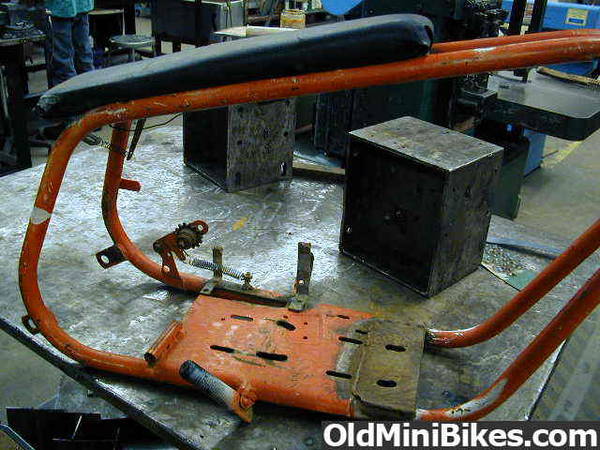
So when member Frank Davis posted a CAT Duster roller in the classifieds over the winter I took one look at it and said “that’s it!!”. The frame had exactly the look and proportions I was looking for to lay the foundation for my dream trike….. simple and clean lines…but with that “bad attitude” 60’s chopper style. It was a nice solid roller, but a long way from ever being restored back to its former glory, so it was the perfect candidate for re-incarnation……..


...to be continued
 
Last edited:
#2
Being a cheap-skate at heart, my first thought was to use up some of the kart racing parts I had lying around and meld it with the Duster to create a "Franken-Trike" of sorts. But then I started thinking it would be a lot cooler if I could build it entirely out of oem CAT/ HPE/ Muskin parts….like if I worked at the CAT factory back in the day and had access to all the components…this is what I would build.
It was a struggle at first…a rim here, a chrome star there, …then I hit the jackpot !!!…..Scooter Boy is parting out his CAT Eliminator. Suddenly I have another rear wheel, some nice wheel stars :drool:, a bitchin gold/green/black metallic seat with the shorty sissy bar :drool::drool:…and oh yeah, an original CAT chrome clutch cover with decal :drool: :drool::drool:

For good measure, he offers the original little spoon brake lever, cable, cable clips and a NOS CAT complete throttle and dummy grip he had stashed in his wall safe..:shifty:

It took some persuading, but I eventually also convinced him to sell me the original 3-1/2 hp Tecumseh out of the bike with it’s factory black paint, engine tag and decals.

I should have just bought the whole damn bike from him to begin with :facepalm: but I was hooked on using the Duster frame….

The pieces of the puzzle were falling into place….
 
#3
Around this same time, Yellowhand started offering the NOS Peerless differentials for sale along with the matching sprocket and some cool NOS Cheng Shin slicks…and so I continued stockpiling the parts I thought I’d need.

Next….I enlisted the help of my faithful assistant…my son Eric…he’s a good kid and my best friend. He thinks all my ideas are good ideas even if they’re not. :smile:

We both enrolled at the local Tech school evening welding course…(had to sneak him in cause he’s only 15) and we started in on the project 2 nights a week. …..

 
#4
First step…cut this baby in half …:scared: :hammer:…I was initially thinking of using the bandsaw :hack: but opted for the plasma cutter :weld: …well just because it’s fun to use :smile:

This is the point in the project when you’re standing there with two halves of a frame in your hand, and you're saying to yourself.. "Holy :censure: "what a mess!! I hope the hell I know what I’m doing”….…:doah:


:doah:
 
Last edited:
#5
Like I said earlier…we wanted to keep the mini-bike look…so we're trying to widen the rear track to accept the differential while squatting it down a little in the back and keeping the front “narrow” looking. We messed around tack welding it together and cutting it back apart a half dozen time to get the stance right….

Made a cardboard template and used it to cut out the new wider (and tapered) motor plate and tacked it in…we positioned a dummy motor to what looked to be the best location and transfer punched the four mounting holes then we laid the original motor plate on top to lay out the adjustment slots just as they were….cut the tacks off removed the new plate, milled the slots in it and welded it back in...


Last edited:
#6
April fools?
WOW, you are a brave dude, kart! That looks like something I would have taken one look at, farted and walked away. And now look at the mess you made!!! This is gonna be good.
 
#8
i dont even like three wheeled..anything.. but this is looking pretty good so far.:thumbsup: i know what you mean when you cut stuff up and think... ohhhh shit. now ive done it.
 
#11
ok...where was I...oh yeah....

I sourced some ¾" bearings, cassettes and mounting brackets for the back axle…actually I couldn’t find the proper cassettes to hold the ¾" bearings :shrug: so I had to weld in some bushing rings so we could utilize the 1”’ brackets….woulda been easier to make them from scratch :facepalm:


We were using some homemade wooden wheels to get the differential located…


but now it was time to start thinking about some real wheels and tires….but what to use..?….well, real CAT wheels of course!!
Problem was how to get the CAT wheels to be “drive” wheels…both of them in this case since we’re using a differential. I noticed the rear CAT wheels have a longer hub (with a mounting flange for the sprocket ) than the front wheels where the hub is essentially flush with the rim’s edge.


… so I contacted BayAreaBurrito who dug a nice one out of his shed for me.
 
Last edited:
#12
I had a pair of old kart wheel flanges made for a ¾ axle with a hub broached for a key.
I cut the flange away using a shell mill chucked in the tailstock of the lathe and then turned down the o.d. so it was a light press fit into the CAT wheel hub.


I then cut this part in half (wasn’t long enough to reach through the entire wheel hub) and repeated the procedure so I ended up with a total of 4 plugs that were drilled and keyed to accept the ¾” axle.
This is where the extra length of the CAT rear wheel hubs comes into play. I cut the sprocket mounting flanges off the CAT wheels, but left about ½” of the hub tube protruding past the edge of the rim…then I drilled clearance hole so I could easily access the locking set screw on inboard side of the wheel. I pressed one into each end of the wheel hub taking care to re-align the keyway with a piece of keystock in an axle stub….. and then welded them into place. The outer half of the wheel has the bushing flush with the rim’s edge as original, along with the hole for the valve stem so it's conveniently located… while the inside of the wheel has the extended side with easy access to the locking set screw


….worked out great!!

Once you have those solid hubs installed the Cat wheels really takes on a substantial heavy duty feel to them….
 
Last edited:
#13
To get a “chrome” edge on the rims, we chucked them in the lathe and spun them up while polishing with various grit paper and finally some Scotch Brite….since its not really chrome and just plain steel we shot some clear on them to keep it nice.


Then we made a mask for the chrome edge so we could shoot the semi-gloss black inside the rest of the wheel. Yes I even consulted with Derekbmn and B.A.B. to be sure that semi-gloss black is "factory correct" :rolleyes:

Polished up the CAT stars and assembled the wheels.
 
Last edited:
#14
As loyal as I am to our country and a staunch advocate of using vintage made in USA parts…I have to admit these old Cheng Shin slicks that I got from Yellowhand were just the ticket….just the right diameter (11-1/2” inflated) and I really dig the “square” profile . Cheng Shin’s been around as a mini-bike supplier since back in the day so even if they weren’t oem on CAT’s they still qualify as vintage in my book.


#16
Ok…the front wheel. Here’s where we had to get a little creative and bend the “CAT OEM Parts Only” rule….

I didn’t want to use the 6” wheels all around…I thought it would look a lot cooler with a bigger (10”) front wheel and tire. Someone will probably correct me here, but after researching some it looked like the only “big wheel” bike CAT offered was on the Endura ……which used a wire spoke wheel. Even if I could find one, I didn’t think it would look right on this project.

Make one.

I got hold of a pretty decent 10” mag wheel from a Rupp Scrambler/Roadster.
(Does anybody in the world have one that's not rusted/pitted on the outer rims...every friggin one I've ever seen is :censure:


I thought I could use it almost as is…I got a 2nd cast bearing support from Smallbikes so that both sides of the wheel would look symmetrical and the width looked good for the forks


however…...


.
 
Last edited:
#17
I simply had to utilize the iconic CAT star on the front wheel so it matched the rears, but the star didn’t fit right or look good next to the big “windows” in the Rupp wheel center. We decided to make our own so we pulled the center out of the wheel and started laying out a new blank from a piece of 1/8” steel plate.

I used a trick I learned from an old machinist to press the 12” square steel plate up against the chuck jaws in the lathe using a bull nose center and some industrial strength two-sided tape. Then I used a parting tool to s-l-o-w-l-y cut the new blank out at the correct diameter….


:doah:...looks like I was spinning it at 3000 rpms...take my word for it, it was spinning slow.

 
Last edited:
#18
Chucked the blank in the lathe and bored out the center hole to size.


We then held both plates together and expanded the jaws on the lathe to hold them concentric while we clamped them tight….


Using transfer punches we laid out the holes for the RUPP center bearing support and the outer chrome rims.

 
Top