Things to do while you are in quarantine
- Thread starter manchester1
- Start date

Have also been spending quality time playing my electric Bass's, mostly to classic rock & classic R&B,, on my old trusty Hi Fi . ")
View attachment 260788
View attachment 260788
Attachments
-
 198.4 KB Views: 20
 -
 453.6 KB Views: 20
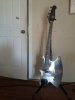
Sweet bass rig. I play guitar and bass. But I've playing mostly bass. Here are a couple of my basses. A custom one off axe that I chromed and my Gene Simmons Axe
Very unique/cool looking axes there , I also like the Extra.
I tune in open D - ''DGCF'', & use D'Addario ECB 82 flat wounds.
My other Bass is a ''semi vintage'' Ibanez SR400 FL ''Fretless'' .
I
Today's quarantine project: See what it will take to breathe some new life into this old blast cabinet that I got for free...

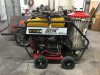
I had a friend call me asking if I wanted a hot water pressure washer. It’s a two year old northstar 3000psi 4gpm with a Honda gx390. It hadn’t been used in a year. He said the burner didn’t work. So I gave him $400 and did a motor service and pump oil change. Figured out the burner problem. It was a flow switch and thermostat. Now I’m up and running. Only took a month of messing with it and waiting for parts.
I hate to say it but my life hasn't changed much during this "zombie apocalypse". I live a dull, boring life all the time, anyway. LOL Staying home is no problem when most everything I have needs repair. I'm NEVER bored! For years now I've joked about present occupation. Since I retired I tell people I "eat and watch TV for a living". My older grandkids are getting about go kart and minibike age, so now is a good time for me to get busy repairing, restoring, assembling, etc. I tease my wife about all of this sheltering in place/quarantine having an adverse effect on me and my mental health. I have NO problems with any of it and she knows I'm kidding! And even though I joke about it, I don't take the issue lightly as there are those that do have a tough time with the isolation, being out of work, worrying about contracting the virus, etc. To those people I say, do not let this situation get you down! We will get through this! Keep your hands and minds busy! The glass is 1/2 FULL! As for me and what I'm doing besides minibikes, I have a pump house to build, my air compressor won't start, my pressure washer pump needs rebuilding, my Harley needs to be put together, my very fast and manly Honda 250 Rebel needs a new headlight, the roof on my shop has a couple of leaks, some fish in my pond need catching, a lot of Cowboy movies and shows need to be watched on my TV - the list goes on and on.
Thanks, Man !
Very unique/cool looking axes there , I also like the Extra.
I tune in open D - ''DGCF'', & use D'Addario ECB 82 flat wounds.
My other Bass is a ''semi vintage'' Ibanez SR400 FL ''Fretless'' .
I
Very unique/cool looking axes there , I also like the Extra.
I tune in open D - ''DGCF'', & use D'Addario ECB 82 flat wounds.
My other Bass is a ''semi vintage'' Ibanez SR400 FL ''Fretless'' .
I
I also have an import version of the Musicman Stingray 4 string. But it's a really nice bass that I got used on the cheap that came with a Hipshot bridge and tuners.
I play mostly classic rock and classic metal so I play in either standard, half step down tuning or dropped D. For strings I use Ernie Ball bass slinky's.
Ibanez makes good stuff. I've owned a couple of their guitars and basses over the years and have always wanted a fretless and was going to get one for my last band but unfortunately, we broke up.
I also have an import version of the Musicman Stingray 4 string. But it's a really nice bass that I got used on the cheap that came with a Hipshot bridge and tuners.
I play mostly classic rock and classic metal so I play in either standard, half step down tuning or dropped D. For strings I use Ernie Ball bass slinky's.
If you ever get a Fretless,, I would definitely try ECB 82's on it.
I

Wife & I came up with a new game, it's called ,, -
- ''Count the sole occupants driving down the road in their own vehicles with masks on, & the windows rolled up''. LOL !
One of my neighbors made a hilarious comment about that saying,,
''That makes as much sense as being alone ,& wearing a condom'' . ''LMFAO'' !!!!!!!!!!!!!!!!!!!!!!!!!!
- ''Count the sole occupants driving down the road in their own vehicles with masks on, & the windows rolled up''.
LOL !One of my neighbors made a hilarious comment about that saying,,
''That makes as much sense as being alone ,& wearing a condom'' .
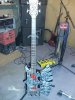
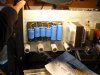
''LMFAO'' !!!!!!!!!!!!!!!!!!!!!!!!!!Today's quarantine project: Home brewed zinc plating on steel parts. This is really just an old science fair project for school kids, enlarged slightly. The process is not unlike building wire spoke wheels. The results are all around us, but few of us ever seem to tackle doing it ourselves. And as with building those wire wheels, it turned out to be quite simple to do.
I found a good description of the process and necessary materials on a dirt bike forum. I also turned to my old pal, You Tube, for pointers.
Only a few ingredients are needed to make the plating solution. Everything is available at local grocery and hardware stores. None of it is harmful. You do need some muriatic acid (HCl) to etch the steel before you plate. That stuff requires careful handling, but it was right there at the hardware store.
Hat's off to @Havasu Dave for his help. Dave gave me a roll of the type of strip that you put on the roof of your house to control moss, repurposed in this case as the zinc source. He also gave me a low voltage DC power supply, but you can use almost anything, including one of those lantern batteries with the curly wire contacts on top.
The plating process goes like this: Clean the part throughly with a wire brush or bead blaster. Dip it into the acid for a few minutes to etch the surface. Rinse the part in water and then into the plating solution it goes. Electrodes are attached to the zinc source (anode, or positive), the part to be plated (cathode, or negative) and in just awhile enough zinc swims through the juice to completely coat the part.
I started with a random rusty washer just to see if this really works. It came out of the solution looking dull and awful, but that's just scale from the plating process. A quick hit on the wire wheel removed the scale and suddenly the washer shined so bright that it was hard to photograph.
I am pleased.
It's not really effective to spend my days restoring rusty washers, but this seems to have tremendous potential for making all sorts of things (chain adjusters, axle spacers, shift levers, etc.) look brand new again.
The detailed instructions that I followed were sent to me on a .pdf doc. Let me know if you'd like to have a copy.
Last edited:
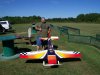
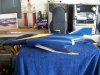
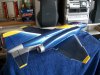
Here's a pic of the latest state of progress on the F4.
Got ''a lot'' of finishing yet, but hope to have it ready for paint within couple of weeks ….
I
View attachment 260397
Got ''a lot'' of finishing yet, but hope to have it ready for paint within couple of weeks ….
I
View attachment 260397

Today's quarantine project: Home brewed zinc plating on steel parts. This is really just an old science fair project for school kids, enlarged slightly. The process is not unlike building wire spoke wheels. The results are all around us, but few of us ever seem to tackle doing it ourselves. And as with building those wire wheels, it turned out to be quite simple to do.
I found a good description of the process and necessary materials on a dirt bike forum. I also turned to my old pal, You Tube, for pointers.
Only a few ingredients are needed to make the plating solution. Everything is available at local grocery and hardware stores. None of it is harmful. You do need some muriatic acid (HCl) to etch the steel before you plate. That stuff requires careful handling, but it was right there at the hardware store.
Hat's off to @Havasu Dave for his help. Dave gave me a roll of the type of strip that you put on the roof of your house to control moss, repurposed in this case as the zinc source. He also gave me a low voltage DC power supply, but you can use almost anything, including one of those lantern batteries with the curly wire contacts on top.
The plating process goes like this: Clean the part throughly with a wire brush or bead blaster. Dip it into the acid for a few minutes to etch the surface. Rinse the part in water and then into the plating solution it goes. Electrodes are attached to the zinc source (anode, or positive), the part to be plated (cathode, or negative) and in just awhile enough zinc swims through the juice to completely coat the part.
I started with a random rusty washer just to see if this really works. It came out of the solution looking dull and awful, but that's just scale from the plating process. A quick hit on the wire wheel removed the scale and suddenly the washer shined so bright that it was hard to photograph.
I am pleased.
It's not really effective to spend my days restoring rusty washers, but this seems to have tremendous potential for making all sorts of things (chain adjusters, axle spacers, shift levers, etc.) look brand new again.
The detailed instructions that I followed were sent to me on a .pdf doc. Let me know if you'd like to have a copy.
What's that Zook I see hiding under a cover?
Someone into moto?