I'm getting ready to hook up the throttle on my old 2-1/2 horse Tecumseh.The return spring on the bell crank is broken,but I can get around that.What I need to know is the position the governor arm and throttle is supposed to be in at rest.I know on some things the throttle is wide open until the engine fires,then the governor brings it back.I have to make a link to go between the throttle and governor arm,so that is why I'm trying to figure out how they go at rest.I have hundreds of books in my garage,with maybe 75 for small engines,going back 60-80 years.Lots of Wisconsin,Clinton,old Briggs,Lauson products,Cushman,Onan,even Maytag.Not one piece on Tecumseh.It was an old Sears direct replacement engine for my mini in the early 70's so I'm not sure if the numbers on the tag are Sears or Tecumseh.Somebody may have explained the numbers to me once,but if I do a search my computer times out before it is complete.The numbers on the tag are,model # 143-597022 and the serial # is,9027 13282.
2-1/2 HP Tecumseh governer
- Thread starter keith true
- Start date
- Tags 2-1/2 governer tecumseh

Keith, at the top of your gov arm is a solid linkage to the throttle on the carb.Then down lower on the gov arm there is a bunch of holes.on about the second hole down from the top a spring goes from there over to the cable pull that is on the shroud.Make sure it has a return spring to pull this lever back down when you let go of the throttle.That's it.

Your pictures confirm what I thought,I still do have the original link and springs,they are just junk.So,on initial setup do I push the governor arm all the way to the left,the throttle plate arm to idle,then set the link to fit? It looks like that is the only way it would go anyway,but I do know on some things the throttle is open at rest until it fires.Looking at this leads me to think it is not so with this design.My spring on the bellcrank is broken,but I can just add another spring to pull the cable straight down on that.I can't remember if this engine is a 2-1/2 horse or a 3.I know it replaced the original 2-1/2 that came on the bike and it looked the same.
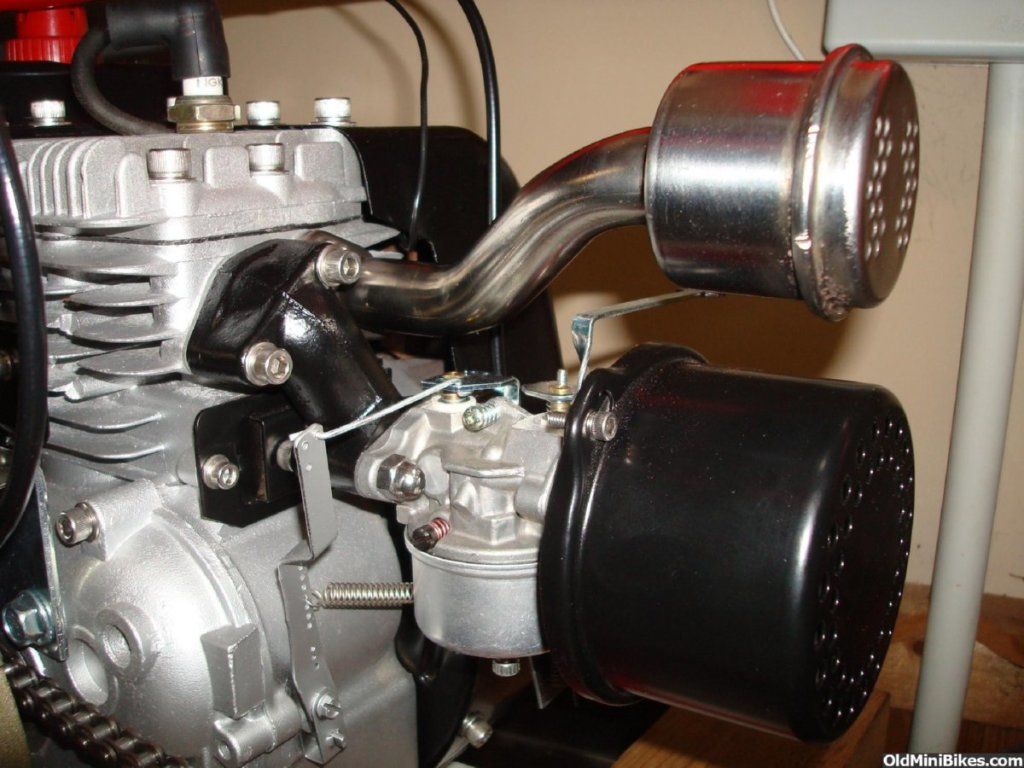
The governor arm should look just about as it does it the drawings.. The very very bottom of that governor arm is like a 3/4 centimeter squared, clip thing, that clamps onto your internal parts, then that long arm has adjustment in it by loosening the screw holding it to that square clamp dude... Typically you shouldn't have to ever mess with all of that, but for the people finding the thread and have NONE of their parts in place....
When you are at full resting idle (shut off) , that clip forms pretty close to a 90 degree angled fit to the rest of the engine....
Then the arm screwed to that square clip, should typically be adjusted so that it is tipped at a slight angle, maybe like 15 degrees, to the PTO side of the engine....
When it is adjusted right and resting at idle, it will look pretty well as the illustration has it drawn... In my honest opinion they may have exaggerated the angle by 5 degrees, and it could look SLIGHTLY more vertical, but thats just my opinion.... :laugh:
Then, to MAKE SURE that you have BEYOND FULL CONTROL of your engine.... I screw the idle speed screw on the carburetor completely out, until it is no longer touching the throttle, and I know my butterfly is at complete closed position... This will ensure you can have the complete range of motion.. :thumbsup:
NOW... When your carburetor, AND governor arm are BOTH at stop or dead idle...
Your small linkage rod, about 2 inches long, will run from your governor arm, to the throttle plate on the carburetor... There are two holes in the arm for the linkage, and you want the one nearest the carburetor... THEN on the carburetor, theres gonna be 4 or 5 holes, you want the one in the corner, nearest the air filter, nearest the governor arm...
You pull the throttle open, governor arm pushes the throttle open...
The little rod is going to sit ON TOP of the throttle plate at your carburetor, then penetrates the hole coming down from the top.... the rod has about 1/2 or 3/4 of an inch of strait, then makes a slight bend (maybe 10 degrees) which sends the rod downwards towards the governor arm, then at the governor arm, the rod penetrates through the governor arm from the front, or surface facing you....
The EASIEST pretty well ONLY WAY in the world to install it, is get your rod in both holes as they belong, BEFORE putting the carb onto the intake manifold...:facepalm:
Once it is all bolted down and in place there, you want to use your finger to push the governor arm over gently, and watch the throttle be pushed open, then let it return, to ensure full range of motion..
The throttle plate (where the idle speed screw meets throttle) also has a little nub at the bottom, which is bent outwards on the same piece of metal that your idle speed screw is using as a bump stop.. The angled over nub will crash into the body of the carburetor when you are at full throttle, also acting as a bump stop for the high end..
I custom fabricate all of my bump stops because most are factory preset to stop at like 3/4 wide open throttle, so I adjust mine so it achieves full wide openess.. :laugh: But I don't recommend screwing with any of that part for right now.. :laugh:
BUT... when the throttle and governor are assembled... You SHOULD BE able to put a finger against your governor arm, and push the throttle open, until the throttle crashes into the body of the carb (wide open) then you should release pressure, and watch the system return RIGHT BACK to idle all by itself pretty much.. It may not SNAP RIGHT BACK SHUT because there is a lot of weight and mechanical doodads for the very small spring on the carburetor to pull, but it should move very freely...
Make sure you can put your finger on the governor arm, and literally go wide open, to idle, wide open, idle, wide open, idle... Just by wiggling your finger on the governor arm.. There should be NO resistance or binding... If you have to put ANY kind of real pressure on the system for it to move.. Something is wrong...
QUITE!! Often, that small rod has been bent some just ever so slightly, and now it won't roll through the motions as smoothly as it should, because it's bent out of whack and is binding....
So make sure that shit all works great before going any farther.... :mellow:
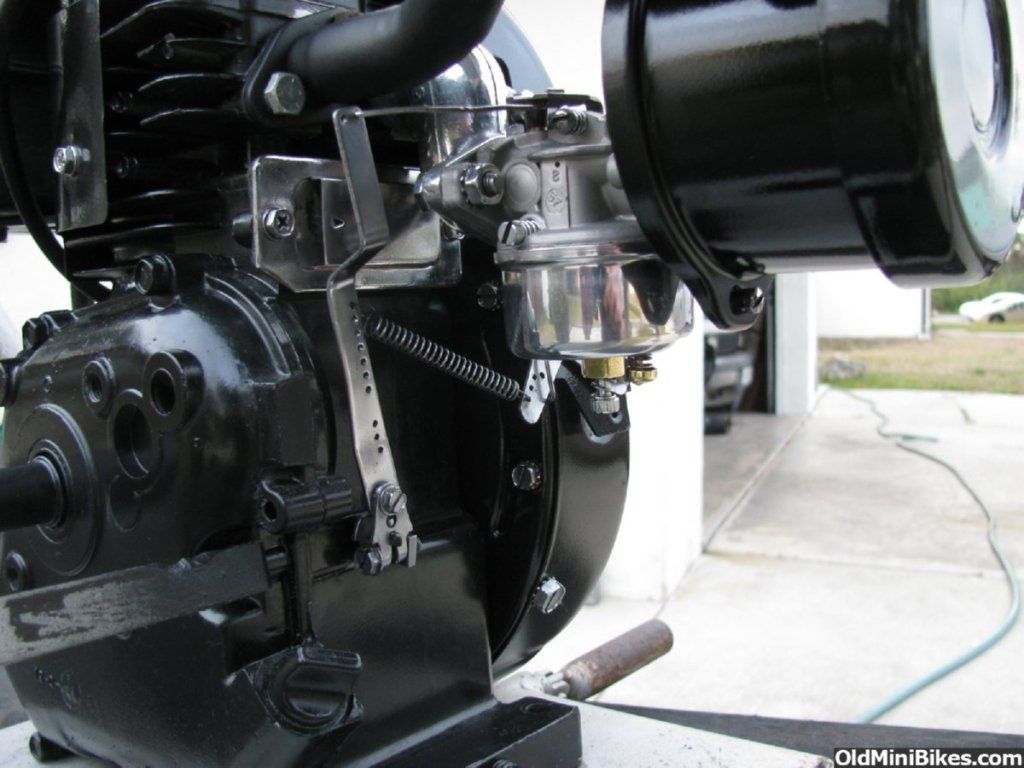
Then, like stated before, your governor spring should be upwards towards the top of your governor arm, and then attached at the lowest point (longest throw) on the throttle linkage piece that is on your blower housing and the beginning of the entire system... It's easier to put one end of the spring on your first boomerarng shaped piece, THEN hook it to the governor arm..
You want to make sure that first boomarang looking arm is moving freely before messing with it anything.... (it's supposed to be VERY springy and spring back on its own) but as we know, yours is broken there.. :laugh: Which is not an issue as you can just ad a return spring... :mellow:
But as long as your boomerang is moving easily..... ( i like to) adjust my cable adjuster (if applicable) to right about in the middle, but having more room to adjust MORE tension into the the system if need be.... Thats about best scenario to hook your cable on with, as it will allow ya to do whatever ya need for the most part...
when your boomerang is hooked all the way to the carburetor, whilst the entire system is still at idle resting poition... Make sure all of your cable adjusters are set so that they have movement in both directions, but more able to add tension than relieve tension....
Then attach your cable to your boomerag at that adjusted meeting point, and you should be all great to go for a test run....
Attach your return spring so that it is pulling on the boomerang, in such a manor that it is pulling the twist grip shut all the way back to idle all by itself, and you are able to pull the throttle wide open until parts start binding up and stops moving at the boomerang area...
twist the throttle open, release, wist the throttle open, release.......
You should now be able to watch the entire system work, by twisting the grip.... Make sure it is working before every trying to start the motor... ALSO!!!! have a working kill switch on the handle bars, whee you can shut it off with one thumb, whilst holding both hand grips in your hand.. even if your kill switch is a ball or bare copper wiring that you mash to the handle bars...It is one of those ( Gotta have it ) parts
If you've managaed to make it THIS far.......
Screw your idle speed screw back out so the engine can idle again.. :laugh: don't forget that...
You should be able to fire the thing up and see what ya get.. :thumbsup:
If the you twist your grip wide open, but the motor is limited to real low rpms and doesn't want to rev up, make sure everything that you are moving has a full range of motion, if so... Your spring needs to be moved up farther on the governor arm, which allows you more leverage to fight against the governor...
If you hit the throttle and it goes like a son of a bitch and seams like it is never going to limit it's RPM's and gonna blow up, move the spring down the arm.. :laugh:
As you stated originally, the governor will pull the throttle open a little when NOT RUNNING, to allow an easier start.... If your entire system is working pretty well right...
You should be able to use the main cable adjuster, where the cable meets boomerang, and start screwing the throttle tighter, until you see the butterfly start to pull open... :thumbsup:
in best case scenario, you will see the butterfly hold like 1/2 open when the bike is not running.. It will be a gentle 1/2 open, like you can touch it and it will close right off... If it's a STRONG 1/2 open, and the governor can BARELY PULL the throttle to idle, you have it too stiff, and will cause it to want to race and not idle down real well...
When you are at full resting idle (shut off) , that clip forms pretty close to a 90 degree angled fit to the rest of the engine....
Then the arm screwed to that square clip, should typically be adjusted so that it is tipped at a slight angle, maybe like 15 degrees, to the PTO side of the engine....
When it is adjusted right and resting at idle, it will look pretty well as the illustration has it drawn... In my honest opinion they may have exaggerated the angle by 5 degrees, and it could look SLIGHTLY more vertical, but thats just my opinion.... :laugh:
Then, to MAKE SURE that you have BEYOND FULL CONTROL of your engine.... I screw the idle speed screw on the carburetor completely out, until it is no longer touching the throttle, and I know my butterfly is at complete closed position... This will ensure you can have the complete range of motion.. :thumbsup:
NOW... When your carburetor, AND governor arm are BOTH at stop or dead idle...
Your small linkage rod, about 2 inches long, will run from your governor arm, to the throttle plate on the carburetor... There are two holes in the arm for the linkage, and you want the one nearest the carburetor... THEN on the carburetor, theres gonna be 4 or 5 holes, you want the one in the corner, nearest the air filter, nearest the governor arm...
You pull the throttle open, governor arm pushes the throttle open...
The little rod is going to sit ON TOP of the throttle plate at your carburetor, then penetrates the hole coming down from the top.... the rod has about 1/2 or 3/4 of an inch of strait, then makes a slight bend (maybe 10 degrees) which sends the rod downwards towards the governor arm, then at the governor arm, the rod penetrates through the governor arm from the front, or surface facing you....
The EASIEST pretty well ONLY WAY in the world to install it, is get your rod in both holes as they belong, BEFORE putting the carb onto the intake manifold...:facepalm:
Once it is all bolted down and in place there, you want to use your finger to push the governor arm over gently, and watch the throttle be pushed open, then let it return, to ensure full range of motion..
The throttle plate (where the idle speed screw meets throttle) also has a little nub at the bottom, which is bent outwards on the same piece of metal that your idle speed screw is using as a bump stop.. The angled over nub will crash into the body of the carburetor when you are at full throttle, also acting as a bump stop for the high end..
I custom fabricate all of my bump stops because most are factory preset to stop at like 3/4 wide open throttle, so I adjust mine so it achieves full wide openess.. :laugh: But I don't recommend screwing with any of that part for right now.. :laugh:
BUT... when the throttle and governor are assembled... You SHOULD BE able to put a finger against your governor arm, and push the throttle open, until the throttle crashes into the body of the carb (wide open) then you should release pressure, and watch the system return RIGHT BACK to idle all by itself pretty much.. It may not SNAP RIGHT BACK SHUT because there is a lot of weight and mechanical doodads for the very small spring on the carburetor to pull, but it should move very freely...
Make sure you can put your finger on the governor arm, and literally go wide open, to idle, wide open, idle, wide open, idle... Just by wiggling your finger on the governor arm.. There should be NO resistance or binding... If you have to put ANY kind of real pressure on the system for it to move.. Something is wrong...
QUITE!! Often, that small rod has been bent some just ever so slightly, and now it won't roll through the motions as smoothly as it should, because it's bent out of whack and is binding....
So make sure that shit all works great before going any farther.... :mellow:
Then, like stated before, your governor spring should be upwards towards the top of your governor arm, and then attached at the lowest point (longest throw) on the throttle linkage piece that is on your blower housing and the beginning of the entire system... It's easier to put one end of the spring on your first boomerarng shaped piece, THEN hook it to the governor arm..
You want to make sure that first boomarang looking arm is moving freely before messing with it anything.... (it's supposed to be VERY springy and spring back on its own) but as we know, yours is broken there.. :laugh: Which is not an issue as you can just ad a return spring... :mellow:
But as long as your boomerang is moving easily..... ( i like to) adjust my cable adjuster (if applicable) to right about in the middle, but having more room to adjust MORE tension into the the system if need be.... Thats about best scenario to hook your cable on with, as it will allow ya to do whatever ya need for the most part...
when your boomerang is hooked all the way to the carburetor, whilst the entire system is still at idle resting poition... Make sure all of your cable adjusters are set so that they have movement in both directions, but more able to add tension than relieve tension....
Then attach your cable to your boomerag at that adjusted meeting point, and you should be all great to go for a test run....
Attach your return spring so that it is pulling on the boomerang, in such a manor that it is pulling the twist grip shut all the way back to idle all by itself, and you are able to pull the throttle wide open until parts start binding up and stops moving at the boomerang area...
twist the throttle open, release, wist the throttle open, release.......
You should now be able to watch the entire system work, by twisting the grip.... Make sure it is working before every trying to start the motor... ALSO!!!! have a working kill switch on the handle bars, whee you can shut it off with one thumb, whilst holding both hand grips in your hand.. even if your kill switch is a ball or bare copper wiring that you mash to the handle bars...It is one of those ( Gotta have it ) parts
If you've managaed to make it THIS far.......
Screw your idle speed screw back out so the engine can idle again.. :laugh: don't forget that...
You should be able to fire the thing up and see what ya get.. :thumbsup:
If the you twist your grip wide open, but the motor is limited to real low rpms and doesn't want to rev up, make sure everything that you are moving has a full range of motion, if so... Your spring needs to be moved up farther on the governor arm, which allows you more leverage to fight against the governor...
If you hit the throttle and it goes like a son of a bitch and seams like it is never going to limit it's RPM's and gonna blow up, move the spring down the arm.. :laugh:
As you stated originally, the governor will pull the throttle open a little when NOT RUNNING, to allow an easier start.... If your entire system is working pretty well right...
You should be able to use the main cable adjuster, where the cable meets boomerang, and start screwing the throttle tighter, until you see the butterfly start to pull open... :thumbsup:
in best case scenario, you will see the butterfly hold like 1/2 open when the bike is not running.. It will be a gentle 1/2 open, like you can touch it and it will close right off... If it's a STRONG 1/2 open, and the governor can BARELY PULL the throttle to idle, you have it too stiff, and will cause it to want to race and not idle down real well...
That is exactly what I needed to know.I had a pretty good idea of it all,but I'm an equipment,tractor,machinery mechanic and any serious work on small engines was many years ago.You have all the little details that I would have to study on for days.I still have a tab that goes under the mounting bolt at the rear corner of the engine under the boomerang.Back when I did work at a small engine shop the owner there would run a spring straight up from that tab,that way the spring had a straight pull on the cable.It seems like that factory was always broken,or it wore the bellcrank on one side so it would bind up.You could also change the springs to get the tension you wanted.I'm pretty well ready to go,I just have to make a new solid link and run a new fuel line.The old one rubbed through on the flywheel.I actually have a test bench from an old small engine shop.It has a post with a gas tank,a bunch of holes to mount an engine,a kill switch to hook on the plug,and an electric motor to start some engines.I'll run it up on that before I paint it and mount it on the bike.Thanks for the info.