Caruso ? Intake for west bend 580/700

markus

Well-Known Member
#1
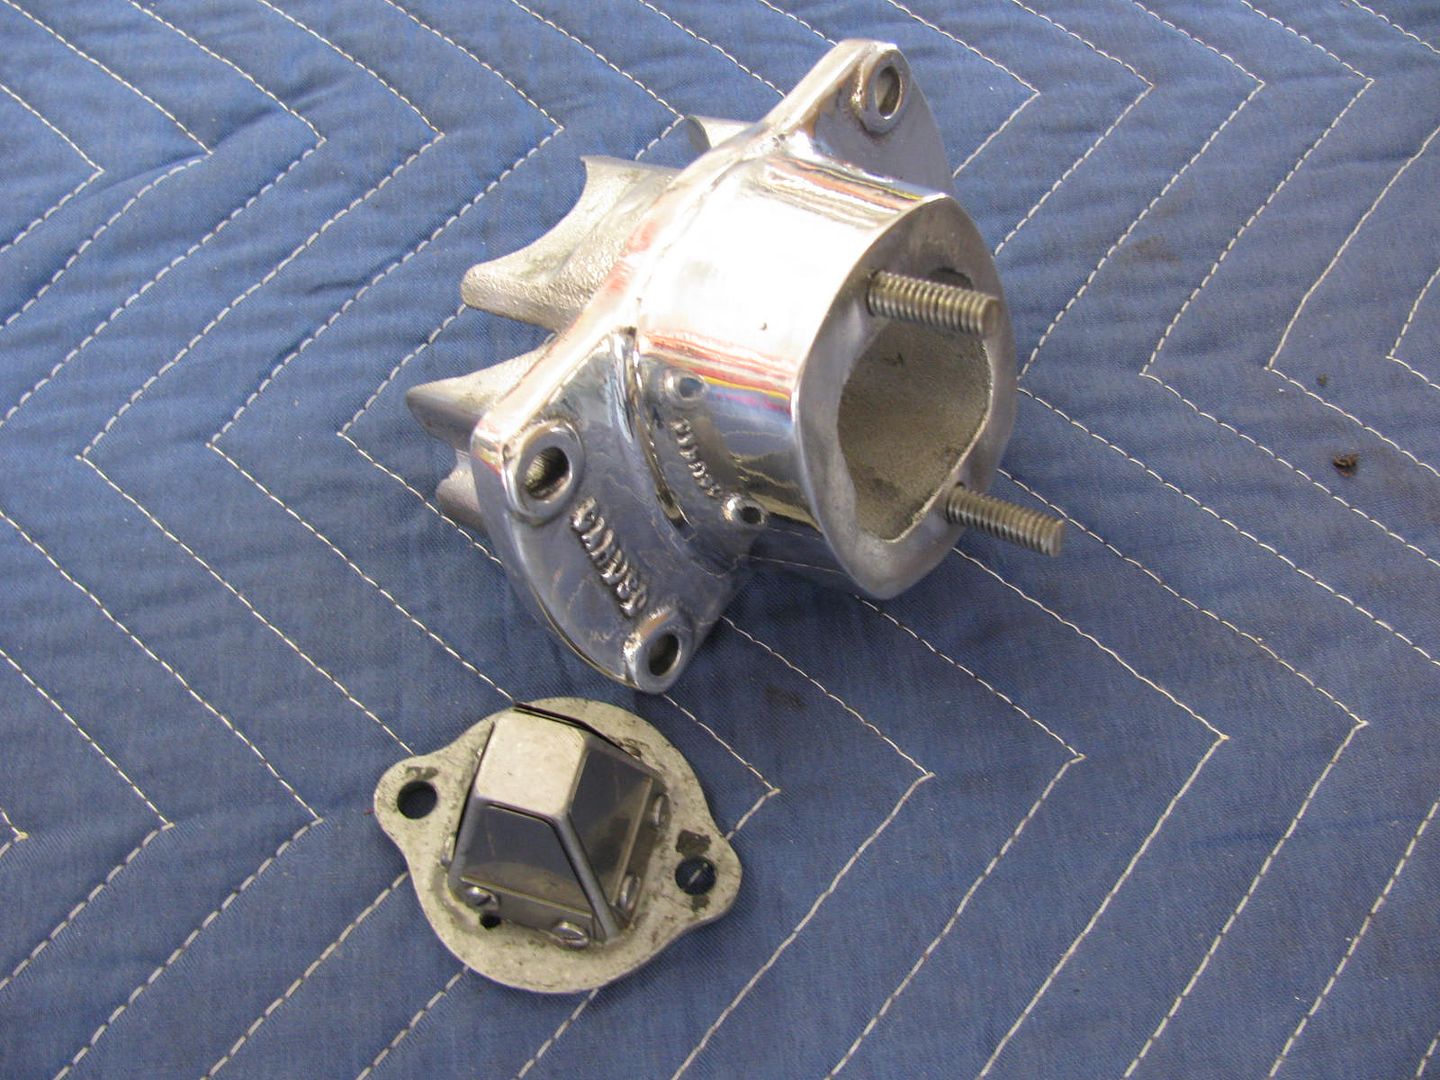
I just picked up a 580 that has a Caruso or maybe capuso centered intake/stuffer on it. Kinda looks like a go power from what I have seen, not sure what the reed plate is I am guessing maybe Gem (if It is can I get new reeds for it :shrug:)


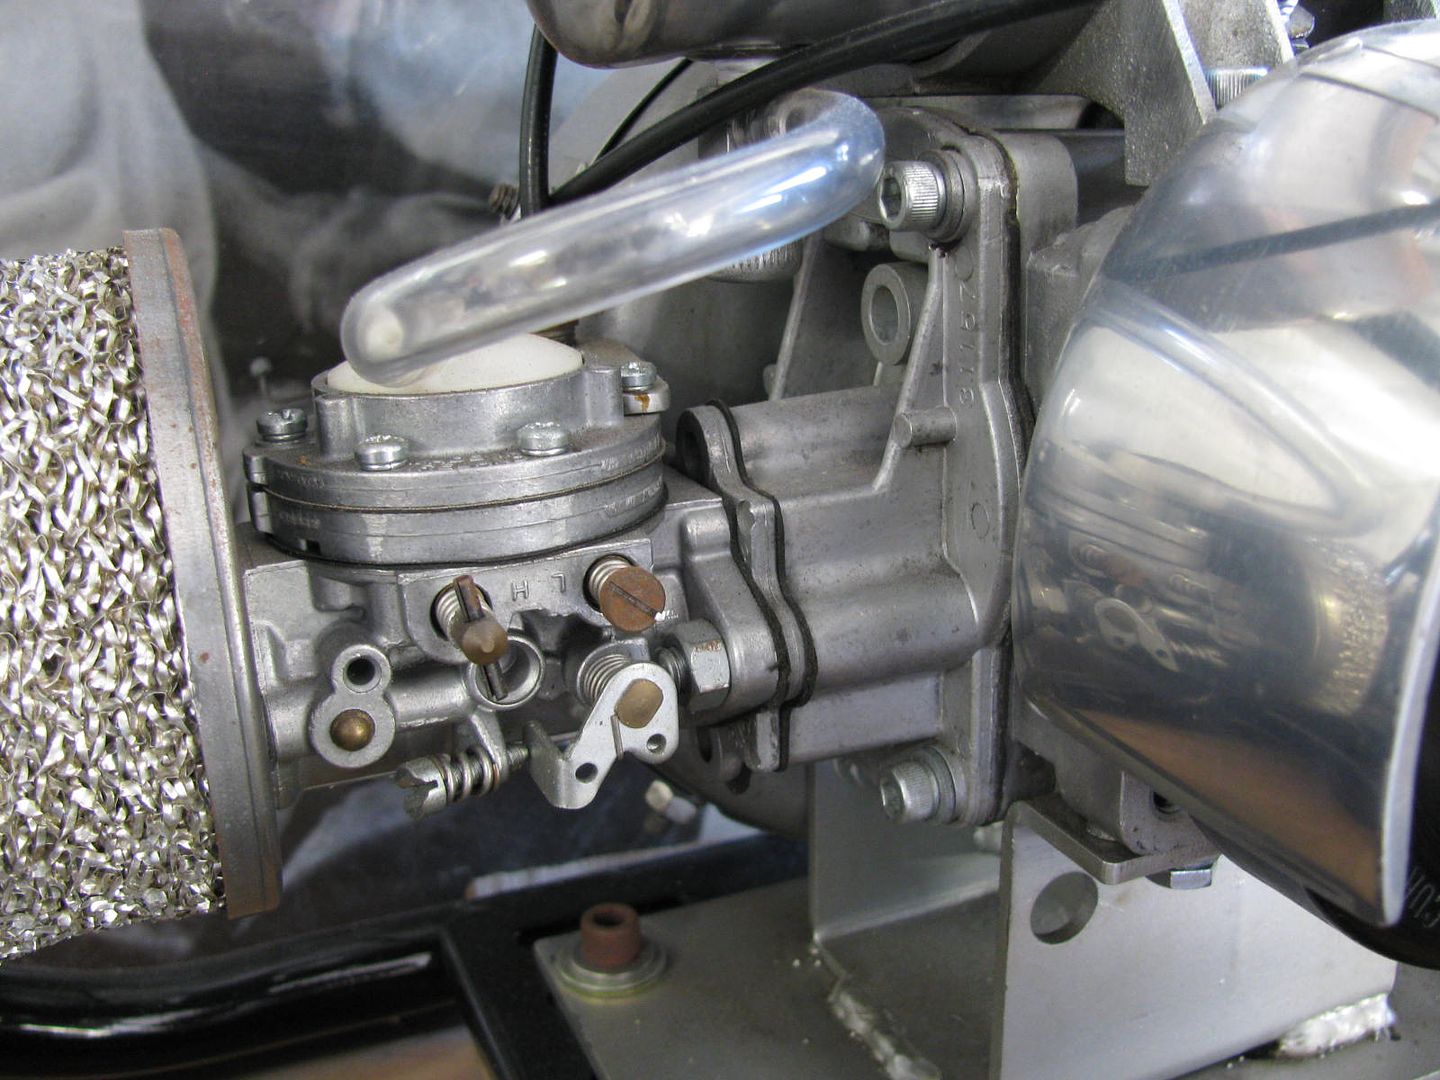
Anyone ever heard of it, and whats it gonna do for me as opposed to what appears to be stock offset intake/reed setup I have on a 700?


Still tearing the 580 down, I just pulled the intake off and was washing it out so it would be cleaner when coming apart, The crankshaft is a weighted one but thats about all I see so far.

Any insight to the goods/bads of using a stuffer/intake like this, My 700 will be coming apart to be cleaned and inspected cause its been sitting around for awhile and time has come to get that bike buttoned up and running, I like the looks of the intake (its polishing out pretty nice) but the 700 runs very well as it is so I dont want to mess up a good thing!!
 
#2
Homelite pyramid reed cage. Cut your own reed petals. Aerospace Specialty Products, Gibsonton, FL, 813-741-0032. Buy a sheet (9 x 12) of .011 fin material, part # G10-011. Use your steel petal as a template, cut the material with a good set of scissors, drill the two holes for the screws, debur the edges with a fine emery. Takes less than 10 minutes to do all four and if a reed breaks it won't hurt the engine.
That intake will run the same as the West Bend factory V reed. I have never seen that manufacture, I have a Go Power but run the factory V reed on my five port 580. From the factory the V reed manifold were mounted with the offset toward the top side of the crankcase, yours looks to be on the bottom, it doesn't make any difference in performance.
The GEM pyramid reed cages have the petal mounting screw in line, Homelite are offset. The performance is the same on either. Don't forget to locktite the screws. The Go Power intake on a 580/700 is good for 20 to 25% increase in power.
The postage on the fin material will probably be the same as the cost of one sheet of material. I have .011 and .016, the .11 responds a little faster, it holds up good. When you tear down the 700 cut fiber reeds for it too.

Louie
 
Last edited:

CarPlayLB

Well-Known Member
#3
Haha...good to see the master stopping by the minibike site! Louie is the man on this stuff!
Markus, I have GEM reed patterns and material and I can cut the reeds for you. I also have gaskets sets for the 580/700's.
The stuffer manifolds like that decrease the volume in the crankcase and give a better "push" of fuel to the top end. The stock flat reed plate is too restrictive to support a lot of fuel. That is a very nice piece!
 

markus

Well-Known Member
#4
Thanks for the info guys, and thanks for the Reed info louie!!!! I may even be able to get that picked up for me as Gibsonton is not too far from here :thumbsup: I think that the intake on the 700 is on the bottom because it has the tank mounted to the engine so the fuel outlet can clear. That actually might be a fitment issue for that caruso one n the 700, eyeballing it looks like it will clear, but may have to come up with a different shut off valve.

I only bought the 580 to get the earlier shroud and cup so the intake was a little bonus.....I think the cup is for 610 though :doah: So I may be back to square one trying to convert my 700 back to the earlier style fairbanks recoil :censure: Soon as I get a Tecumseh I sold yesterday packaged up and off the table I'll start tearing down and checking it out to see what I need for parts. Got some other Tecs being sent in to redo for someone soon so I need to at least get a better idea of what I need while I have an open spot on the bench!

Thanks again:thumbsup:
 

markus

Well-Known Member
#5
Louie, ASP has that fin material listed in only .010 and .016 and up online. Does it have to be .011??? Also, there are 2 reeds doubled up per side in metal currently, when I replace do I just use one F/G or double them up as well?

Thanks
 

CarPlayLB

Well-Known Member
#7
Markus, just say the word and i will make these for you! Made 40 sets of Mac 91 reeds Thursday night! I have the patterns and the materials. Send me a pm and i can get these done for you!
 

markus

Well-Known Member
#8
Thank you, I was hot to trot to try and get all the stuff I need ordered earlier this week so I started hunting online and saw the .016 noted here and there in various threads on karting sites. so I went ahead and ordered a sheet of that, so I am relived to hear say use the .016 :laugh:

Got all my gaskets, bearings, seals, and the fin material in this week for both engines. Got tied up on some other peoples projects this week but I am working on cleaning up today and getting the bench clear so I can open up the 700 (got the 580 tore down last week to verify it was still servicable)

Havent tried cutting the reeds out yet, should be interesting!

thanks for all the help :thumbsup:
 

markus

Well-Known Member
#9
slacking on this (like every other projects I have going on :doah:) The engine that has that caruso stuffer on it they also filled in the casting ribs around the needle bearing support to complete the "stuffing" :laugh: You can see the caruso intake has that added wall that fills in the area under the Ball bearing too where the WB one does not.

Looks like they filled the ribs themselve up with some sort of metal filler and then smoothed it out with maybe some Epoxy,


Obviously the epoxy was starting to delaminate a bit from age etc.. and just a light hit on it I can get it to fail. So I plan to redo it. I was going to use 24hour JB to do this job :shrug: cant see that doing anymore damage than epoxy on the internals if it failed??

When we raced R/C boats I remember we rigged a cracked case out of desperation prior to a race we attended with JB (could not get a case and carve it up/match the work we had done in time) we ran 65% nitromethane blended for us in our race boats, they spun quadruple the rpms these do and it held up for the race, granted we didn't perform any long term tests or anything though as it was a just a sloppy repair job 48 hours beforehand to in hopes to at least keep us in the points for the year.
 

markus

Well-Known Member
#10
got the side plate ribs filled in better finally, took a few days as I filled some pin holes in what I would guess was something like All metal filler that they used to fill in the ribs and then laid over another a couple layers of JB 24 hour so I waited between layers. You can see whats filled in compared to the side plate I just took loose from the 700:


This is the first time I have ever opened the 700, Its only had a few tanks of fuel through it and even though it has sat on the shelf for a few years I was pretty good about keeping some oil in it,and the holes plugged up. Would spin it over every now and again too so thankfully its clean and fresh inside still. got to see that Palmini piston finally, the porting, and Franks builders info lightly scribbled in :pimp:


Something I see that Frank also did was double seal the crank on the flywheel side where that 580 was not, so I am going to do that as well :thumbsup: I decided I am just going to focus on the 700 and get it done and not bother with building the 580, I have nothing to put it on so its just going to be wasting my time to do it so i will probably just part it out on ebay.

Gonna go back to the old school look with the 700, the standard gray paint on the shroud and tank over the silver that was on it, Fairbanks recoil (I recently scored and NOS art deco style handle!!) got the bubble top gas cap now, maybe even use the diamond west bend decal at the back of the shroud instead of the checkered one on the top, switch it up a bit :thumbsup:
 

CarPlayLB

Well-Known Member
#11
Markus,
I have gaskets and reeds for these! Just made reeds and gaskets for Vince this morning!

Frank is a master with these engines! That one should be a good performer!
 

markus

Well-Known Member
#12
Markus,
I have gaskets and reeds for these! Just made reeds and gaskets for Vince this morning!

Frank is a master with these engines! That one should be a good performer!
I think you mentioned that before...like 3 times :laugh: I stocked up on some gaskets from Riggs / Gotfishon in KY, I have bought a few different gaskets and WB parts from him over the years, but thank you :thumbsup:
 

CarPlayLB

Well-Known Member
#13
I think you mentioned that before...like 3 times :laugh: I stocked up on some gaskets from Riggs / Gotfishon in KY, I have bought a few different gaskets and WB parts from him over the years, but thank you :thumbsup:
Sorry! I just like my products to go in to capable hands for the feedback! I know Bill does a good job on his gaskets...I just wonder how his hands are holding up! Punching and cutting gaskets manually has to be quite a job! Mine are all digitized and CNC cut! I drink a beer and push a button! My hands are good!:thumbsup:
 

markus

Well-Known Member
#15
Typical for me I totally lost interest in this project and havent touched this thing for awhile. I did however have to get an engine I redid for a customer in paint Yesterday so I figured it was time to get off my duff, finish the bodywork and fuel cap mods so at the very least I could spray the sealer coat on it the same time I laid it down on the final assembled HS40. Thats the only thing about doing little stuff like this, mixing up those small quantities of paint just to hit a couple of small items and then have to go through and clean the gun etc... Wears a lazy guy like me right out :laugh: So the gun was in use for the day and better than that I was actually getting paid to use it so I took advantage of the situation.

Another member hooked me up and gave me (thanks again Dan:thumbsup:) the really hard to find thimble top cap. the "thimble" was dinged all up so I used a beater bag to sit it on and and rounded the end out on an old chisel to use to tap it back into shape, then for some bling I took a chromed fuel cap and cut it to fit the thimble top:


Stuff was not to bad, couple of light dings and some low spots in my tank that was on the bike.


When I picked up some other supplies at the paint supply I brought in an old west bend shroud that still had the OG gray on it,and just picked something out of the dupont (now called Axalta) fleet book in single stage Nason Fulthane paint that looked pretty close. So all this stuff after all body and prep work was complete got hit with Nason "2k urethane" primer sealer (both these parts and the white engine behind it), and after I got the paint laid down on the white engine and looking good, I cleaned out the gun mixed up the gray and knocked this stuff out as well:


I'm diggin' my cap, I gotta get my straps looking shiny to match the cap. I think it will look nice on top of the engine, and should not dribble fuel like a flat cap will sittin' atop one these little shakers :thumbsup:


Top