CT200U modded into a pit bike.

#1
Tried this over on the Coleman group part but it won't allow photos to be added to the posts. Odd. :eek:ut:
So might as well give it a go here, at least if you don't understand my post the photos may help with the madness.

Well I already have one, but have come to find out I could never find it at the track as someone was always out riding around on it.
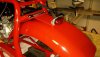
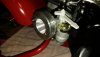
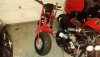
So in looking for another candidate I stumbled across a somewhat new CT200U, that already had a Predator 212 on it, for dirt cheap.

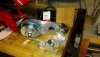
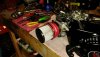
What I'm looking at and already have coming from OldMiniBikes and a few Ebay buys are as follows.
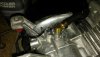
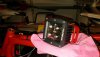
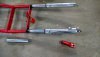
Pair of SunF street tires 19x7x8, pair of pocket bike front forks, LED head/tail lights and switch, AGM battery, normal carb jets and emulsion tube, air filter adapter, TAV/spare belt and mount bolts, billet rod and flywheel and of course gaskets. I"ll more then likely build my own exhaust and add front brakes later.
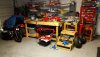
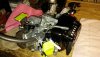
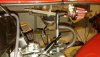
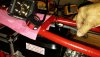
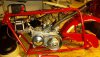
Here's our start.
 

Attachments

#2
Well let's begin. First step strip the bike down and give it a good cleaning, followed by paint touch up. Rustoleum Regal Red is a near perfect match to the stock red.

While the paint was drying, I tore into the Predator, tossed the clutch and jackshaft assembly, removed the governor completely, I installed a brass elbow in it's hole for additional blowby venting.
Word of advise, if you are running a stock fuel tank, don't go too large on the elbow as the sump on the tank will hit it. Ask me how I know.
Also while in there I removed the low oil sensor and plugged it's hole.
 

Attachments

#3
Modded the throttle linkage with a rod to the carb in place of the spring, and added a secondary return spring as the stock one was a little weak.
Pretty simple to do, you invert the one unused throttle cable clamp, and use the old governor rod, with a couple of bends to fit. Though you do have to trim the throttle plate for clearance. No biggie, just a couple swipes with a cut off wheel. If you don't have such, a file would do as well.

Mocked up the lights and switch to figure out wiring and such, made up a tail light bracket from a piece of 1" aluminum angle. Headlight uses the front fender mount bolt to hold it in place. Just noticed the lense cover on the headlight is upside down, oh those silly kids that assemble them at the factory. For a switch, went with a factory kill switch, works like a charm. Little lacquer thinner removed the insignias for the kill switch and I painted a white light bulb in it's place to tell what is on.
 

Attachments

#4
Well if you have lights you need a battery. I went with a 4 amp hour AGM motorcycle one. Okay got a battery, now where to stick it and retain it?

I think I came up with a winner. I went to Wally World. I used the same set up that I used on the other pit bike. Of all things, it's a recipe box. Kinda looks like an old treasure chest. Some foam for padding and the battery fits nice and snug. For mounting, more left over 1" aluminum angle, attached to the fuel tank mount studs. Drilled a bunch of 3/8" holes in the sides to give it a sporty look. Pair of bolts through the bottom holds the box to the rails. Lid on the box is hinged to allow it to be opened to charge the battery, and the latch keeps it locked down. You can even lock it.

Ran all the wires, added conduit to protect it all and made connections so either lamp could be removed if need be, same for the switch and the battery itself.
 

Attachments

#5
Anybody notice how nice the paint matches, of course the front forks aren't done as they are going to see some mods, but the paint on them matches up pretty well to the rest that I spotted in all over the frame and fenders.

On to venting. As previously noted I added an additional vent line from the old governor hole. Well time to finish that up. The line from that and the line off the valve cover get connected together and those feed into a small breather that is attached to the left upper frame tube. I did similar on the other bike and have not had any problems with oil coming out of it. My thinking with the vent mounted up so high is that oil doesn't reach it. Any that makes it into the lines just runs back into the block.

And while doing that I figured better work on a vent for the fuel tank too. Simple enough, mini fuel filter attached to the stock vent tube, and it will sit up under the front seat mount. Out of the way, and high enough I don't think fuel will ever make it there, well as long as the bike is up right. LOL!
 

Attachments

#6
Well that's about it for now, OldMiniBikes order is set to arrive tomorrow, so hopefully I can get at least a look at all the stuff. Rest of my orders, within the next week or so they say.

Something odd I noticed, OldMiniBikes says you have to order a standard bolt kit for the engine to fit the TAV as the motor doesn't have metric tapped holes. Well this one does. 5/16" bolts don't even attempt to fit, but 8mm ones do. Oh well just more stuff for the stash pile.

How bout a teaser till then? Like what the mod to the front forks might be seeing? :hammer:
 

Attachments

Last edited:
#8
Thanks, should be a nice version when completed.
Anywho, out in the shop waiting on the delivery truck. Hopefully before I head out to work.
Took the headlamp apart and now have the bezel in the correct location, and noticed something with the front forks.

Apparently the original owner must of tossed the assembly manual and just winged it when installing them. Both of the triple trees were bent.
Not from impact, they never installed the washers between the trees and the neck, They had double washers at the bolt and nut, so it bent the trees when they torqued down the nut.

Nothing a bar clamp reversed can't fix. All straight now and I can fit the propr washers in their correct location. Dang kids!

And I mean that, story I got from the father as to why this one is Predator powered. They bought it, somewhat assembled it and put gas in it and rode it till it locked up. That's what happens when you don't read the manual and don't put oil in the engine. Somehow using Marvel Mystery oil got the engine freed up, added oil and rode it till it locked up permanently. Dad got fed up, went to H/F on 12/26/17 and bought the 212 with a 2 year warranty (like that's any good now) and put it up for sale.
 
#9
Nice progress..:thumbsup:.the bolts for the pred 212 should be 5/16-24 fine...i cut the rear crossbar off mine today.:grind: was fugly, may get a welder guy to buzz a crossbar a few inches behind engine plate to make up for it..although i looked at dragbikes and they don't have alot of crossbracing unless the tubing is stronger,looks the same 7/8".Mine wont be seeing any trails. Many choices on front wheel:shrug: 14" spoke..12" spoke 10" solid spokes (i call em) or motorcycle rim..on & on & on...the stock one is so heavy..believe those pocket shocks got 12mm hole but doesn't have to ..:biggrin:...
 
Last edited:
#10
Raskin, Yeah, just takes a drill bit. LOL!
Got pictures of your TAV set up, I think you mentioned you didn't have to raise your engine?

And yep my bad on bolt sizes, well actually not my bad, apparently the dad was as bad as the kids.:eek:ut:
Not sure how he did it but he used metric bolts to hold the jackshaft and clutch on. Maybe from the old engine? Anywho, when I checked I only spun the bolts in far enough to see what fit. Yep, I just spent the last hour retapping the side cover and crankshaft holes so they were standard thread the whole way, instead of half way. Some folks should not be allowed to play with mini bikes.:doah:

Anywho, got my delivery from OldMiniBikes, Happy Happy Joy Joy. Almost. I ordered the ARC 69_31 air filter adapter, which states it fits the 212.
NOT!!! The air filter studs are two different lengths, and the short one is flush with the adapter, can't even start a nut on it.
I guess I'll call them tomorrow about it, that or mill the one hole in the adapter deeper and larger so I can get a nut on it.
 

Attachments

#11
Yeah..that's strange carb stud short.People buy a mini bike w no clue how to even break a chain or clean a carb..:rolleyes: I had got my tc well before OldMiniBikes came up w that one so i went ahead with original plan coz i got no other bike i want it on and I'm not going big hp gains, hot dog muffler,jets and modified airbox or pod filter kit....it'll be fine...it'll be nice to see your final build.I'm going minimalist w no fenders .I need a new tablet to take photos,may get one before i complete mine.If i do I'll post my own build thread if not just a final pic.
 
Last edited:
#12
Yeah the cross brace has to go, along with the jackshaft bracket. I think I'll cut it off flush on the right side and leave part on the left, get the TAV mocked up and then weld something to the stub to hold the chain guard on. Looks like I'm going the trim the TAV plate to fit, 1" risers will have the fuel tank cap smashed up against the frame. That or move the tank up to the top of the frame and slip the battery box back to the original fuel tank mount.

Like you I'm not building for a race bike, I just want something that runs better then stock and doesn't look like every other CT200 out there.


On the front forks mod, I'm thinking of adding another tube, or rod inside the stock tubes, up through the triple trees. Thinking that it would help with the stress on the fork stubs. So it's not focused right where they meet the lower triple tree.
 
Last edited:
#13
Well an update until I get some time from work to play.
Got an answer from OldMiniBikes on the carb stud. The non Hemi's have the staggered studs. Of course there's no mention of this when you buy the air filter adapter by itself. And OldMiniBikes does offer a regular length one. Suggested to them to maybe note this on the ad for the adapter.

Anywho, me being me, and not wanting to pay more in postage then the part is, I went to the scrap pile. Found a battery hold down, that already had the correct thread size/pitch on one end, probably from a Honda or Toyota. Simple enough, cut to proper length, thread the other end and we have a proper carb stud. Adapter and filter mounted.

Also saw a neat trick on mounting the TAV cover. Instead of fumbling with bolts to remove/install, you take 4 bolts that have a shoulder on them. Cut off the head, and drill a small hole sideways through the shoulder. Large enough to fit a hair pin clip, like the ones that were on the original clutch cover. Apply loctite to the new studs and screw them in place. Pop the cover on, and install the pins. You could probably skip the pins as the shoulder portion is long enough that I seriously doubt the cover could come off.
 
#14
Also saw a neat trick on mounting the TAV cover. Instead of fumbling with bolts to remove/install, you take 4 bolts that have a shoulder on them. Cut off the head, and drill a small hole sideways through the shoulder. Large enough to fit a hair pin clip, like the ones that were on the original clutch cover. Apply loctite to the new studs and screw them in place. Pop the cover on, and install the pins. You could probably skip the pins as the shoulder portion is long enough that I seriously doubt the cover could come off.
I like it! TAV mods get me excited!!!:drool:
 
#15
Dang you are easily excited. LOL!

Anywho, who the heck screwed up the weather? It's been in the 30's down here in the morning. It's Florida for goodness sakes.

Okay back to the bike. Got my SunF tires today, really liking the looks of them. My header/muffler parts should hit tomorrow. Forks are stuck somewhere in Louisiana. Oh well I'll do some cutting and drilling tomorrow for the TAV.

Other then that, I reworked my blowby set up, didn't like the looks of the adapters and hoses up to the filter, now it's all one piece and looks much neater, and less hokey. Oh and picture of the air filter set up with the shorty filter. Less to knock off with a leg. Have to get cooking on this, we start dialing in the race car next Saturday and I'd like to have all but the forks done by then.
 

Attachments

Last edited:
#16
That's cool.i don't have the $$$ to get into cars.Sounds like fun.What are y'all into?My last rides were '68 Nova and a '79 low compression Camaro years ago..:laugh: i woke up a bit w a cam and gearing...i like all motorsports.Was fun ..now i just blast around on minis.
 

SAS289

Well-Known Member
#17
That's cool.i don't have the $$$ to get into cars.Sounds like fun.What are y'all into?My last rides were '68 Nova and a '79 low compression Camaro years ago..:laugh: i woke up a bit w a cam and gearing...i like all motorsports.Was fun ..now i just blast around on minis.
What engine did your 68 Nova have?... I'm a Ford guy but loved the 68-74 Nova's. Had a 74 6cyl three on the tree. LOL.
 
#18
What engine did your 68 Nova have?... I'm a Ford guy but loved the 68-74 Nova's. Had a 74 6cyl three on the tree. LOL.
It had a 350 w 286 cam,Edelbrock intake,Holley 600..its original engine was a six that was replaced..miss that car...I'm no purest.I've had Fords,Mercury,Plymouth Fury and 3 vw bug puddle jumpers.
 
#19
Well we, my son and I road race, Road Atlanta, Gingerman, Mid Ohio, Blackhawk and such. Ours is an Evo 9 with only 500 whp/475 torque. Not bad for a 4 banger. More than my Mustangs, Chevelles, and GTX did way back when. :doah:
 

Attachments

#20
Anywho did get some things done on the pit bike. TAV is installed, push pin/studs for cover retention too.
Took the Doodle Bug under seat exhaust I got from Hot Rod Mini Bikes, cut off the muffler, added an extension and then welded the extension and muffler back on. Wrapped it and it's in place. Trimmed the chain guard to clear and made up a new front bracket for it. Still have to weld it on.

Tomorrow I hope to have the tires mounted and installed, finish up the chain guard, put the forks back on (at least till the new ones show up) and button up all the other odds and ends.:hammer:

Maybe even get a chance to take it for a spin.
 

Attachments

Last edited:
Top