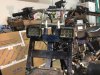
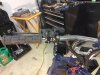
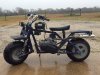
It's been a little over a year since Farm Hog made her debut and for about the last 4 or 5 months I've been slowly making mods to her on some ideas I had kicking around in my head.
Added headlights, raised the tank, swapped to a spring loaded chain tensioner, and made an exhaust system. You'll see.
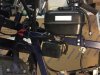
The headlights are 2 Nilight 18w pods, 1 spot and 1 flood, powered by a lifepo4 10ah battery with a dual light switch. 5 amp inline fuse.
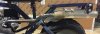
I was going to mount the battery behind the seat but that was going to be a little tight. Then I was going to mount a battery bag to the front of the handlebars but I didn't find one I that I really liked. That's when I decided to raise the tank (which I had thought about doing already for easier access to the engine), and added a battery mount to the underside.
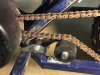
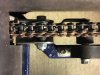
Hat tip to @Mr. Pink for the pictures he posted of the tensioner he uses in this thread, Tips?, post #14 That is the one I chose. I used a piece of unistrut I had lying around to make the mounting bracket.
Due to the design of my frame, my chain is only a 1/2" from the inside edge of the frame. I made a liitle modification. I took the roller nut off and screwed on a rod coupling then added a thick rubber spacer over the coupling. When the bottom of the chain goes tight on deceleration the spacer hits the frame and keeps the chain from having a lot of slack on top. Seems to be working out okay.
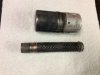
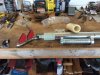
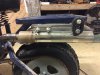
Hat tip to @sparkwizard for his post in the DIY exhaust thread, post #23. That gave me the idea for my set up. I found some inexpensive 3/4" sch 40 black pipe 90's and 45's on ebay, and the perforated tube with packing, the clamps and rubber hangar on amazon. Bought the 18"L x 2 1/4" o.d. exhaust extension from auto parts store. I already had a 3/4" rigid conduit with a threaded coupling on hand. Once I cut the conduit to the lengths I needed, I took the pieces out back and used my propane torch to burn off the galvanized coating. Standing upwind of course.
I welded the header, screwed the briggs hotdog on and tested it on the engine, All good.
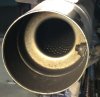
In the interest of full disclosure, I freely admit that the way I attatched the homemade resonator to the muffler is somewhat sketchy on my part. The diameter of the hotdog muffler is larger than the 2 1/8 i.d. of the exhaust extension and smaller than the 2 1/4 i.d. of the slip fit end of it. I decided to cut off the slip fit end of the exhaust extension and use a butt clamp. I wrapped the end of the hotdog with a couple of layers of High Temp foil tape and then tightened the heck out of the bolts on the exhaust butt clamp. As I suspected, the vibrations from a short test run was causing the clamp to start slipping off the muffler.
That is when I screwed the clamp to the muffler with 5 8-32 screws. So far, which hasn't been very long, it's still holding together. I suspect it will fail sooner rather than later but for now, I'm going to maintain the status quo.
I have to say, I really like the way it sounds. Lowered the pitch of the hotdog and cut a few decibels to boot.
I needed to change the jetting, so I installed the ruixing carb I had on hand and swapped over to a gx200 airbox. I just prefer a cannister type filter instead of the foam filter. Right now jetting is .018 pilot and .032 main with stock e tube. Very noticeable power increase. More testing to be done. Work in progress.
Almost forgot, I welded a 1/4-20 stud to the header for the support bracket off of the engine.
Added headlights, raised the tank, swapped to a spring loaded chain tensioner, and made an exhaust system. You'll see.
The headlights are 2 Nilight 18w pods, 1 spot and 1 flood, powered by a lifepo4 10ah battery with a dual light switch. 5 amp inline fuse.
I was going to mount the battery behind the seat but that was going to be a little tight. Then I was going to mount a battery bag to the front of the handlebars but I didn't find one I that I really liked. That's when I decided to raise the tank (which I had thought about doing already for easier access to the engine), and added a battery mount to the underside.
Hat tip to @Mr. Pink for the pictures he posted of the tensioner he uses in this thread, Tips?, post #14 That is the one I chose. I used a piece of unistrut I had lying around to make the mounting bracket.
Due to the design of my frame, my chain is only a 1/2" from the inside edge of the frame. I made a liitle modification. I took the roller nut off and screwed on a rod coupling then added a thick rubber spacer over the coupling. When the bottom of the chain goes tight on deceleration the spacer hits the frame and keeps the chain from having a lot of slack on top. Seems to be working out okay.
Hat tip to @sparkwizard for his post in the DIY exhaust thread, post #23. That gave me the idea for my set up. I found some inexpensive 3/4" sch 40 black pipe 90's and 45's on ebay, and the perforated tube with packing, the clamps and rubber hangar on amazon. Bought the 18"L x 2 1/4" o.d. exhaust extension from auto parts store. I already had a 3/4" rigid conduit with a threaded coupling on hand. Once I cut the conduit to the lengths I needed, I took the pieces out back and used my propane torch to burn off the galvanized coating. Standing upwind of course.
I welded the header, screwed the briggs hotdog on and tested it on the engine, All good.
In the interest of full disclosure, I freely admit that the way I attatched the homemade resonator to the muffler is somewhat sketchy on my part. The diameter of the hotdog muffler is larger than the 2 1/8 i.d. of the exhaust extension and smaller than the 2 1/4 i.d. of the slip fit end of it. I decided to cut off the slip fit end of the exhaust extension and use a butt clamp. I wrapped the end of the hotdog with a couple of layers of High Temp foil tape and then tightened the heck out of the bolts on the exhaust butt clamp. As I suspected, the vibrations from a short test run was causing the clamp to start slipping off the muffler.
That is when I screwed the clamp to the muffler with 5 8-32 screws. So far, which hasn't been very long, it's still holding together. I suspect it will fail sooner rather than later but for now, I'm going to maintain the status quo.
I have to say, I really like the way it sounds. Lowered the pitch of the hotdog and cut a few decibels to boot.
I needed to change the jetting, so I installed the ruixing carb I had on hand and swapped over to a gx200 airbox. I just prefer a cannister type filter instead of the foam filter. Right now jetting is .018 pilot and .032 main with stock e tube. Very noticeable power increase. More testing to be done. Work in progress.
Almost forgot, I welded a 1/4-20 stud to the header for the support bracket off of the engine.