Fixing a flex-o

#41
Thanks guys for your kind words :thumbsup:


I've been screwing around with this bike when I should be finishing up the "BOGUS" bike :doah: It's cool with me though.... I like to build stuff.... So it makes no never mind to me what I'm working on :shrug: I find it relaxing and alot of fun to build these contraptions, and post my findings here on OldMiniBikes :thumbsup: I get in no hurry.... When they blow smoke.... They blow smoke.


I've been play'n around with tires for this bike and I wasn't too happy with knobby tire gig.... Nor was I happy about the 5" front wheel and the selection of tires offered for it (I wanted to run a slick out back) the bike had to have the right size tires to make it look right in my eyes. It then came to me that I needed a 4" front wheel to make it look right, bisides OldMiniBikes had a nice looking Kenda tire that fit the bill (2.80/2.50-4). Not alot of crap on the sidewalls (ribs) and a simple thread design that looked good for a front tire with a slick in the rear.


I picked up a repop 4" GO-POWER wheel from Scott at ..... ASW MACHINING

Once the tire was mounted it had the look that I was after.... A small little tire for a small little bike..... The way it ballooned out on the wheel was just to my liking.... I just have to polish the wheel..... It came ball burnished....


On the rear, I went with a 10/4.50-5 Duro slick and a 1/2" wheel spacer from ASW.....


Scott is a vintage karter in his spare time and a nice guy to deal with! I met him and his son last week at SACTO at the track. He also makes a 1" spacer for GO-POWER wheels.....

All's I can say is use LOTS of soapy water.....


....And a 5/8 ths bolt to suck all this together.....


A second pair of hands is a MUST..... Lots of fun getting this together :censure:


But well worth the effort in my case :thumbsup:.....


I had 70 PSI in the tire before the sidewalls "POPED" thanks to the "Mini Bike Gods" from above :thumbsup: that the tube didn't pop first.


BC1500 DAVE :thumbsup:
 
#47
i did a little grinding on the mount tonight :grind:


.....And some mock-up fitting of the mount when it's mounted in the frame. Granted, this picture is of the frame UP SIDE. Nothing will change when it's all done. The engine plate will be welded to the bottom of the frame. The engine mount as you now see it mounted, will be the same when the bike is finished.....


The ruff grinding so far......


Seeing how I'm lowering the engine 7/8".... I needed to take some material off the chain guard so the chain will not hit..... I used a short ruler to come up with this. You can use some string.... a chunk of chain..... some wire..... :shrug: whatever it takes from the clutch gear to the J/S gear to see that you have no issues for the chain hitting the chainguard......


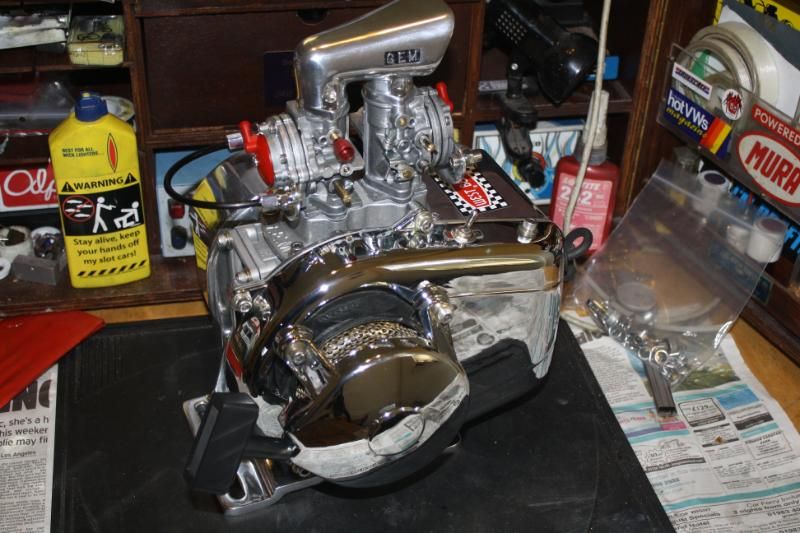
I'm going to be working on these carbs.....


I'm not liking these choke leveeeers.....


.....And these fuel inlets will be RED.....


Thanks guys for your kind words :thumbsup: "H/P" I'm glad it's not hanging in your shed either.... It now sits on my work bench waiting for any attention I can give to it :doah:


BC1500 DAVE :thumbsup:
 
#50
Thank's Clay & Brother Buck! :thumbsup:


!'ve been working this morning and here's what I've gotten done so far.... I got some ARP studs and 12 point nuts for the header. I like to stud the exhaust on anything that blows smoke when possible. When it comes to aluminum head(s) I don't give it a second thought....


Dont't forget to wire brush the threads :doah: and apply some bolt grease....


I've been using dye on nylon items now for over 20 some odd years....


When using colored dyes, you have to watch very closely.... One minute it's almost the red shade you are after..... Add another minute or two..... and it's a dark blood red :mad2: Some nylon parts will dye in a minute and some can take 10-15 minutes. I've found when they are a molded piece like the fuel inlets. I'll boil them in water for ten minutes and then dump them into the ALMOST boiling dye. You want to keep your dye from boiling, when it boils up it becomes a mess..... It foams up and boils out of the pot. and it will become burn't and you will get dark splocthes in your items. I keep it at a medium temp. and I stear the simmering dye constantly.

If you screw up with the colored dyes, :shrug: you can always dye them black :thumbsup: I have this old meshed deep fry spoon that I use to dip parts and pull them up for a look see at the shade of the color. I use wire also to tie to parts for dipping. Here's how you want to keep the dye in your pot.....


Buy a junk pot, for obvious reasons. I dyed the throttle cable covering on the back carb black to match all of the other cables on the bike. I tie wired it and dipped in the black dye for a few minutes and it was done....


..... and there you have it, turning white nylon into a color of your choice. *REMEMBER* this can get very messeeeee your first few trys until you get the hang of it. If doing it on the stove? Keep a wet rag handy to wipe up the dye that splaters out of the pot. Once you have the parts dyed.... Take them to a sink and rinse them under running water till all the dye is rinsed off. Now to them choke leveeeers.


BC1500 DAVE :thumbsup:
 
Last edited:
#52
Thank's Clay......I'm glad to have helped you out :thumbsup:


After taking the chokes out of the carbs, I chucked the shafts into my jewler's lathe and took the end down to 1/8" X 1/4"....


I got a hold of these aluminum hard anodized knobs from ALPHA RACING....


....They need to be opened up to 1/8".....


All done and ready to install back into the carbs.....


Once I got the chokes all assembled and in working order, I took a jewler's file and filed a flat spot at the 12:00 position ( chokes opened) for the crub screw in the knobs....


All done....and much better looking.....


I used a Hillard "FURY" clutch..... If'n it works on a 16 horse clone in a Go-Kart, it will be just fine for this engine and it's intended use. I used the "ORANGE" springs (1800 RPM engagement) for starters and see if I need to go up or down in engagement springs once the bike blows smoke. Snap ring pliers make for quick and easy installation of the springs.....


I had to remove about 40 thou of material from the bushing to get my 20 thou of end play.....


I stuck a tooth brush handle under the crank counter weight to lock up the engine and bolted down the clutch.....


All done and ready to go..... don't forget to use some Blue Loctite on the bolt.....


i'll be starting on the frame next :grind: :weld:


BC1500 DAVE :thumbsup:
 
Last edited:
#56
Thanks guys for your kind words :thumbsup:


I've been screwing around with this bike when I should be finishing up the "BOGUS" bike :doah: It's cool with me though.... I like to build stuff.... So it makes no never mind to me what I'm working on :shrug: I find it relaxing and alot of fun to build these contraptions, and post my findings here on OldMiniBikes :thumbsup: I get in no hurry.... When they blow smoke.... They blow smoke.


I've been play'n around with tires for this bike and I wasn't too happy with knobby tire gig.... Nor was I happy about the 5" front wheel and the selection of tires offered for it (I wanted to run a slick out back) the bike had to have the right size tires to make it look right in my eyes. It then came to me that I needed a 4" front wheel to make it look right, bisides OldMiniBikes had a nice looking Kenda tire that fit the bill (2.80/2.50-4). Not alot of crap on the sidewalls (ribs) and a simple thread design that looked good for a front tire with a slick in the rear.


I picked up a repop 4" GO-POWER wheel from Scott at ..... ASW MACHINING

Once the tire was mounted it had the look that I was after.... A small little tire for a small little bike..... The way it ballooned out on the wheel was just to my liking.... I just have to polish the wheel..... It came ball burnished....


On the rear, I went with a 10/4.50-5 Duro slick and a 1/2" wheel spacer from ASW.....


Scott is a vintage karter in his spare time and a nice guy to deal with! I met him and his son last week at SACTO at the track. He also makes a 1" spacer for GO-POWER wheels.....

All's I can say is use LOTS of soapy water.....


....And a 5/8 ths bolt to suck all this together.....


A second pair of hands is a MUST..... Lots of fun getting this together :censure:


But well worth the effort in my case :thumbsup:.....


I had 70 PSI in the tire before the sidewalls "POPED" thanks to the "Mini Bike Gods" from above :thumbsup: that the tube didn't pop first.


BC1500 DAVE :thumbsup:
The bike is looking great :thumbsup: but what you call a repop front wheel is actually a type 2 go power from the original mold.... the mold is actually owned by Matco Mfg Scott just buys the wheel from them and re sells it... he does not build the wheel... Matco is behind my shop I have known of the mold for 15 years...

Diecast Nosewheel

Not sure if you got that front tire from Scott but Matco sells that also...
 
#57
Oh.... Buck :thumbsup:


I love the way you make posts here OldMiniBikes :thumbsup: and refer to them in the way of the other sex! I.E. "Better than Porn" .... "Hotter than my first wife" :laugh::laugh::laugh: It's too bad you weren't my neighbor. I read your post the other day about the 11,001 post and you were gone.... Out of here and the door was hitting you on your way out. I had a SAD FEELING when I was reading it. Then I read your next post....And I laughed aloud :thumbsup: I tip my hat to you my friend and your way of being a much needed DIPLOMAT:bowdown::bowdown::bowdown: here on OldMiniBikes :thumbsup:


Yep....Don :thumbsup:


It's the very same engine.... Minus all the dual carbed/manifold/header/scoop/Fair banks rope pull and such.... It is indeed the same engine that "BONZIA DAVE" said had very little internal ware to it before he did his porting/rebuilding work to it....


Ya know Don.... If it weren't for YOU my friend :thumbsup: I would not have this "SCRAMBLER" and I thank you MY FRIEND for the head's up when Randy put it up here on OldMiniBikes :thumbsup: for sale.


"H/P" my friend :thumbsup:


I thank you! I'm going about this bike as how I once laid my eyes on one ..... "HOT ROD IT" :thumbsup: your bike WAS and IS the PERFECT CANDIDATE to carry out this theme.... Yep Randy....I know the PURESTS out there are looking the other way..... and that's cool! I like anything restored back to the day it came frome the dealer. This bike is not the case though :doah: I only hope that you approve of the finished "HOT ROD"


BC1500 DAVE :thumbsup:
 
Last edited:
#58
Jeff that is some good info right there, this mini bike is going to be really nice.You have my full attention with your build, very nice :thumbsup:
 
#59
Hey Jeff....


Thanks for your kind words, I dig your work on the TACO stuff....VERY NICE :thumbsup: It's too bad I don't own a TACO. As far as my wording of the word "REPOP" goes..... This is how I see it..... Anything remade after the original item was once produced .... Is a "REPOP" in my eyes. Heck .... I know of a lot of "REPOPED" items being sold today that came from the original mold...... It's still a "REPOP" in my eyes and most collectors out there:thumbsup:

I understand that the wheels in question are a "TYPE TWO" edition. I'm not knowing who the "PLAYERS" are here in this world, nor do I care :shrug: Then again, I'm not stupid when it comes to GO-POWER wheels and their variations. Be them from the past or present :thumbsup:

Scott is the FIRST person that I ran acrossed that sold me the wheels (A spare set of wheels for my Go-Kart and ONE 4" front) A great guy that is a Karter. He dosen't post here nor does he advertize here. No matter who made my front wheel :shrug: it's great and I like it, as far as the front tire goes there Jeff.... I got it from OldMiniBikes :thumbsup:


BC1500 DAVE :shrug:
 
Last edited:

buckeye

Well-Known Member
#60
Wish you were my neighbor as well.
I could learn a lot about building these things.
Thank you for the compliments.:thumbsup:
 
Top