Larger intake valve question and cutting a new valve?

#1
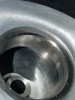
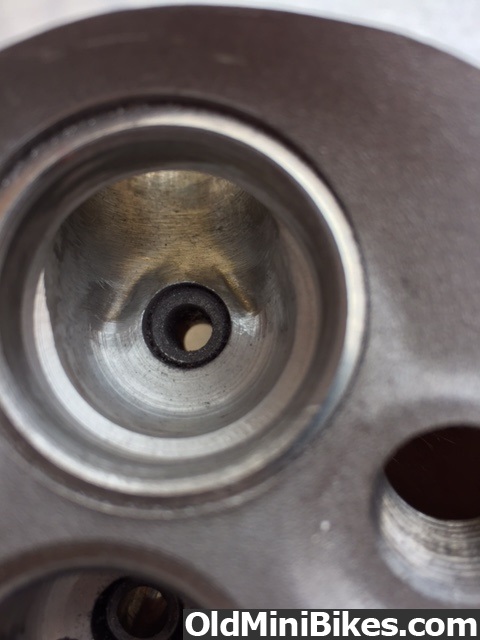
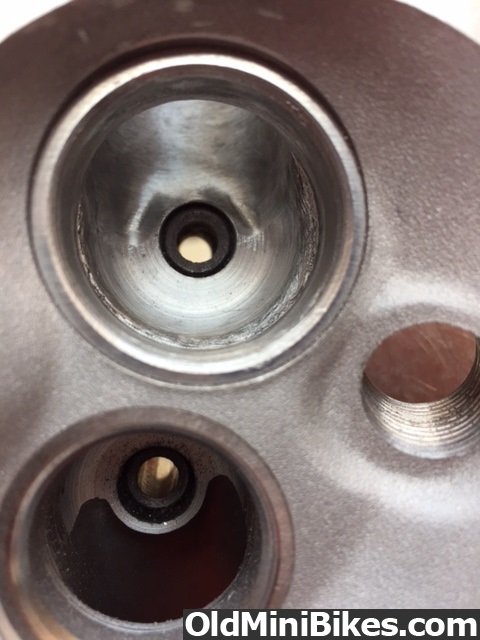
I have a UT2 head I am working on with the valve seats for the 26mm intake and 24mm exhaust. I am going to order a 27mm intake tomorrow but am unsure how deep to have the seat honed out. I know to hone the whole seat larger but how far in to the bowl do I go? I know to machine the whole valve seat larger but after that I am unsure. I don't want to go too far as I don't want to mess up the shape of the valve pocket and mess up flow. I was thinking about 2/3 of the way down from the top of the valve seat so I can blend it in. How far down do I have the machine shop hone? Or do I just machine the valve seat and blend the bowl below the seat?

I also had a question on the valves... I bought a nice stainless exhaust valve and am ordering my intake tomorrow and see that there is only 1 angle on the valve. Is this how there installed or dose it need machined? I know I need to lap the valve, that's not what I am asking. I was thinking of lapping the valve so I could see were is sits on the seat and having a machine shop cut the valve for better flow, at least on the back side. I will talk to the machine shop I get the seat cut at about my set up too and also ask them these questions but what is your opinions guys? Should the valve have a 3 angle valve job like a car would? Its a small valve and I am guessing no but want to make sure.

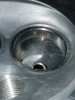
I ported the head today lightly. Turned out pretty good. I am guessing I will have to re do some of the intake after the valve seat is enlarged. I was planning on using a dremel with a flex shaft attachment but found doing it by hand with emery cloth glued to different things worked better. I just blended everything between the ports and bowls and lightly made a transition on the port floor as it had a sharp edge and is flat as a board. Not sure the work will show up on a picture but will get some up in a day or 2. This is my first head to port and it looks nice. The wife has the phone so pictures will be late tomorrow.
 
#2
the depth of the valve is critical ... you have to take the valve geometry into question if you sink the valve too fare or not enough the geometry is off and can screw up the valve train,,, I would measure the top of the valve stem to the spring pocket then sink the new valve to that dimension.. then unshroud the chamber around the valve edge then open the bowl erea and blen to the port......the angle on the valve should not be messed with ...as far as the valve job there are many different angles to use that effects flow...three angle five angle all with different degrees will effect how air flows by them... there is no one way to do it...flow bench the head with different angles is the only way to know what works best..but then just when you think you have it change the port angle or size a little and it may change...also in my opinion big valves are not always the right way to go ...you may increase cfm flow but may loose velocity and fill the cylinder less... remember the bigger the hole the higher the rpm has to be to achieve the velisity required to fill the cylinder... that's why I build my motors around the head not the other way...also unless you know what the head actually flows use a smaller cam...to many people over cam their engines thinking that a big cam means more power
 
#3
I think your head has a 25mm intake valve diameter and if you are going to a 27 that is .080 larger. To open up the throat you would use a piloted bowl hog either 75 or 80 degrees. You want to be conservative so opening should be no larger than 88 percent of the valve diameter max. The valve should have a 45 degree angle. You can backcut the intake with a 30 degree backcut, but if you do not have the equipment or know how to do it don't the improvement is not worth it. Also on high performance heads (cars) normally the throat or pushrod pinch areas are the MCSA point which is the minimum cross section which is the limiter of maximum flow. What you are accomplishing with a larger throat and valve is improving low lift flow up to the point where the MCSA limits any further flow. On these heads you have a very efficient runner that tapers down to about .5 - .6 sq inch. then a bowl that is machined in to intersect the runner with no blending whatsoever. The biggest bang for the buck it to optimize the short side and put a radius on it and then streamline the guide area. Here are some port molds that you can see how the bowl intersects the runner and how it necks down right before the bowl.
 
#4
Thanks guys. I don't plan on sinking the valve in the seat past were it was suppose to be or mess with the stock angle of valve were it meats the valve seat. Will have bowl opened and then I will blend by hand again. This motor I think is only going to be spinning to about 6K with an animal coil that has the 6100 RPM rev limiter in it. I am thinking of using a cam with 225* duration and I cant remember if it was 275 or 300 lift. Going to have the cam ground on a 106* LSA and advanced 4*.

ole4 the UT2 head that I have was stock with a 26mm intake valve that is why I bought it. Most 160 and 200 heads have a 25mm but the UT2 was special :smile:
 
#9
KMC3420 Thanks for those Pictures! Now I can see visually how much meat is on the roof of the port. I always worried it I would break into the spring area.
 
#10
Pictures of short side and bowl to port. Hope these help.

Port Photos
Thanks this was very helpful. Looks like I was on the right track for how I was porting. Going to port farther in the short side. Will see if I can do better work around guides with out hitting them.

ole4 that is cool how you made your molds and a great idea so you can see the work that needs done. Been wanting to get in to casting and molding for a little while now for PC and car parts just have not done it yet. Too many hobbies right now.
 
#11
intake port 1.jpg intake port 2.jpg porting 3.jpg

Going to keep working at the head but this is my work so far. You cant see the short side radius well on camera and I need to work on it more anyways. Going to clean around valve guide and short side more. I ordered my intake valve and retainer and lock kit today. Next week I will try to get some 22 LB valve springs I hope.
 
#12
Here are pictures of the head I just finished. This is the intake and had a larger 28MM seat cut in. The first picture is where the ledge was after the area where the seat sits was opened up. The 2nd picture shows the ledge has been rounded off the best I could. A person could probably use a Mill and clean this up better if that tool is available to them. This head will be traveling to MN to be flowed, just to see how I have done.

 
Last edited:
#13
Looks nice, did you push your valve guides up before you ported or am I suppose to grind on the guide too and then de ream it? I am afraid of hitting the guide as every thing I read says to not grind on the guide but when I see porters port heads they shape the guide too some times. This picture answers my original question thanks.
 
#14
Yes, the guides are pushed up to help in porting. Gives more room. Then pushed back down after porting is finished. On my valve guides I have smoothed them as much as possible to streamline air flow, allowing the air to flow down the valve stem better, at least that is my goal. I am sending this head off on Monday to be flowed. I'm no expert, just have a steady hand. Only thing I would be very worried about hitting is the valve seat.
 
Last edited:
#15
Well I think I only have to worry about hitting is my exhaust seat as the intake is getting honed out larger. Still not going to hit the intake seat but not going to be sad if I scratch it once. Do you know what a stock head flows on there machine so you know how well you did?
 
#16
Well I think I only have to worry about hitting is my exhaust seat as the intake is getting honed out larger. Still not going to hit the intake seat but not going to be sad if I scratch it once. Do you know what a stock head flows on there machine so you know how well you did?
I agree if you are putting a larger seat on the intake no need to worry about hitting the stock seat. I purchased my head from the same person who is flowing it. He said he has a pallet of them he could flow as the baseline.
 
#17
Think I am going to stick to a mild clean up of my head like I did so far. I have done a decent job I think on the short radius which is hard to take a picture of. I might get a little more gutsy on the head I take off the motor I build though. Baby steps hahaha.
 
#18
Think I am going to stick to a mild clean up of my head like I did so far. I have done a decent job I think on the short radius which is hard to take a picture of. I might get a little more gutsy on the head I take off the motor I build though. Baby steps hahaha.
So you are going to get a complete engine and put your Honda head on? Are you going to run a gx200 clone or a predator 212, or a real deal Honda gx200? I spoke to the guy who is flowing my head, he stated a stock 18cc head flows 42-48 cfm, that's a 27IN 25EX.
 
#19
Ya getting a complete new 196 Honda clone motor and mod it. Either this or I am buying a colman CT200U witch has a clone on it. I don't want to track every bracket and gasket down. I plan on building a few motors later so I might take the parts I have left over and build a new motor from either a salvaged used block or from a new block later. I plan on swapping out almost everything. Friends and family are looking at building drift trikes for the adults and some gokarts for the kids so I might put together a motor later for one of the kids with what I take off. I am the only one using new stiff so maybe I use the old parts for a rebuild or something, who knows. Going to mod in stages and see what makes power and do some testing of parts. Just doing this for my own entertainment. Might build a drift trike my self too. Probably going to experiment with a lot of parts, flywheels, carbs valve train stuff. Will end up with a lot of extra parts later to play with. Going to mod the carb before I replace it with a makuni. Though about trying turbo later maybe with a pull through set up. Would like to have put the UT2 head on stock to see if I could tell the difference before and after I modded it but its too late now. The head will make power no mater what because it will raise the compression so I may never know how much if any power the larger valve, better valves and the port clean up made. Almost tempted to get another UT2 head later to see. I want to put the head on a mostly stock motor and see if I can feel a difference with only the head and a re jet maybe.
 
Top