OldMiniBikes Shop Notes

#61
Just something I was thinking of as I was posting these pics in another thread:

If you own a band saw and have ever tried to push round stock into it you will find out in a hurry that it can put a hurting on you. You may think you can hold it from spinning...but chances are that it's going to grab and spin and when it does it will pull your fingers under and flatten them like a little steam roller.

I found the best way to hold smaller stock is with a little machinist vise like this Palmgren:


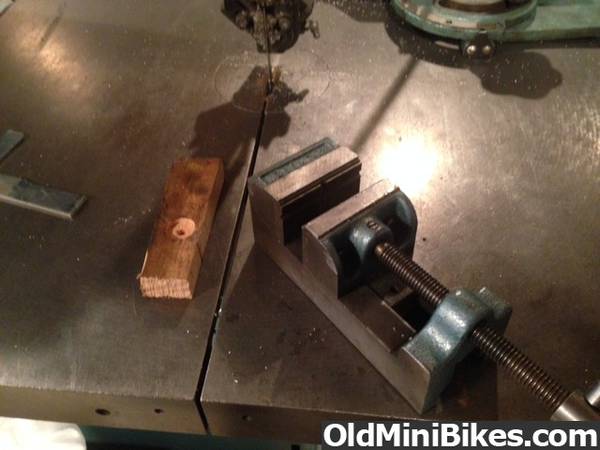
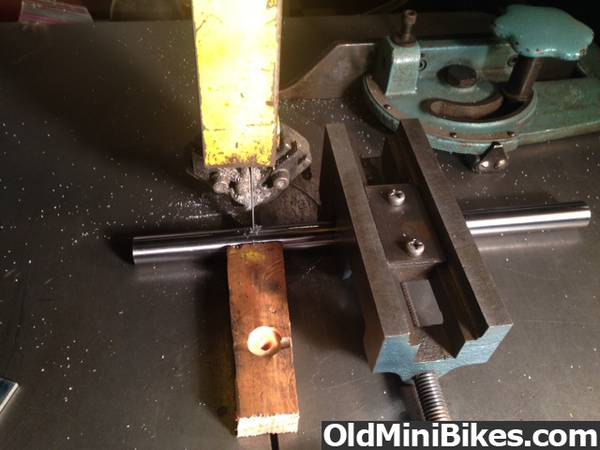
These are really great little vises because they are machined flat or square on 5 sides so you can accurately hold parts and material parallel or perpendicular to your saw, drill press, grinder, mill, etc... And always use a push stick if you want to keep all your fingers.
 
#63
A two stroke engine is a simple beast. So long as it has gas spark and compression it's operable. But if there is the tiniest air leak they are NOT happy. I found this on a scooter forum. Build a leak down tester. Using a pump bulb from a BP meter(sphygmomanometer) and a LOW pressure gauge and some pipe and a rubber plug or rubber plate to block the exhaust and a rubber plug big enough to be TIGHT in the intake. Assemble it in a manner where u can pump the air into the engine and measure the pressure. A healthy two stroke should happily hold five to six lbs of pressure. Pump it up, and walk away for a smoke or half a beer (10 minutez) if the gauge has moved u know u have a leak. Of course a running motor is easy to check for. aleak. A fresh build on ur bench, not so much.
 
#64
One more thing. Rings, a PITA to install without a ring tool. I have a way that may sound unorthodox but it does work.
Take a piece of scrap extension cord, strip the rubber insulation, separate ONE or TWO strands. Wrap it or them around the rings and pull the wire tight enough to compress the rings twist it then snip it close as possible to the ring Now this is the strange part. Assemble the engine leaving the wire in place. It will burn off and melt on first start, coating that ecylinder with a very faint copper coating. Not major thick, but still it's there. I actually read this tip in the classic novel, " The Grapes of Wrath". I didn't believe it so I tried it just for kicks. IT WORKS!!!!
 
#65
Sometimes for a phillips head screw that slips, you can take a new or at least in very good shape phillips bit and hammer it into the damaged screw. It often will give it enough bite to remove it. If the bit shows any signs of wear it is junk. Get a new one. If it spins on the screw it is ruined so don't let it spin. Make sure the bit is at a 90 degree angle to the head. Use the right size phillips bit. I am amazed at how many do not know that there are several sizes of phillips. Typically you will find number 1,2,and 3. On rare occasions you will find a Reed/Prince headed screw. looks like a phillips, but isn't. It will have stamped slash marks on the head between the cross marks. Need to use a Reed/ Prince bit. Worse case on a stubborn screw is to drill it out with a left handed drill bit. Often the heat and the left hand turning bit will back it out.
 
#67
Sometimes for a phillips head screw that slips, you can take a new or at least in very good shape phillips bit and hammer it into the damaged screw. It often will give it enough bite to remove it. If the bit shows any signs of wear it is junk. Get a new one. If it spins on the screw it is ruined so don't let it spin. Make sure the bit is at a 90 degree angle to the head. Use the right size phillips bit. I am amazed at how many do not know that there are several sizes of phillips. Typically you will find number 1,2,and 3. On rare occasions you will find a Reed/Prince headed screw. looks like a phillips, but isn't. It will have stamped slash marks on the head between the cross marks. Need to use a Reed/ Prince bit. Worse case on a stubborn screw is to drill it out with a left handed drill bit. Often the heat and the left hand turning bit will back it out.
Another one to add, JIS screws. Japanese Industrial Standard, use a regular Phillips on these and you'll strip the head.


Anywho, my tip. Working on anything that has say a small E or C clip Put the part inside a large Zip lock bag when disassembling or reassembling. That way when the said clip goes flying off, the bag will catch it, and you won't spend the rest of the day looking for it.
 
#68
Nobody likes rusted/stuck fasteners, and we're all well acquainted with our favorite brands of penetrating oils (WD-40 IS NOT a penetrating oil) but here's a little tip I picked up from the pages of Hot Rod magazine sometime in late 80s/early 90s, and it has never failed to produce the desired results...

A little bit of heat and an old discarded table candle. Heat the area surrounding the fastener up enough so that when you touch the candle to it, it melts. Get it too hot, and the wax just boils off, robbing you of any benefit (save for that provided by heat alone). When the wax melts, the "heat" wicks it into the threads, breaking both the chemical bond as well as lubricating the threads. a CAREFUL application of torque__and sometimes some turning in/turning out repetition__and you will soon be backing the fastener all the way out.

As was touched on a few posts back, LEFT-HAND DRILL BITS make the best easy-outs! Approach any broken fastener as you would if you resorted to just drilling it out__by that I mean, start with a small bit and as close to dead-center as you can (a jagged end can be cleaned up with a Dremel tool) and if you're fortunate enough to have any drill guide-bushings, you can make a center-punch pretty much on center. As was stated previously, the heat from drilling and the bit "biting in" is very often enough to make the broken stub unthread itself right out, as you progressively move to larger diameter LH drill bits. (an index of them from 1/16" to 1/2" by 32nds is a worthwhile investment if you mess around with enough old, neglected equipment).

Big thanks to all the other contributors here too; I'll definitely be trying the couple of lathe tricks )to center the cutter height and the brass to center the work).
 
Top