Rust in gas tank?
- Thread starter copyman
- Start date

.
Thanks for any ideas
Thanks for any ideas
The most success I've had was finding a local machine shop that does it commercially, I've used them for everything from minibike tanks to full size car ones. Price may vary by size but every one I had done was worth every penny, they got them way cleaner than I would ever have. The last Fox tank they did was around $60 bucks? IIRC. Also try searching radiator shops in your area.
What is best way to remove rust build up in Fox gas tank? I've already filled with rust remover and let sit for about a week, it removed some of it but still a lot of rust buildup inside. Outside chrome is fine.
Thanks for any ideas
Thanks for any ideas
POR 15 works well... https://por15.com/products/motorcycle-fuel-tank-repair-kit
![DSCF1380[1].jpg](/forum/data/attachments/217/217487-5173e69712a0c59db898754fb038ebd6.jpg)
I have used and recommended the use of muriatic acid over the years here. What seems to be missed is that I dilute it down to about 5:1. It eats metal, and with non-ferrous metals, produces hydrochloric nuclear bomb gas. I still use it diluted, but for motorcycle tanks I've started using good old fashioned electrolysis.
I make a sacrificial anode fixture that allows me to keep it isolated from the tank, but gets the anode far enough into the tank to do some good. To that, I hook a positive battery lead. (Motorcycle batteries work pretty good) The ground goes to the tank, and for electrolyte I use washing powder soda or phosphoric acid mixed up from a powder.
Sounds more complicated than it is, but I do 50 year old MC tanks like this, then follow up with Caswell's Epoxy sealer. I've heard all about POR and Kens, and everyone has their favorite, but Caswells is mine. It isn't cheap, and nothing I said above is what I do, not what I've read. Well, I did read about it before trying it, and I've tried a lot of things to get rid of rust. The reason I now use electrolysis instead of muriatic acid reductions is that I've put holes in valuable tanks with the acid. It's faster sure, but it can do some damage. I still use acid for a lot of stuff though.
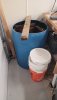
Here's a pic. Anode was 1/4" rod, welded into an "L" and jammed in a hole in 2X4. 12VDC batt, I kept a charger on it, and my volt meter, just to monitor charge voltage because I was curious about amperage draw. (I = V over R)


I make a sacrificial anode fixture that allows me to keep it isolated from the tank, but gets the anode far enough into the tank to do some good. To that, I hook a positive battery lead. (Motorcycle batteries work pretty good) The ground goes to the tank, and for electrolyte I use washing powder soda or phosphoric acid mixed up from a powder.
Sounds more complicated than it is, but I do 50 year old MC tanks like this, then follow up with Caswell's Epoxy sealer. I've heard all about POR and Kens, and everyone has their favorite, but Caswells is mine. It isn't cheap, and nothing I said above is what I do, not what I've read. Well, I did read about it before trying it, and I've tried a lot of things to get rid of rust. The reason I now use electrolysis instead of muriatic acid reductions is that I've put holes in valuable tanks with the acid. It's faster sure, but it can do some damage. I still use acid for a lot of stuff though.
Here's a pic. Anode was 1/4" rod, welded into an "L" and jammed in a hole in 2X4. 12VDC batt, I kept a charger on it, and my volt meter, just to monitor charge voltage because I was curious about amperage draw. (I = V over R)
Yes, I fill it as full as I can get it. The reason I like the phosphoric is that it leaves a black film that seems to be protective. Depending on the amount of corrosion, you'll be changing electrolyte often- once a day anyway. Keep old towels etc under it all to catch the nasties that roil out of the filler hole. You'll never get it perfect. Well, maybe you will, but I rack a disciprine, and shut the process down before it's clean as a whistle, because I know I can dump in some Caswells and cover everything forever. NOTE: I have not tried POR15 and it is highly recommended on the net and here by people who know what they're doing. I'm just in love with using catalyzed epoxy, and if you reduce it down a tad with rubbing alcohol, it thins it out. Also, despite dire warnings, I routinely use half batches out of the $50 motorcycle kits, saving the remainder and using it months later with no ill effects. The stuff is expensive after all. A bit more than two cents worth, but still ash tray change. Plan to spend a weekend with the process, but you dont have to stand over it.
Wow some good info here. That tanks looks rough. I’ll just add what I did to my tank that wasn’t as bad as yours. I filled mine with vinegar. Just white distilled vinegar from the grocery store about 3 bucks a gallon here. I filled the tank and let it sit for a week. I then poured fish tank gravel in the tank and shook it ALOT. Empty the gravel and repeat. I did this a few times over a few weeks and it came out mint. I used the smaller more jagged gravel as opposed to the more rounded stones. last thing to do is fill it with water and some baking powder for about 20 min to neutralize the acid from the vinegar
When I have a Tank that has RUST inside and hard to remove.I tank it to the Radiator shop.They do this all the time.I recently
brought the tank there. The will pressure rise it and if you tank has seams they will sweat solder all the joints.They charged me
$42 for a 12'' x 4'' Tank for all of the above.
brought the tank there. The will pressure rise it and if you tank has seams they will sweat solder all the joints.They charged me
$42 for a 12'' x 4'' Tank for all of the above.
I've started using good old fashioned electrolysis.
Attachments
-
 83.5 KB Views: 13
 -
 90.3 KB Views: 13
 -
 265.7 KB Views: 13
The hardest part was finding an old battery charger that would work well with it.
So I recommend a battery for anyone doing this, if nothing else to maintain steady voltage, and it should trick your new smart charger into getting with the program, no matter what it thinks.
If I could only convince HP that my printer really does need new ink, despite the lies my printer is reporting via my band width to HP, who has taken control over my printer, and probably my smart charger, and several GFI outlets in the garage. (Psychic Spies from China)
Heck yeah! The new "smart chargers" don't like to supply voltage when they don't feel a load. In my case, I got this run down Yamaha with an expensive battery that my charger said was bad. So I kept the charger on the battery, red lamps and all, and then applied the pos and neg leads to the tank and anode and just rolled with it. I kept my voltmeter hooked to it, and over time, the damned charger actually started charging the battery, and now suddenly I no longer have a "bad" battery! It now sits in the restored Yamaha, keeps a charge, and everything is hunky fricking dory! LOL, those who have these smart chargers and see their relatively new batteries fail will appreciate this.
So I recommend a battery for anyone doing this, if nothing else to maintain steady voltage, and it should trick your new smart charger into getting with the program, no matter what it thinks.
If I could only convince HP that my printer really does need new ink, despite the lies my printer is reporting via my band width to HP, who has taken control over my printer, and probably my smart charger, and several GFI outlets in the garage. (Psychic Spies from China)