Super Bronc project has begun

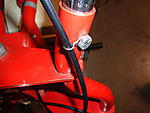
I bought new levers and new cables for the SB. I got the levers installed and started routing the cable. I didn't like the random routing of the cables so I made some retainers for them. I had some 1/16th stainless welding rod and bent it into a figure 8 and welded the ends together. One end is slightly smaller than the other. The bigger end goes on the handlebar bolt and the small end is twisted 90 degrees and the cable runs through it. So far so good. I made 3 of these, 2 short and 1 long. I cant get the longer one to load onto OldMiniBikes but I got the 2 shorter ones loaded. I think it looks a lot better than random routing like it was.

Levers.
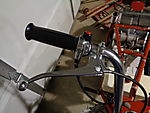


Cable retainers.
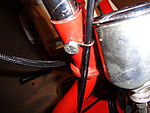


At least its progress. I was looking for levers with adjusters but when I looked at them I didn't like the adjuster being so visible. I am making an adjuster for the front wheel brake. I don't think I will need one on the rear brake. These levers have so much travel that I probably don't even need one on the front either.

Doug
 
Doug, I really like those cable retainers.. Got me thinking now!
Thank you sir but what a pain in the arse to make... Clean and simple is what I was trying for.

I had the Tig set at 20 amps and had to use about half the pedal and then the Auto Darkening helmet didn't want to stay dark.... Its a Miller Digital Elite so its not a fault of the helmet I was just that low in the amperage. I even had to turn the shade down to 8 so I could see.....

I think I made 7 or 8 of them to get 3. They get ugly quickly... But I do like what they do.

Doug
 
While trying to adjust the brake cable I managed to round out the set screw in the retainer..... I had to take the Dremel and just cut the cable off both sides in order to get the retainer out. I put it in the vice with the set screw up and looked in the hole to see a round hole in the setscrew..... Geesh what a mess. I dug around in the tool box and came up with my left hand drill bits. Well its supposed to drill until it catches and then screw the screw out. Supposed to..... No joy. I ended up drilling it out completely and then ran a tape down it to clean up the threads. It cleaned up like new and the threads didn't show any signs of damage at all.

So while digging through a junk drawer full of odd piece parts. I didn't find any set screws but instead found an 1/4 - 20 Allen bolt. Hummmm, it screwed right in and was the perfect length to use. So I put it together with an Allen bolt instead and I must say I feel a lot better about the end result. You really wont notice it unless you go looking for it. I also decided to add a small spring to help the brake band float. I think it will be alright now.

I bought new levers for it and once they were on I just don't like them enough to leave them. So after a lot of searching I came up with another set that look a lot like the original levers so I ordered them and am waiting on them to come.

Here is the cable retainer fix.


Doug
 
Yeah!!!!!!! I got to ride it today for the very first time. Runs like crap..... Need to adjust the carb and see if I can clear that up. Rear brake works good right up until it grabs and locks the tire stalling the engine in the process. The front brake works but not very well. Properly adjusted but it just doesn't have much bite. Speedometer seems ultra slow. :shrug: A little underwhelming to say the least. Rode it about 250 feet had to re crank it a dozen times.

I guess a tank flush and fresh gas plus a carb cleaning are in order. Doesn't have much power but I contribute that to the governor not being adjusted yet. Rides nice though.....

I just have not had the time to devote to it with this build off bike whipping my butt.

Plus the trans is acting up in my Powerstroke. Its a custom built unit with a billet converter and all cryogenic treated hard parts. I talked to Bryan Thompson at BTS (He built it) and he said that changing the filter should be all it needs. 12 years and 100,000 miles and never been touched. He even said to reuse the oil that I drain out. Its Schaeffer's synthetic and it is pricey.... The trans, when he built it and the system was dry, held exactly 5 gallons of Schaeffer's. It has been an absolutely bulletproof trans for the $4000.00 that it cost me. I was at his shop in Lead Hill, Arkansas by 7:40 AM. He showed up at 7:50 AM and opened up. The trans was out by 8:15. Disassembled and fully washed by 8:45. He built a brand new front pump for it and then started in the back and replaced every bushing and bearing in it. checked my parts for wear and put them on one shelf and pulled the exact part off another shelf that had been through the cryogenic treatment. Built super heavy duty clutch packs for it. Got it all assembled including a highly modified valve body and put it back in the truck. While he was building the trans his guys were flushing the lines and adding a 6.0 trans cooler. It is abut 7 inches taller than the 7.3 cooler. They slipped the new trans in and buttoned it all up in short order. And we headed out the door and drove that dude to lunch at 11:45. We will see what happens this week...

I have some custom made parts coming for the Warrior this week. So that should allow me to put a big dent in it and finish up the rear suspension. I hope.....

Doug
 
Thanks for the info

A big "Thank You" to Doug and everyone that added pictures & posts to his thread. I recently picked up 2 SB's ('74 VT-812 & '81 VT-1012) and will be going thru the same learning curve. The good news is that all the valuable info you guys have shared will save me a tone of time and frustration.

Charlie
 

Attachments

A big "Thank You" to Doug and everyone that added pictures & posts to his thread. I recently picked up 2 SB's ('74 VT-812 & '81 VT-1012) and will be going thru the same learning curve. The good news is that all the valuable info you guys have shared will save me a tone of time and frustration.

Charlie
Nice finds. Glad you could learn something from my madness...

I am not finished yet. I still have to get the rear brake to work correctly. I just got frustrated with the brake and walked away. I have chatted with a lot of people about it in the mean time and think I know what needs to be done. And you need a [MENTION=18286]manchester1[/MENTION] seat on that VT_10.....

There's a lot more to come as I have a second VT-812 as well that will be gone through after this one. I just need to get back on it.

Doug
 
Last edited:
Ya that seat on my VT-1012 is atrocious! I put one on order from Karen the day after I bought the bikes. I also bought a new style kick stand from Bryan (jeep2003) for my '74 VT-812 because the original was incomplete. All I had was the bracket mounted to the underside of the engine mounting plate - no kick stand. I remember reading in one of your posts that you were trying to keep the bike original and was leaning towards reworking the existing kick stand. One thing you should know about the newer style K/S's is that the mounting holes are different than the original K/S. The good news is that Bryan supplies a diagram for drilling the new holes.

Charlie
Oh I know the new style has different bolt holes. The Green SB has the new style on it and it is all screwed up. I have bought 2 from Bryan, one stock length and one that is longer by 1 1/2 inches. I just don't like the lean on the stock length. I have not tried the longer kickstand yet but I have the stock length sitting on a 2 x 4 and it sits where I want it. So it should be close with the extra 1 1/2 inches.

As far as the original kickstand on the red SB I took it apart and straightened the slight bend. Then looking at the hole for the pin that limits the travel I realized that the original metal was to soft so I welded up the hole and redrilled it. I have not installed it yet but if I hold it up to the bottom of the engine plate it stands out exactly where it should. Everybody said to replace it with a new style from Bryan but I want to keep it and I think it will sit up on the stand correctly. One concern that I do have is it staying in the up position while riding. If it doesn't want to I have one really simple idea that I think will fix it.

Its sitting on a milk crate right now. Its just the right height to slide it in place and it sit there nice and secure.

Doug
 
Last edited:
Bryan supplied me with a longer kickstand to my specs which I really appreciated. The "original" length just leaned over (way) too much for my liking. I did have to use a stronger spring , however, to raise it up properly.
Michael
 
Bryan supplied me with a longer kickstand to my specs which I really appreciated. The "original" length just leaned over (way) too much for my liking. I did have to use a stronger spring , however, to raise it up properly.
Michael
I remember you saying that you needed a heavier spring. With that in mind I have some extra Baja kickstand springs and had planned to use one of those on Bryan's kickstand on my green SB. He made me one that is 1 1/2 inches longer and I think that will be real close to how I want it to sit. Its sitting on a 2x4 at the moment and That is where I want it so I should be close.

And I agree the stock length is just to short for my liking.

Doug
 
Were you able to sort out your rear brake? I just got my SB running today and have the same issue. When I squeeze the brake lever it kills the engine. Is the rear pulley on the clutch supposed to free-wheel when you are off the gas? Mine does not. As long as the engine is running the small sprocket is turning. (I don't have the chain on yet) Anyone have opinions or cures for this issue?
Brian
Per Ron Kimble, through [MENTION=18319]chatten63[/MENTION] you need to apply 3 drops of motor oil on the drum as you roll the brake drum in a forward direction. This reduces the grab of the brake band to allow it to properly engage. I have not tried this yet but it makes sense to me. As for the torque converter, the rear pulley is directly attached to the rear wheel when the chain is on so no it should not turn when the engine is running but the front should turn with the engine.

Just an FYI. The front pulley assembly on a torque converter is called the Driver and the rear pulley assembly is called the Driven.
 
Thanks, I will try that. What would cause the driven pulley to turn while the engine is idling? I know that the driven pullet turns when the RPM is increased. What could I have screwed up??
 
Thanks, I will try that. What would cause the driven pulley to turn while the engine is idling? I know that the driven pullet turns when the RPM is increased. What could I have screwed up??
The driven is going to turn from drag caused by the belt just being moved by the Driver. When you put the chain on and you have the belt on the correct direction the Driven wont move. Check the belt and make sure that the flat side is towards the engine. As long as the chain is off the Driven should turn.

Your original question says that you have the chain off and that the engine stops when you apply the brake...????? Am I correct that this is what it is doing??? Is the belt on the correct direction???? Flat side in - beveled side out. It should have printing on it that says "towards engine".
 
Yes, I have the belt on correctly. I recall you said in an earlier post that you were having the same issue. There seems to be some slack in the belt but when I have it running the driven pulley turns as fast as the driver.
 
Top