Who's got kickstand woes?
- Thread starter Minimichael
- Start date

Thanks @sparkwizard for noticing. 
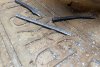
But the marking and drilling tested my patience more than the cutting did. And like I said I'm trying to control the quality (or not) by at least staying consistent. The prototype took a lot of tinkering to get it dialed in, so I'm hoping repetition helps these ones go quicker.
Plus, I really love my portable bandsaw which makes pretty easy work of the freehand cuts.
And just wait til the hammering starts on these. Talk about tedium.
Attachments
-
 1.1 MB Views: 26
 -
 1 MB Views: 29
 -
 2 MB Views: 29
Last edited:
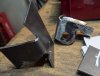
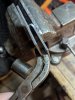
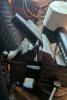
No press. Just my vise.
Keep up the good work !
Thanks for the kind words, @RobertC.
I also must bow down to you for your ingenuity and hard work. Your results are always excellent and your posts are interesting and educational.
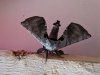
I'm so bout the Lime Green Flyin thingy now!
Lol
Lol
Attachments
-
 572.1 KB Views: 15
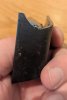
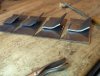
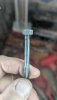
The first bends are begun as of last night. I figured some heat might help, but that still didn't allow the vise to completely squish the fold flat. I'll have to hammer them next, to close the last 1/8 inch or so. You might notice I tried to encourage the cut ends to flare outward during the squishing. I also changed my choice of pliers and found the vise grips worked best for that. (Fourth time's a charm I guess.) Pretty sure the accidental drill hole on that final bracket also helped it flare better. (Live and learn.) I'll just have to beat the others until they start looking more like their perfect sibling.
Attachments
-
 881 KB Views: 18
 -
 1.2 MB Views: 18
 -
 1.5 MB Views: 19
 -
 1.1 MB Views: 18
 -
 874 KB Views: 21
 -
 542.6 KB Views: 18
Last edited:
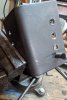
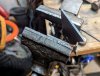
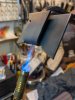
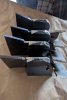
Not all of the backing tabs' first folds folded real square. One of them did. But the others were off a sliver or so, so I was able to adjust them by laying the whole piece onto the blade and just wait patiently for it to get from the outside to inside. Damn I love this saw. If you're doing a lot of cutting with portable jigsaws, a portable bandsaw should be your next saw. Just sayin
So hammering's next, but I adjusted some edges and bends. Just taking my time here. And my old vise jaws are trashed so I'm thinking about replacing them before any more bending. But hammering's next.
So hammering's next, but I adjusted some edges and bends. Just taking my time here. And my old vise jaws are trashed so I'm thinking about replacing them before any more bending. But hammering's next.
Attachments
-
 1.8 MB Views: 14
 -
 1.1 MB Views: 15
 -
 1.3 MB Views: 15
 -
 553 KB Views: 17
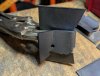
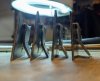
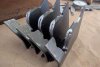
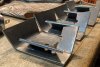
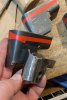
The reinforced pivot tabs are hammered flat enough now that the kickstand clevis fits nicely and may even have enough room in there for a spring washer for smoother operation...once I get a lot further.
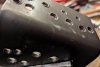
Filing the circle shapes went smoothly, after I bent the rear adjust tabs back out of the way. Not sure yet where their final positions will be.
Next, I have to bend the front cover tabs into place, which may be tricky because I'm already running out of ways to grip these in the vise.
Filing the circle shapes went smoothly, after I bent the rear adjust tabs back out of the way. Not sure yet where their final positions will be.
Next, I have to bend the front cover tabs into place, which may be tricky because I'm already running out of ways to grip these in the vise.
Attachments
-
 1.2 MB Views: 12
 -
 1.2 MB Views: 9
Last edited:
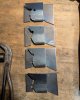
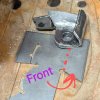
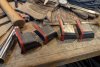
My vise jaws' edges are not smooth, so some stand-ins with better profiles helped me get the bends I'm after. Here are some pics of how I got the frontmost tab into place.
To stay consistent, I'm trying to keep hammer blows to a minimum. And while some seem to call for sharper hits with precise shapes, others want more forgiving pummels, like from a rubber mallet. I also found that putting an intermediate hammer into position against the piece and then hammering just the intermediary really cut down on mistakes. So, I used my square-faced shaping hammer for harsher strikes, driven with a ball pien; and for the softer, bigger bends, I fronted with the rubber mallet, driven by a dead-blow hammer.
It's surprising to me how clean and uniform these have remained.
Next comes cutting though.
Attachments
-
 515.6 KB Views: 10
 -
 1.2 MB Views: 9
 -
 572.5 KB Views: 10
 -
 1.4 MB Views: 10
 -
 1.3 MB Views: 9
 -
 702.3 KB Views: 10
Last edited:
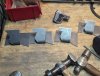
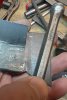
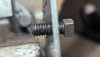
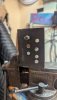
So here's a tip..
If you're tapping threaded holes through 10ga. steel and you want a nice tight thread grip on your 5/16-18 screw, do it with a 5/16-17 tap. You shouldn't go all the way through (so maybe it's really getting your thread lines started with the 17), but then you get your screw and carefully force that the rest of the way through. So I guess this is really form tapping now that I think about it. Anyway, I'm working with mild steel and it's working well so far. I'm also glad I'm practicing these...
If you're tapping threaded holes through 10ga. steel and you want a nice tight thread grip on your 5/16-18 screw, do it with a 5/16-17 tap. You shouldn't go all the way through (so maybe it's really getting your thread lines started with the 17), but then you get your screw and carefully force that the rest of the way through. So I guess this is really form tapping now that I think about it. Anyway, I'm working with mild steel and it's working well so far. I'm also glad I'm practicing these...
Attachments
-
 1.4 MB Views: 11
 -
 1.7 MB Views: 11
 -
 1.7 MB Views: 11
Last edited:
With all the folding and bending done, it's time to trim some excess off the tops to match the prototype. You can check my video to see how the band saw and a single drag cut helps me keep the line straight and clean.
Coming up soon: drilling the main hole.
https://youtube.com/shorts/VFUz2LLnybg?si=oG2uw4RV34XCzjja
Coming up soon: drilling the main hole.
https://youtube.com/shorts/VFUz2LLnybg?si=oG2uw4RV34XCzjja
Attachments
-
 1.3 MB Views: 14
 -
 1.6 MB Views: 14
 -
 1.3 MB Views: 14
 -
 1.1 MB Views: 13
Last edited: