Briggs 2.5 hp side cover issue
- Thread starter bbiggs54
- Start date


The simple answer is yes you need a bearing to install this cover. However, it is not quite that simple to install it.
Ball bearing drive sides were mostly used on water pump and gear reduction engines of the 3hp variety. The crankshaft was machined from the factory to have a ball bearing installed on it and there are a second set of timing marks on the crank and camshaft, due to the bearing covering the crankshaft timing mark when installed (see pic).
2 and 2.5hp (same crankshaft) ball bearing crankshafts were produced but they are very hard to find. 3hp ball bearing crankshafts are easier to find but will likely have a threaded PTO shaft (for Pump), a splined PTO shaft (for gear reduction) or a 3/4" keyed PTO shaft (tillers and such).
All that said, it is possible to install a bearing onto the 2hp crankshaft you have and run it but you will need to create some alternate timing marks to be able to time the engine once the bearing is installed. I have installed a 6204-2RS-7/8 bearing on these shafts, created alternate timing marks and run them (see bike in my avatar) with no problem. You can feel a real difference in the output of the engine as there is a lot less drag, especially with the side-loaded chain drive of a minibike.
Your alternative is to locate and install a 3hp ball bearing crankshaft. You will gain 1/4" stroke making for higher compression and more power. You will need the 3hp connecting rod to go along with it but can reuse the 2.5hp piston. all else remains the same.
The 3hp engine will perform much better if you change from the vacu-jet carb you have to a pulsa-jet carb for better fuel metering, a good intake port smoothing and reshaping will help a lot with power delivery.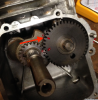
Last edited:


I would recommend removing the inner seal and just run the outer or neither (they pop out easy), this will allow the bearing to be lubed with engine oil instead of grease
You might be able to push it onto the shaft without disassembling the crank from the case but you should add the timing marks before you try this. look at the picture above, the lower marks are the factory timing marks on your crank and cam. With the lower marks aligned as shown, take a center punch and add the upper set of marks in the picture.
When i build these engines, I disassemble down to the bare crankshaft, it makes installation clean and easy.
When i build these engines, I disassemble down to the bare crankshaft, it makes installation clean and easy.
Is the ONLY reason you are swapping the sidecover so you can mount a clutch cover? If so (assumed), you can still do it with the original sidecover. You will need to fabricate some brackets that will bolt unto some of the sidecover bolts. That is how the factory did it with the "Taco" minibikes made by Steens.
Michael
Michael
Well owning an original lil indian from 1968 that's not how it was done. I'm a purist and this a restoration not a restomod. The bike is a '68 and the engine falls within the build time. I know its crazy but just something I wanted to do. When your 70 + you want to relive the past. My first bike was a lil indian with 2.25 hp motor with I eventually put a 5hp Briggs on. Then I moved on with my own money and bought the Cat 400TS which I restored close to what it was, documented on this site. Any way, I always loved mini bikes like everyone who frequents this site and that's how I approach things in life. Once again I thank you for your help and everyone else on this site that enjoys this hobby. I have found everyone here to be very helpful and will do the same whenever I can. Here's a copy of a Polaroid photo of me on that lil indian ( with the 5hp)....my little sister is on bike handle bars, mom and other younger sister standing behind! Bob
Attachments
-
 3.2 MB Views: 30
Well owning an original lil indian from 1968 that's not how it was done. I'm a purist and this a restoration not a restomod. The bike is a '68 and the engine falls within the build time. I know its crazy but just something I wanted to do. When your 70 + you want to relive the past. My first bike was a lil indian with 2.25 hp motor with I eventually put a 5hp Briggs on. Then I moved on with my own money and bought the Cat 400TS which I restored close to what it was, documented on this site. Any way, I always loved mini bikes like everyone who frequents this site and that's how I approach things in life. Once again I thank you for your help and everyone else on this site that enjoys this hobby. I have found everyone here to be very helpful and will do the same whenever I can. Here's a copy of a Polaroid photo of me on that lil indian ( with the 5hp)....my little sister is on bike handle bars, mom and other younger sister standing behind! Bob
Sidebar comment: I am also "70+" and I 100% get it having done both restorations and restomods.
Michael
You might be able to push it onto the shaft without disassembling the crank from the case but you should add the timing marks before you try this. look at the picture above, the lower marks are the factory timing marks on your crank and cam. With the lower marks aligned as shown, take a center punch and add the upper set of marks in the picture.
When i build these engines, I disassemble down to the bare crankshaft, it makes installation clean and easy.
When i build these engines, I disassemble down to the bare crankshaft, it makes installation clean and easy.
Attachments
-
 1.2 MB Views: 10
 -
 1.6 MB Views: 11
The new bearing fit may be tight on the shaft and need to be driven on, as I said I have only done this with the crank out of the case. after the bearing is installed, the crank and cam are installed together, and you would need the marks to confirm timing after installation. you can use emery paper to make the bearing a sliding fit onto the crank and then you don't need the second set of marks.