
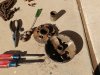
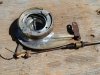
I remembered I have a bearing separator that might be big enough, so I got that on the clutch, and was able to pull it off. The outer half, at least. I still want to remove the inner half, but that might wait until I take the engine apart? I do need to get the rust off the cone, so it won't eat the belt. Anyways, I couldn't find any pics of one of these things taken apart, so now there is a picture of one of these things taken apart. The little clips that hold the springs on are fun, just pry them up, stick some needlenose pliers underneath to hold the spring, and slip them off the end of the spring. The last one that does not have a slot in it, works the same way, which was not obvious to me at first.
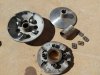
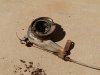
I probably need some new balls, these are a bit rusty. I'll blast the rest of it to clean it off, and I might spin the cone in the lathe to polish it up some?
I probably need some new balls, these are a bit rusty. I'll blast the rest of it to clean it off, and I might spin the cone in the lathe to polish it up some?
New balls may be available, measure diameter. Try to find ball bearings, grade 25 chrome. Only use dry Moly, high temp lube such as Max Torque. https://www.OldMiniBikes.com/max-torque-dry-moly-lubricant.html
Thanks.
I decided to try to polish the balls, I chucked one up in the lathe, and ran sandpaper on it...seems to work. But it takes a while. I know I can buy new ones....they're just 3/4" steel balls (the mic says 0.7500")
I was able to remove the inner cone. I had squirted some penetrating lube on it, then tapped the hub a few times, and noticed that the liquid was moving in and out of the crack between the hub and shaft...so it was not rusted solidly to the shaft. I used the two jaw puller (I had previously thinned the jaws to fit some other project), and off it came. Cleaned up the cones in the lathe, they have some rust pitting, but mostly look shiny now. It might all work, I guess I'll find out in a little while.
I need a new belt, though. Still researching the size.
Polishing the balls worked fine. They roll now. Just needed to remove the rust from them. I put it all back together, and went for a little ride...the clutch is happy now, it speeds up and slows down like it should. The carb drips, but it seems to run mostly ok. I guess that's the next part that needs attention.
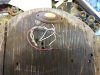
I also found the serial number. B for Bonham?
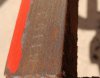
Oh...belt size...appears to be 5/8" top width, around 40" long?
I also found the serial number. B for Bonham?
Oh...belt size...appears to be 5/8" top width, around 40" long?
Last edited:
Thanks, very helpful! I wonder what serial number Davis' bike is?
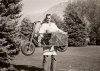
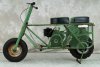
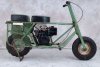
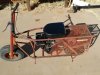
It sure looks like there was some variety on these things, as far as a few of the smaller parts. The seat on the old picture of the bike on it's stand, looks like what mine has. Black all over. The pegs on the two in the brochures I've seen have the light colored pegs like mine, and the brake levers in the one on the blue brochure, and on another one I found pics of on the internet, match the levers on mine. The wheel colors seem to vary, also. Mine appear to be silver, where the paint is still intact on the rear wheel.
I wonder what they had for the kill switch originally, maybe the springy lever next to the spark plug? Mine has the wiring connector next to the tappet cover, but no evidence anywhere of a switch. And no evidence of a springy lever, either, since it would have been painted with the engine, right? Strange.
I took my carb apart, it was dirty, but looks like it will clean up ok. Not much wear. Ordered a kit for it. I also ordered the belt that I think is the right size, we'll see if it fits/works. It's rather confusing....
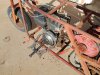
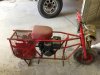
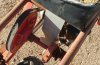
I removed the engine, and did a little cleaning. Sure is a nice bright red under the engine (and on the underside of that plate, also). The engine mount bolts are black steel, no rust on them, because the leaking oil preserved them perfectly.
It sure looks like there was some variety on these things, as far as a few of the smaller parts. The seat on the old picture of the bike on it's stand, looks like what mine has. Black all over. The pegs on the two in the brochures I've seen have the light colored pegs like mine, and the brake levers in the one on the blue brochure, and on another one I found pics of on the internet, match the levers on mine. The wheel colors seem to vary, also. Mine appear to be silver, where the paint is still intact on the rear wheel.
I wonder what they had for the kill switch originally, maybe the springy lever next to the spark plug? Mine has the wiring connector next to the tappet cover, but no evidence anywhere of a switch. And no evidence of a springy lever, either, since it would have been painted with the engine, right? Strange.
I took my carb apart, it was dirty, but looks like it will clean up ok. Not much wear. Ordered a kit for it. I also ordered the belt that I think is the right size, we'll see if it fits/works. It's rather confusing....
I removed the engine, and did a little cleaning. Sure is a nice bright red under the engine (and on the underside of that plate, also). The engine mount bolts are black steel, no rust on them, because the leaking oil preserved them perfectly.
Last edited:
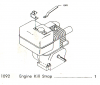
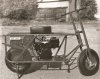
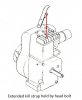
The 'B' in the serial number probably meant a later production model. Tote Gote serial and model number are a very cloudy subject. There were no clear records kept. Ralph even hates to talk about the subject. What we now call the model A, was just known as a Tote Gote ( no model name). It just came before the model B. The model VS was the first recorded model number. The model B came later and was distinguished by the frame hoop to protect the Salsbury clutch. These pictures also show the later kill strap that extended out for easier access. You lifted the strap to kill the motor. The later kill strap attached to motor head bolt.
Attachments
-
 146.5 KB Views: 32
 -
 137.1 KB Views: 31
 -
 86.5 KB Views: 24
Last edited:
")
I was thinking about the kill switch, and the doorbell button that was hanging by a wire from my engine. Where was it mounted? then I figured it out, must have been under the seat. So I looked at the seat plywood, sure enough, there are two screw holes that line up exactly, near the front. Neat place for it. I think I'll put it back there. This is one modification that I like.
Made a new seat today, my wife sewed up the cover. I took the front brake apart, and cleaned out the excess grease that someone pumped into it. Got lucky, the shoes were not gummed up. The carb kit came in the mail, so I got that back together, and running...but it was dark out by the time I was able to get it done, so I didn't get much opportunity to get it tuned and test driven.
Been thinking about the painting thing. I'm thinking about powder coat, I'll probably get an estimate, and it will be too much, so I'll end up sandblasting the frame etc myself, and painting it with automotive paint, or something.
Been thinking about the painting thing. I'm thinking about powder coat, I'll probably get an estimate, and it will be too much, so I'll end up sandblasting the frame etc myself, and painting it with automotive paint, or something.
Painting
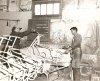
Tote Gote used a 'flow' process to paint their machines. Using hoses, the paint was liberally applied and allowed to flow off, back into the vat. They were rotated to prevent runs. Then put onto the rack to dry.
I like how you've done your seat. You're doing a good job of keeping it original.
Tote Gote used a 'flow' process to paint their machines. Using hoses, the paint was liberally applied and allowed to flow off, back into the vat. They were rotated to prevent runs. Then put onto the rack to dry.
I like how you've done your seat. You're doing a good job of keeping it original.
Attachments
-
 923.7 KB Views: 55
Thanks! the picture is very helpful. I had read about the flow process, and was thinking about how I might do something similar. The main problem with painting something like that, is getting the paint everywhere, especially underneath. I was thinking about making a rotisserie, mainly to make it easier to get everything painted. Might also help reduce runs, if I keep turning it after painting (it would probably need to be motorized). Way too much effort, I know! but I thought it was neat that the nuts and bolts holding the jackshaft bearings have paint in the threads. Can't really powder coat it, and have the bearings installed.
Might be a little while til I get around to the cosmetics, though. My shop is full of Airstream trailer right now, which I need to get working on again, and get outside.
Might be a little while til I get around to the cosmetics, though. My shop is full of Airstream trailer right now, which I need to get working on again, and get outside.