Gonna Be Ugly - Powell Model D First Build
- Thread starter The New Guy
- Start date
- Tags custom model d modified powell
Good to be back in town
Business trips suck! They take you away from the important things in life, like your first mini bike build.
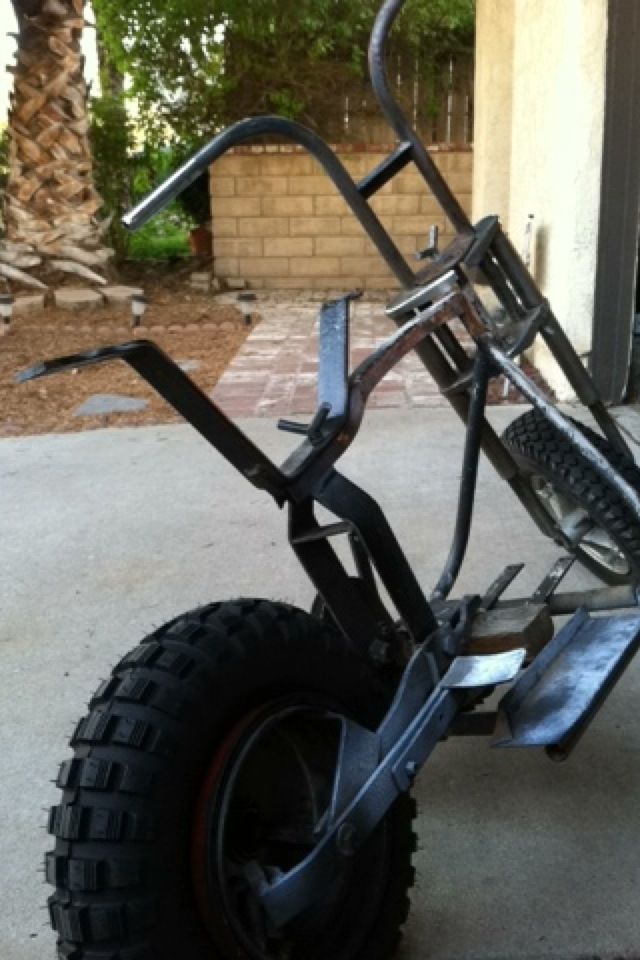
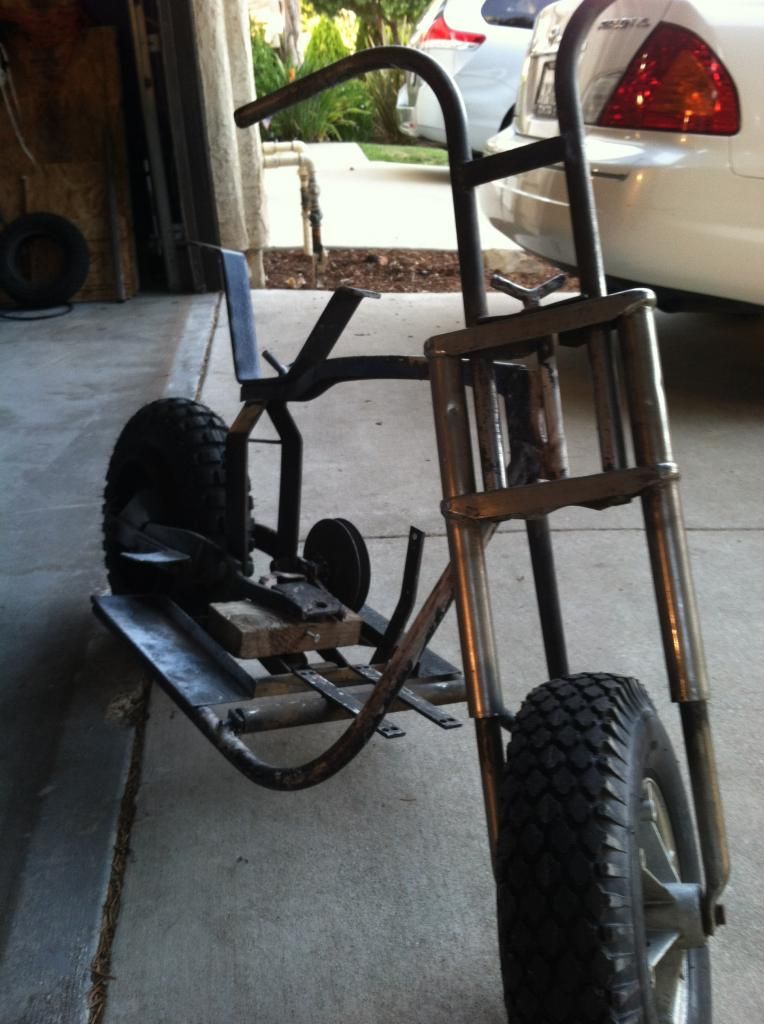
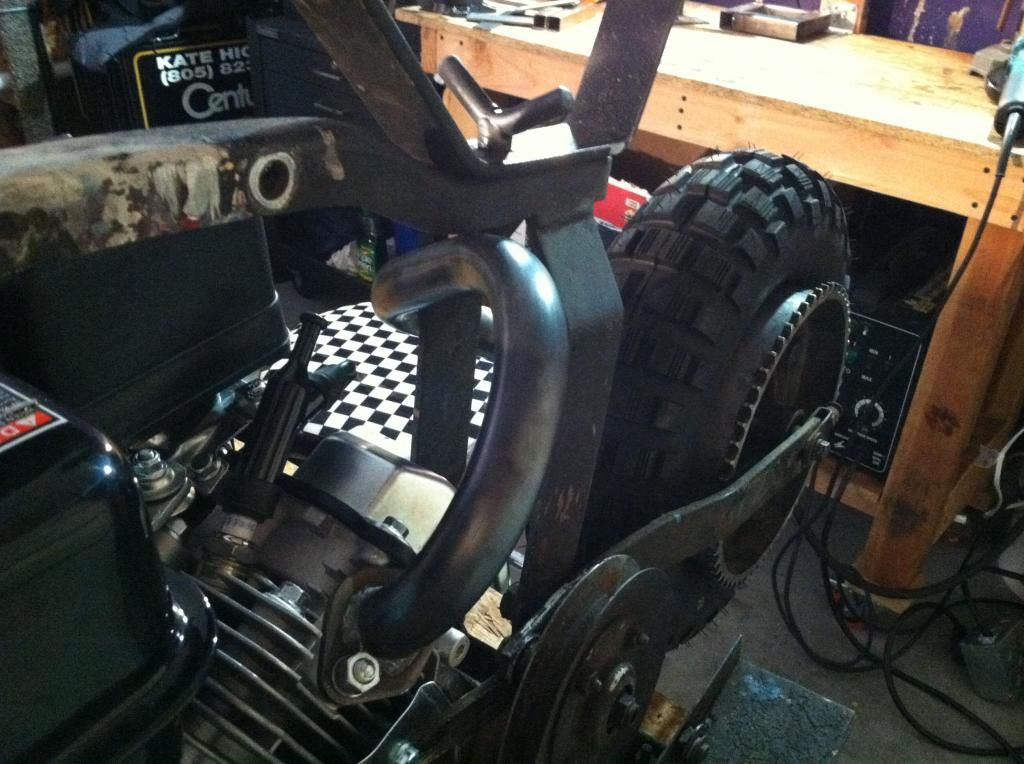
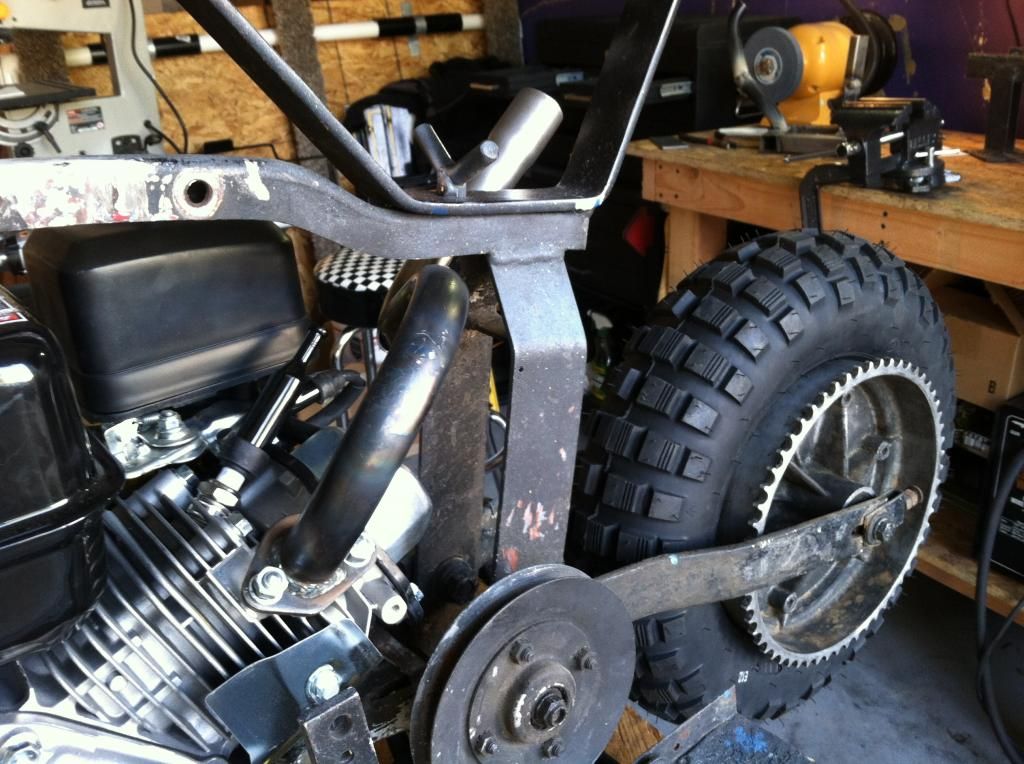
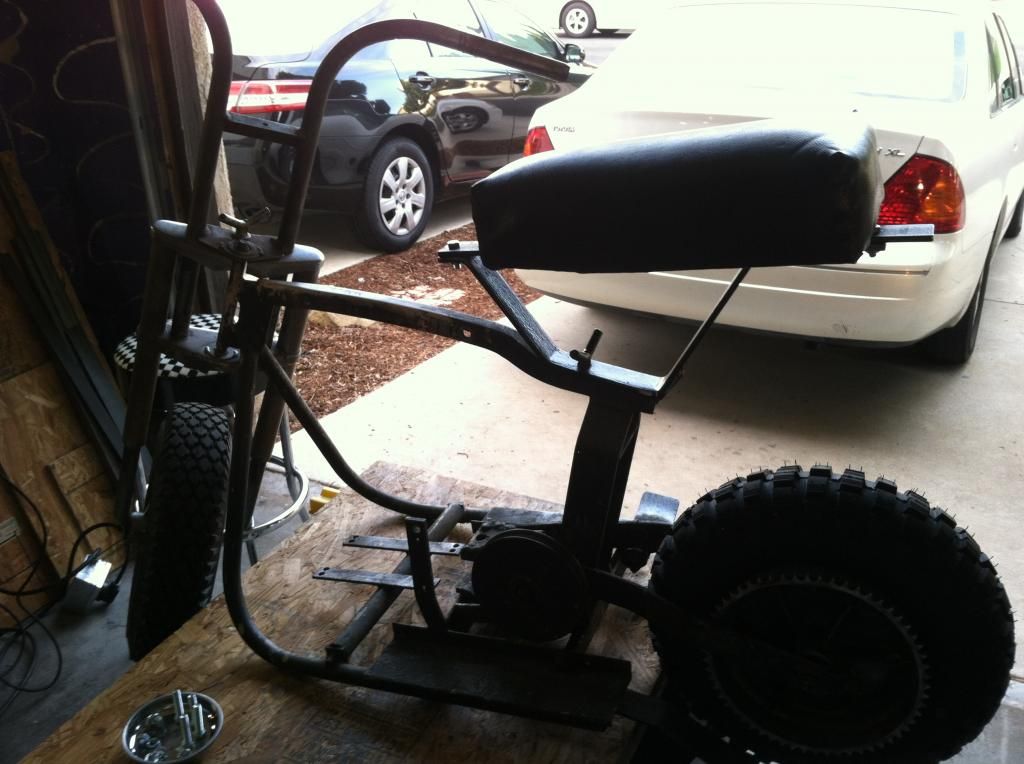
On the plus side, most of my parts arrived while I was gone! I spent awhile yesterday pulling everything together, and I now officially have a fairly complete rolling frame.
The first order of business was the tires - no problem there, new tires and tubes, all good on that end. The wheel bearings are still in awesome condition too.
Next was the rear shock, which was the most interesting challenge. To start off, I cannot tell if I need any special parts to properly mount the spring - so I simply just threw it in there and wrenched the mangled stop strap back over it with a c-clamp. Eff it.
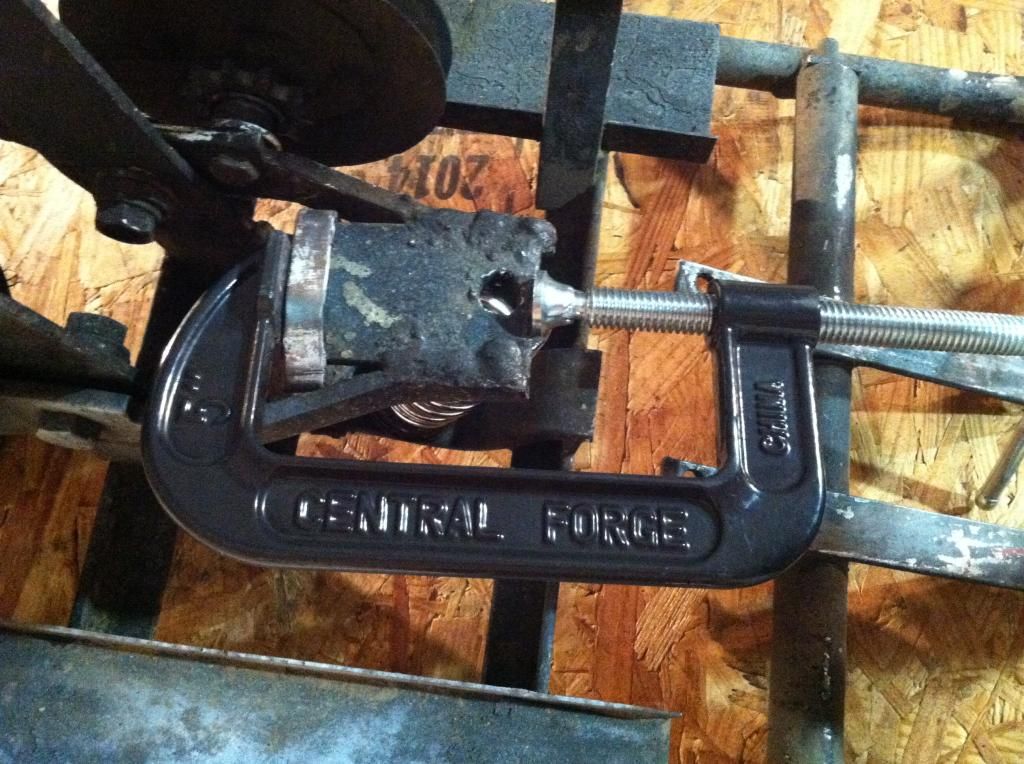
If it becomes a problem, I'll do it nicer and proper, but for now, I rolled up and down several bumpy hills and the spring performed perfectly.


Unfortunately it's a bit soft, being only a 200lb spring, and bottoms out without too much difficulty (I'm 160lb.) I'm going to need to buy a heavier spring, or if I have to, a second, smaller inner spring. Either way though, it was a success, and it feels great to have a very smooth rolling frame.
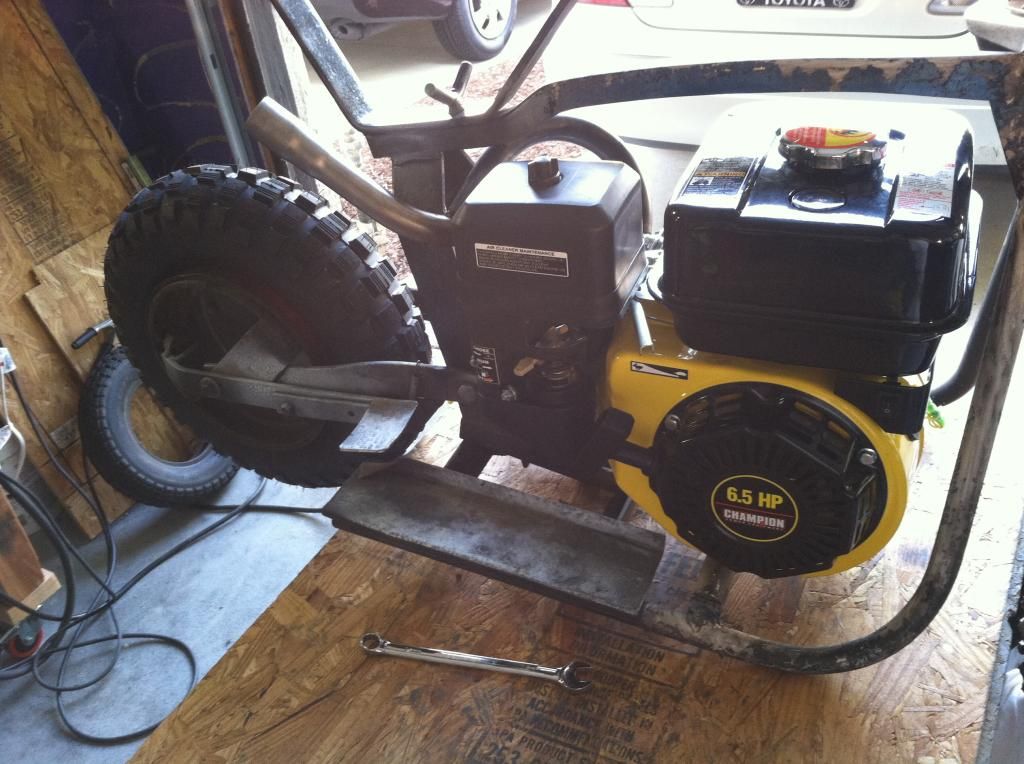
At this point, I ordered a torque converter from the warehouse (the Comet 30 clone). I'm going to try and make the existing pulley/10-tooth sprocket work, but if I can't I'll have a backup.
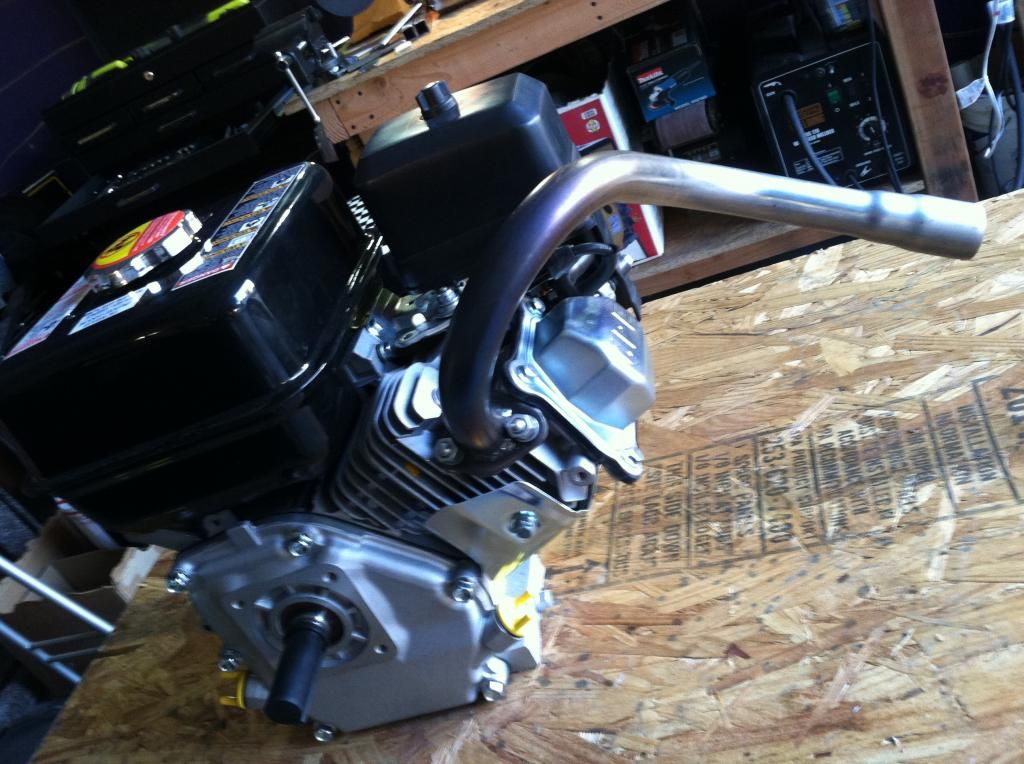
The other bit of fun I face now is mounting the engine. The great news is that I don't need spacers. As suggested, I replaced the "manifold" with a header, and I've got more than enough room now. Unfortunately, the prefab header is hitting the frame, preventing the engine from mounting at the correct angle. If I can't bend it to the way I need it, I'll simply have to make my own. Should be a small issue to take care of. Overall, good stuff all around!
Business trips suck! They take you away from the important things in life, like your first mini bike build.
On the plus side, most of my parts arrived while I was gone! I spent awhile yesterday pulling everything together, and I now officially have a fairly complete rolling frame.
The first order of business was the tires - no problem there, new tires and tubes, all good on that end. The wheel bearings are still in awesome condition too.
Next was the rear shock, which was the most interesting challenge. To start off, I cannot tell if I need any special parts to properly mount the spring - so I simply just threw it in there and wrenched the mangled stop strap back over it with a c-clamp. Eff it.
If it becomes a problem, I'll do it nicer and proper, but for now, I rolled up and down several bumpy hills and the spring performed perfectly.
Unfortunately it's a bit soft, being only a 200lb spring, and bottoms out without too much difficulty (I'm 160lb.) I'm going to need to buy a heavier spring, or if I have to, a second, smaller inner spring. Either way though, it was a success, and it feels great to have a very smooth rolling frame.
At this point, I ordered a torque converter from the warehouse (the Comet 30 clone). I'm going to try and make the existing pulley/10-tooth sprocket work, but if I can't I'll have a backup.
The other bit of fun I face now is mounting the engine. The great news is that I don't need spacers. As suggested, I replaced the "manifold" with a header, and I've got more than enough room now. Unfortunately, the prefab header is hitting the frame, preventing the engine from mounting at the correct angle. If I can't bend it to the way I need it, I'll simply have to make my own. Should be a small issue to take care of. Overall, good stuff all around!

Looks good so far :thumbsup: Like David said cut the header and turn it to where it will work :thumbsup:
This is what I did with the one on my trike
This is what I did with the one on my trike
I didn't like the way the header came straight out the back :doah:

So I took it to work and stripped the paint off :thumbsup: and then took it to the band saw and cut it in half between two of the bends :hack:

I brought it home and just tacked it back together the way I want it :weld: I'll take it back to work tomorrow and have my buddy tig it all the way around :weld: add some header wrap and you will never know :thumbsup:

So I took it to work and stripped the paint off :thumbsup: and then took it to the band saw and cut it in half between two of the bends :hack:
I brought it home and just tacked it back together the way I want it :weld: I'll take it back to work tomorrow and have my buddy tig it all the way around :weld: add some header wrap and you will never know :thumbsup:
So you installed the spring without taking the swing arm off ? If the swing arm is taken off it all installs easy , it's just slid back from the front with the spring in place .
The header is going to need to be cut and turned to not hit and come out where you need .
The header is going to need to be cut and turned to not hit and come out where you need .
Didn't have to take off the swing arm David! The stop strap had already been bent back over an inch, so the swing arm was just swinging around freely. All I had to do was throw the spring on, put some weight on the bike to depress the swing arm, then pull the strap back over the stop plate where it should have been!
Great thought on simply cutting the header, I hadn't even thought of that. Hopefully one smart cut will eliminate two bends I was planning on making. :hammer:
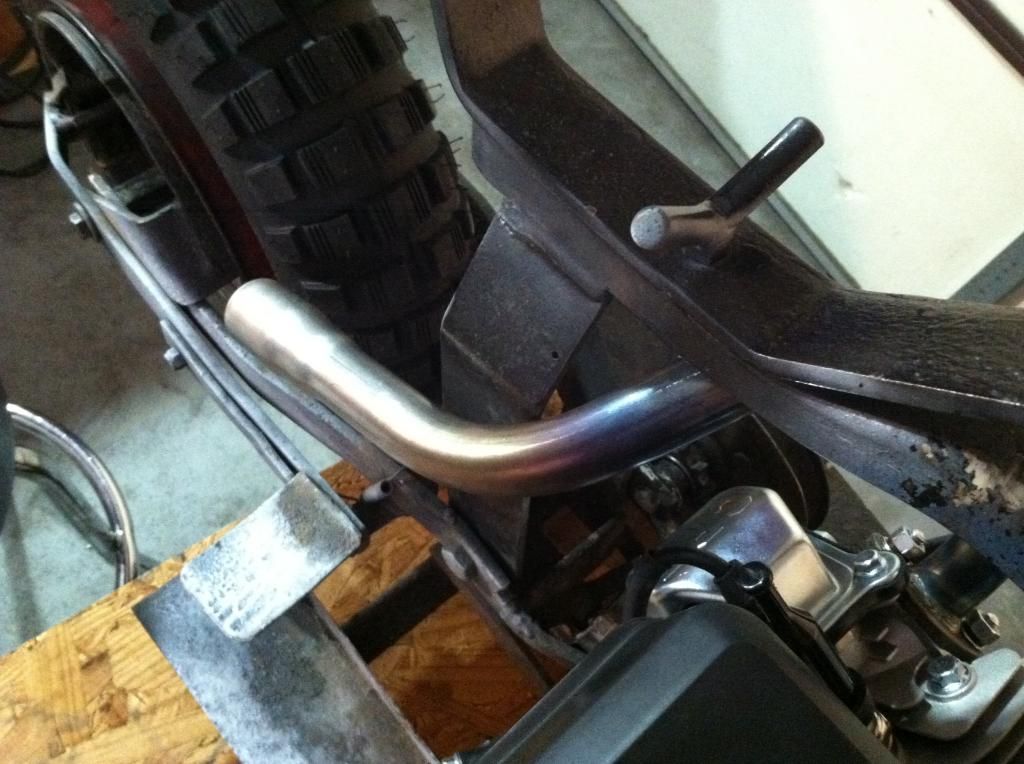

I think you would be better off cutting it close to the flange and turning it there and then cut it and turn it up :thumbsup: I think if you can get it hot enough to bend it it may kink :doah:
Yes Sir, that's exactly what David did on my new Honda Powell. It looks pretty much like it came that way, one weld. He also welded on the small NR muffler.
Jesse
Well, maybe I got lucky, but it worked out pretty damn well! I used a mix of the different suggestions I got. I did end up heating up the pipe near the flange and lowering it - took a lot of heat, but it worked perfectly! It worked so well, in fact, that now I don't need to even tilt the engine forward to make it all fit!
Then, I made a cut closer to the end of the pipe, rotated the end upwards, and tacked it to create room for a muffler and make it look better. I like the aggressive, short-pipe upward-angle look. I then ran out of wire, and now must wait until Monday to finish the weld. So far not bad though, I think!
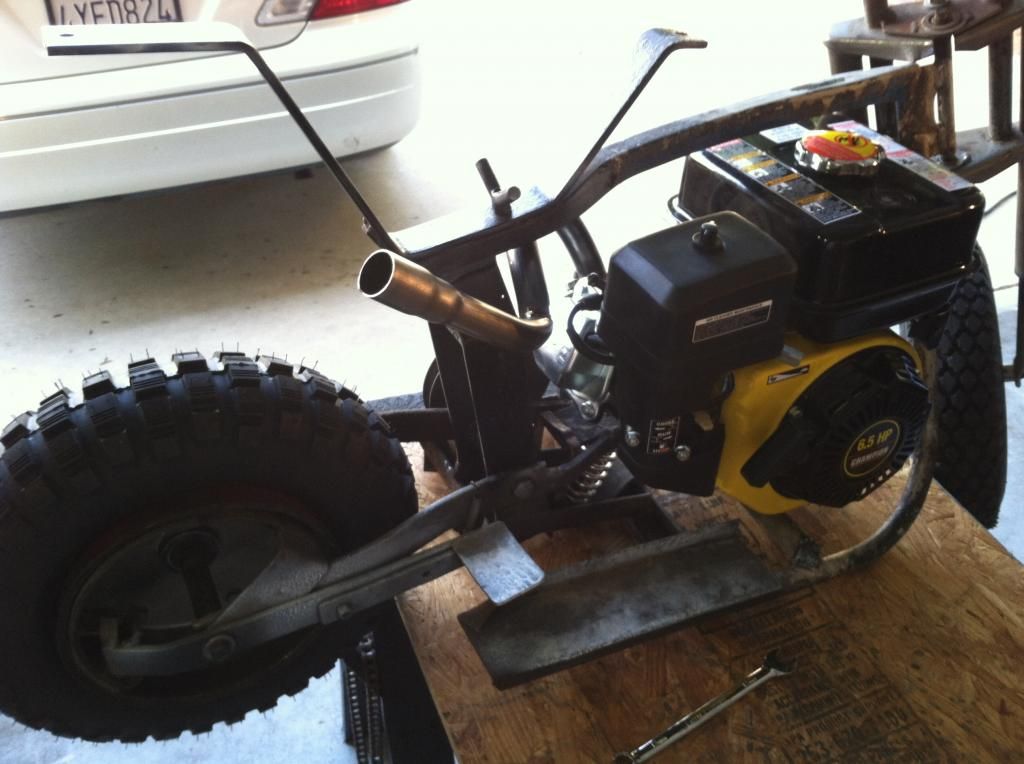
I now am rethinking welding a plate to freeze the pivoting engine mount; I may just create a bracket to mount the engine to the top of the frame, where the old upper mount was located before I had to remove it. I'm trying to alter the frame as little as possible. Great progress! Ordered the TAV2 yesterday and now I'm just deciding between NR's small and large muffler. :thumbsup:
Then, I made a cut closer to the end of the pipe, rotated the end upwards, and tacked it to create room for a muffler and make it look better. I like the aggressive, short-pipe upward-angle look. I then ran out of wire, and now must wait until Monday to finish the weld. So far not bad though, I think!
I now am rethinking welding a plate to freeze the pivoting engine mount; I may just create a bracket to mount the engine to the top of the frame, where the old upper mount was located before I had to remove it. I'm trying to alter the frame as little as possible. Great progress! Ordered the TAV2 yesterday and now I'm just deciding between NR's small and large muffler. :thumbsup:
Rear spring challenge
Well, buying the 200lb-ish spring was a huge oversight on my part, not sure what I was thinking. A 200lb spring, yet the bike and I weigh a combined 250, at least. Ah well, I did say dumb mistakes would be made :doah:
I just bought a 465+ pound spring for my next attempt, I'm optimistic about it. The 200lb spring does work, but if I hit so much as an acorn, it'll want to bottom out. :thumbdown:
I spent every minute of my free time today trawling the internet for a spring that comes reasonably close to the specs of the original spring, and even this new one takes some liberties - hopefully it'll work. Should be here by the end of the week.. For reference, the new one I bought is here:
RAYMOND Die Spring,Medium Duty,1.5x4 In - Compression and Die Springs - 44U650|104716 - Grainger Industrial Supply
Last edited:
Captain's Log, Entry 6
Busy week!
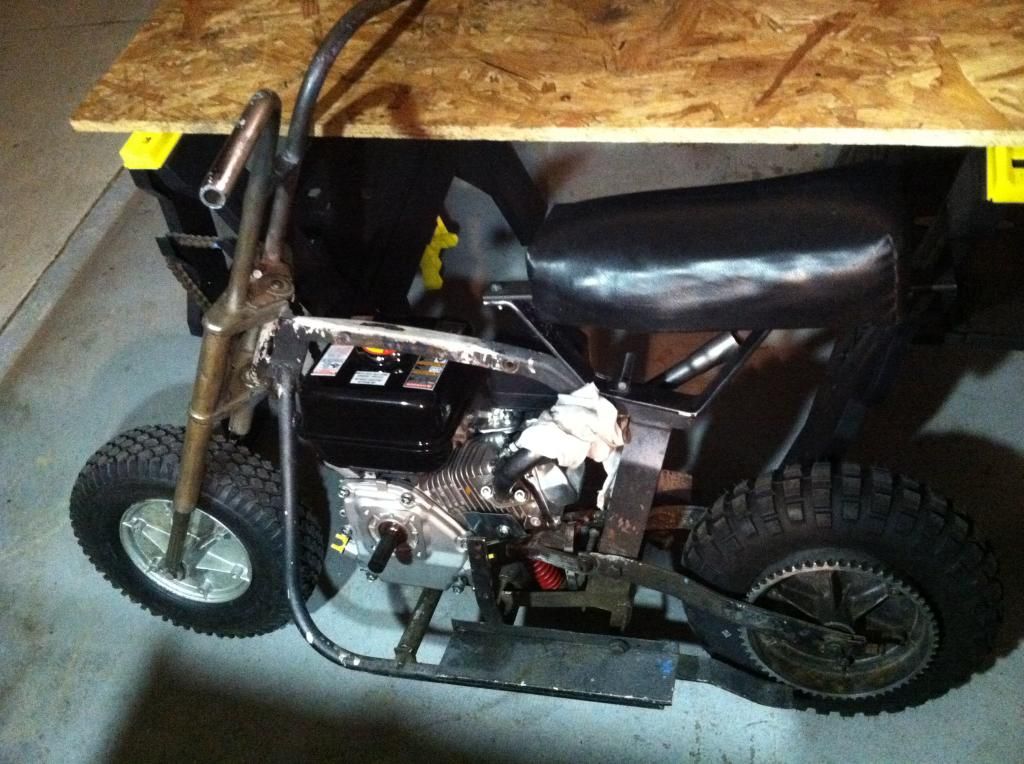
All of my parts arrived, and my welder is back up and running. The exhaust alteration is all done, and several other challenges were tackled.
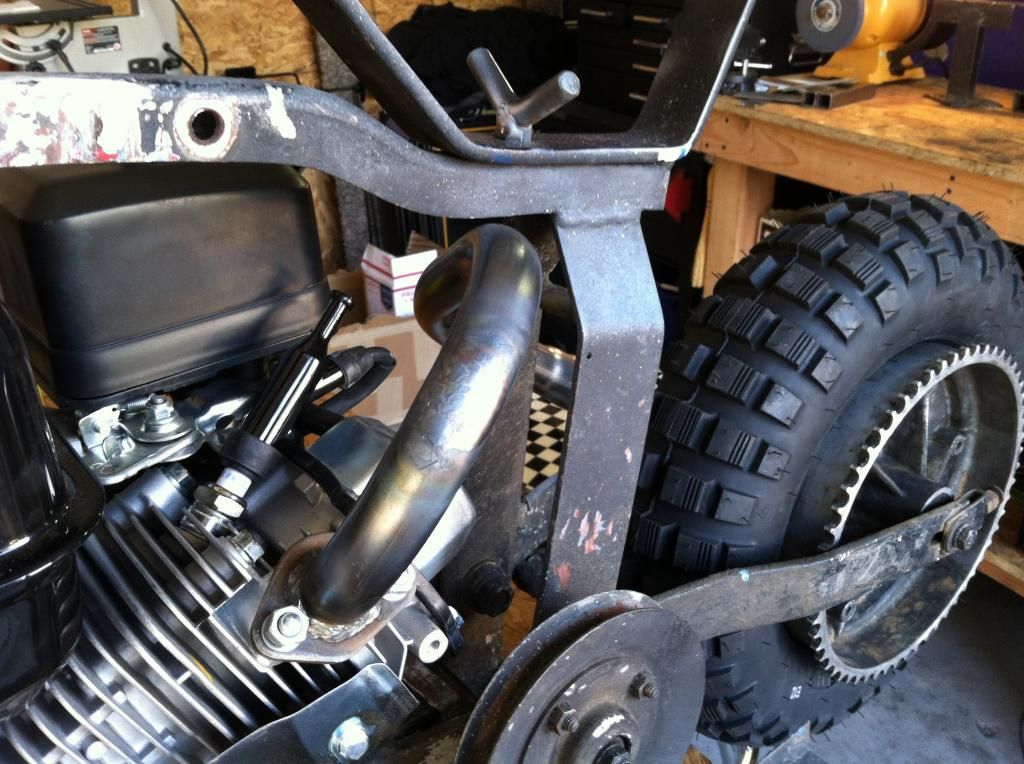
The first of which was the seat. It was the easiest to knock out, and starting with a small victory seemed good. With a new piece of steel running across the seat bracket, four drilled holes with some WD-40 out got me a frame I could sit on.
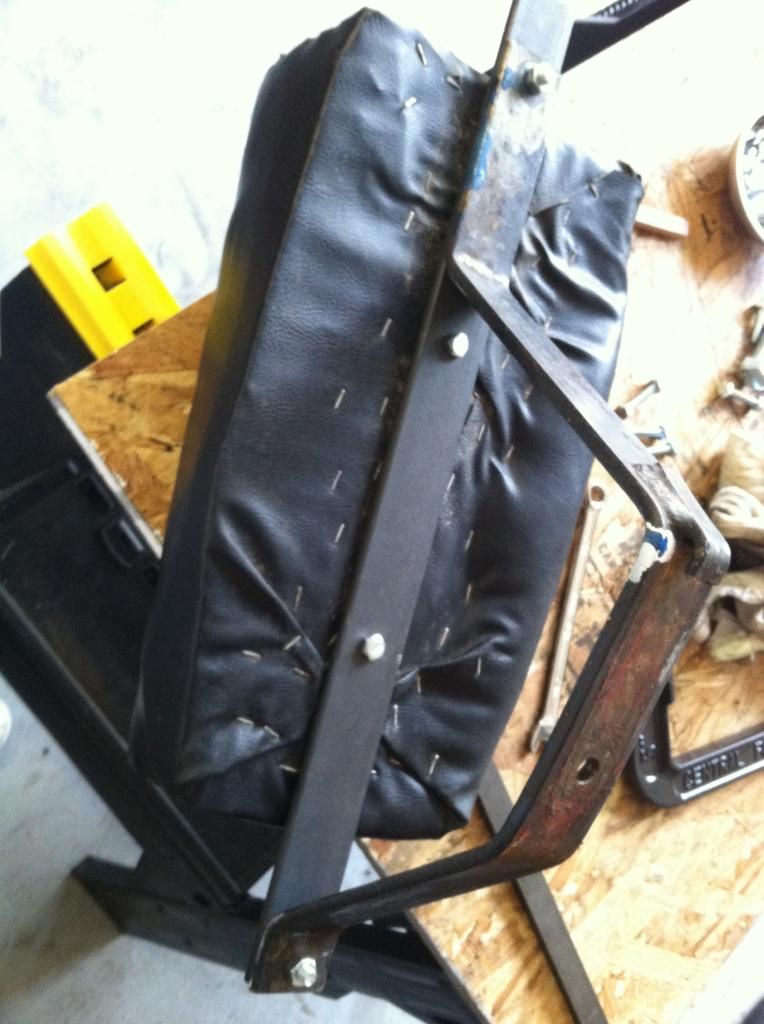
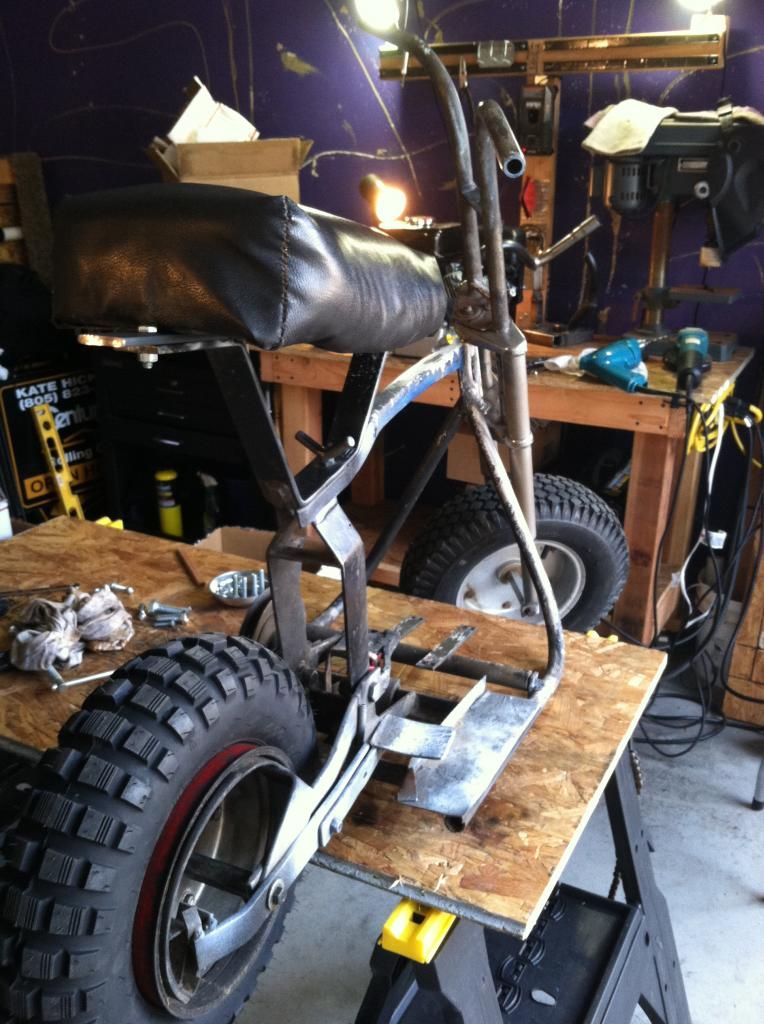
How and why did I find such a sexy and sleek seat? (Sarcasm intended.) Easy: $17 on Ebay. Done. :thumbsup:
Next up: The overly soft spring. I swapped it out with the new 465+lb/rate red spring - or at least I tried, but the modifications that a previous owner had made to the swingarm made that difficult. I kind of fudged it with an added bolt welded on, but oh well. It works, and it works perfectly, so I don't care that the spring isn't seated properly. Not too stiff and not too soft for my ~250lb combined weight including the bike, I highly recommend this spring, just prepare for the .75" inner diameter.
I also received the muffler (I'll weld on later) and the torque converter. This is where my biggest challenge lies. The torque converter is way-the-eff off of where the bike seems to need it to be.
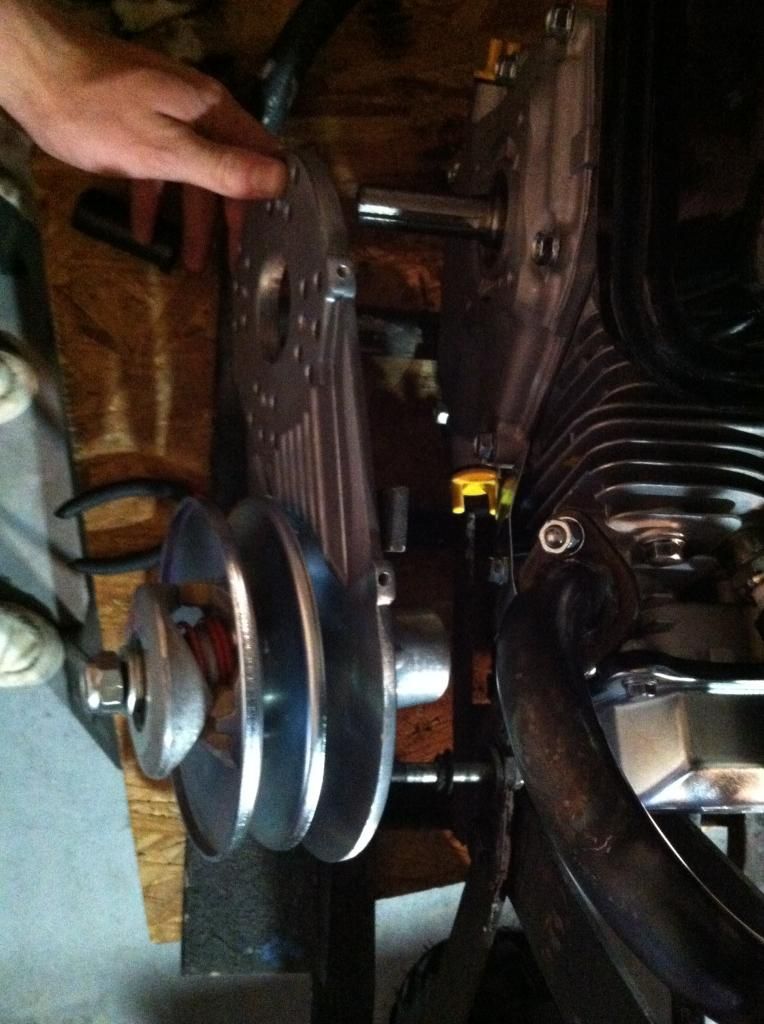
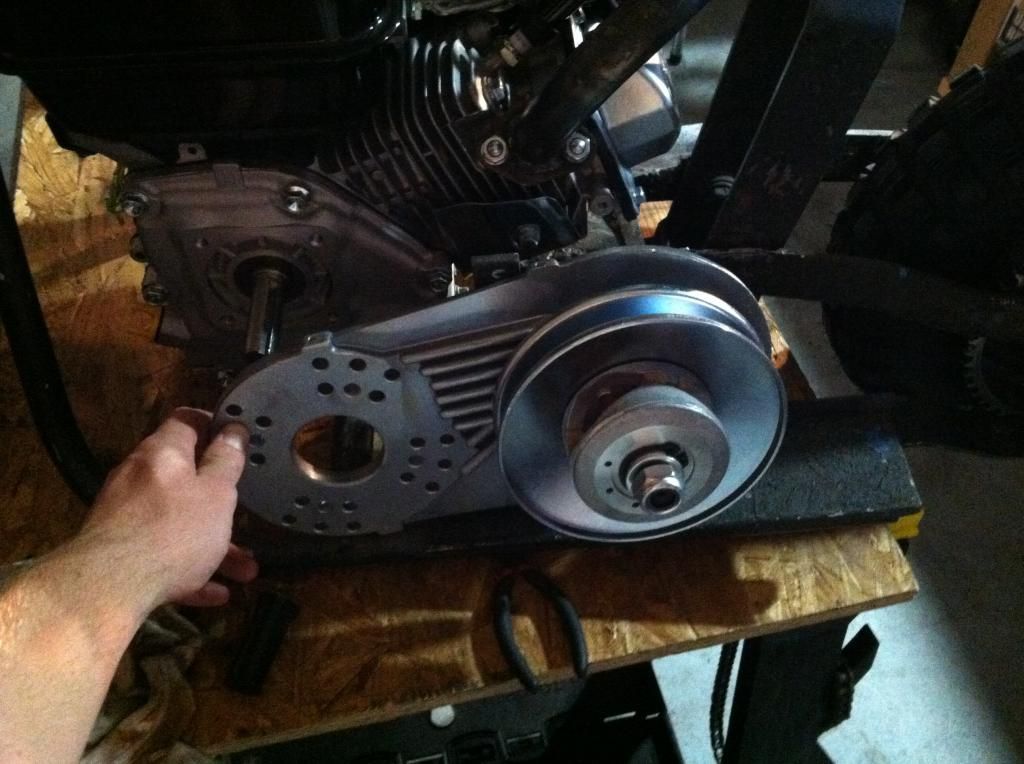
This really does not seem to have an easy fix, I'm really going to have to think about this one. A quick assessment screams "this is NOT going to work," so I'm going to have to try to find a way to use it, so I haven't wasted $140! :doah:
Overall though, major hiccup aside, it's coming along! I'm really pleased with the springs/suspension.
Busy week!
All of my parts arrived, and my welder is back up and running. The exhaust alteration is all done, and several other challenges were tackled.
The first of which was the seat. It was the easiest to knock out, and starting with a small victory seemed good. With a new piece of steel running across the seat bracket, four drilled holes with some WD-40 out got me a frame I could sit on.
How and why did I find such a sexy and sleek seat? (Sarcasm intended.) Easy: $17 on Ebay. Done. :thumbsup:
Next up: The overly soft spring. I swapped it out with the new 465+lb/rate red spring - or at least I tried, but the modifications that a previous owner had made to the swingarm made that difficult. I kind of fudged it with an added bolt welded on, but oh well. It works, and it works perfectly, so I don't care that the spring isn't seated properly. Not too stiff and not too soft for my ~250lb combined weight including the bike, I highly recommend this spring, just prepare for the .75" inner diameter.
I also received the muffler (I'll weld on later) and the torque converter. This is where my biggest challenge lies. The torque converter is way-the-eff off of where the bike seems to need it to be.
This really does not seem to have an easy fix, I'm really going to have to think about this one. A quick assessment screams "this is NOT going to work," so I'm going to have to try to find a way to use it, so I haven't wasted $140! :doah:
Overall though, major hiccup aside, it's coming along! I'm really pleased with the springs/suspension.
Your doing good, and you are having the challenges that all of us have faced!
In regards the TAV not fitting, what part is not working? Alignment issues? Move it over? Driven side hitting the motor? Tilt it forward more, grind some TAV fins...move on! EVERYTHING can be done, and part of the fun for me is figuring these things out. Whenever I do something, I don't have the benefit of of a welder, so I need to be creative! YOU CAN DO IT!
seat is fugly...matches the rest of the bike:laugh:....you may want to ad some cross support the the mounting piece. Your seat may want to wobble forth and back and it won't last long!
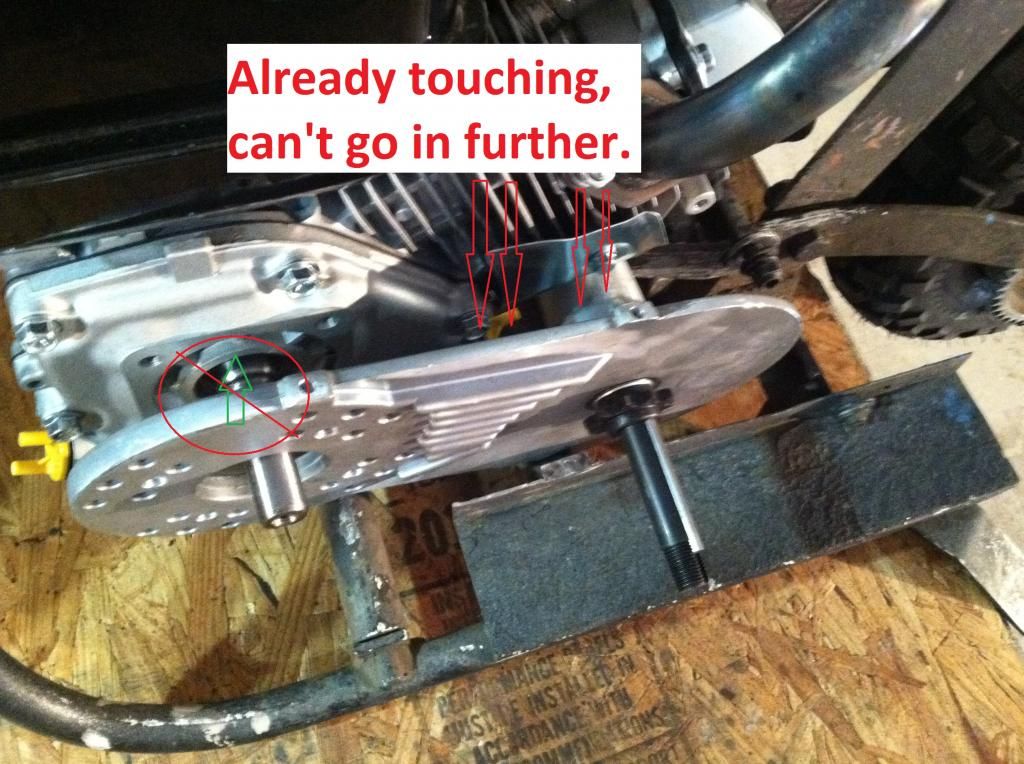
Haha! Thanks CarPlay. Regarding the TAV2, I included a couple pictures above that simply show that keeping the pulleys mounted to the plate would prevent them from ever fitting; way too close together. I am leaning towards ditching the plate and buying a longer belt, I just need to figure out of that's possible. :laugh:
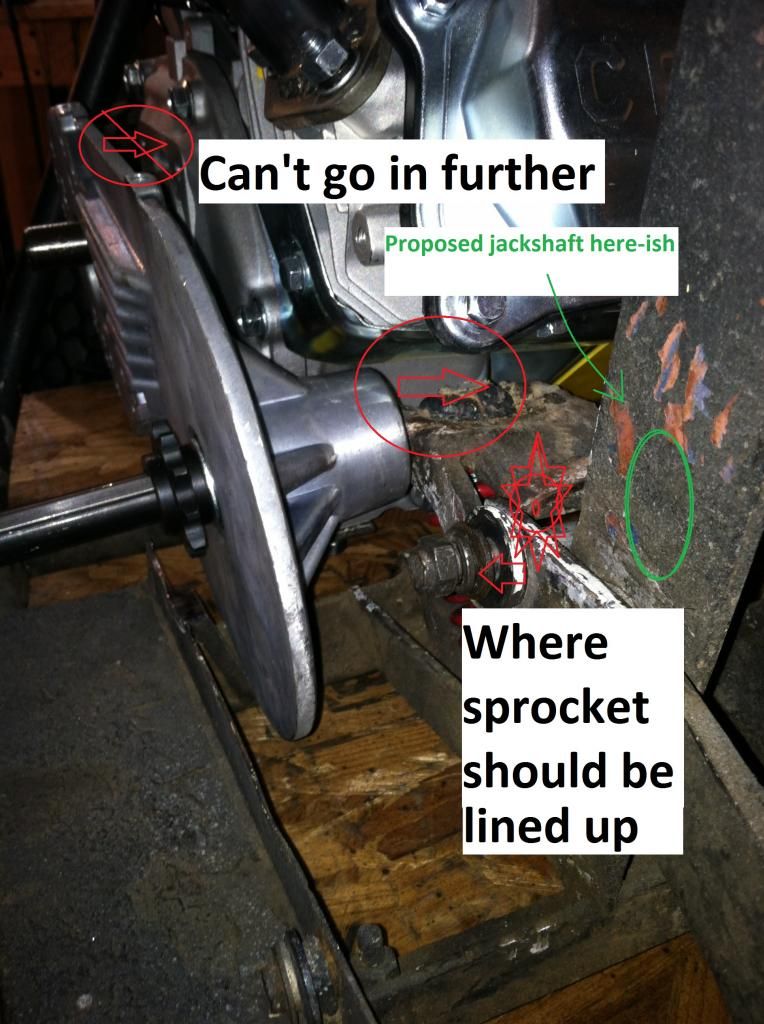
Well, looks like I'll be making and mounting a jackshaft.
I looked at this thing for half the day today, and I just can't see any other way. The aluminum TAV2 mounting plate is great, but it's just not going to work. I removed the vertical steel bar to make sure my guess what right, and it looks like there's just no other feasible way to make it work. This should be interesting. Studying up on a few of XJRock and David Wulf's builds to see how they did it, if ever.
I looked at this thing for half the day today, and I just can't see any other way. The aluminum TAV2 mounting plate is great, but it's just not going to work. I removed the vertical steel bar to make sure my guess what right, and it looks like there's just no other feasible way to make it work. This should be interesting. Studying up on a few of XJRock and David Wulf's builds to see how they did it, if ever.