Pat, This ignition option has been discussed several times here. Everyone says it can be done because someone on smoke stack said it could be.
So the only question I have, is how is this device setting timing at .065" before top dead center? (That is where your H35 needs to fire the spark plug)
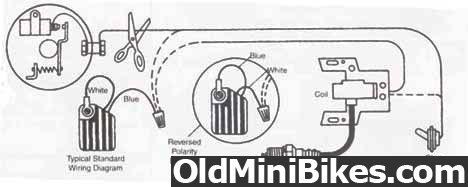
These systems are designed to work off of magneto primary winding sensing, and the electronic unit fires the signal back to the magneto secondary winding for spark. I do not know if the points-type Tec magneto will accomplish this externally. I don't think so. So lets say you get the two wire or three leg magneto so you can trigger this thing:
How do you set the timing to the .065" of advance it needs to fire correctly? A degree wheel, a timing light, an electric drill with crank adapter, once you determine what degree of rotation .065" in the hole converts to.
For the price, it's worth giving it a try, but I can find no reason it "would" work, nor any indication that it has the ability to maintain, or handle timing adjustments.
You do not need to remove your flywheel after setting the timing on your Tecumseh. It is a very simple process to set it, although aging engine blocks tend to yield some of the book instructions moot. For example a .020 point gap at TDC doesn't always give you the required timing (points just start to open) at the prescribed (varies with Tec model) advance setting.
I'm here to help. Off line if needs be, or over the phone.
So the only question I have, is how is this device setting timing at .065" before top dead center? (That is where your H35 needs to fire the spark plug)
These systems are designed to work off of magneto primary winding sensing, and the electronic unit fires the signal back to the magneto secondary winding for spark. I do not know if the points-type Tec magneto will accomplish this externally. I don't think so. So lets say you get the two wire or three leg magneto so you can trigger this thing:
How do you set the timing to the .065" of advance it needs to fire correctly? A degree wheel, a timing light, an electric drill with crank adapter, once you determine what degree of rotation .065" in the hole converts to.
For the price, it's worth giving it a try, but I can find no reason it "would" work, nor any indication that it has the ability to maintain, or handle timing adjustments.
You do not need to remove your flywheel after setting the timing on your Tecumseh. It is a very simple process to set it, although aging engine blocks tend to yield some of the book instructions moot. For example a .020 point gap at TDC doesn't always give you the required timing (points just start to open) at the prescribed (varies with Tec model) advance setting.
I'm here to help. Off line if needs be, or over the phone.