New Rupp Project for Christmas

#1
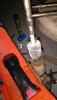
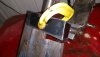
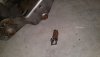
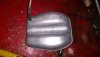
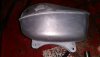
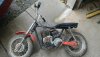
My daughter and son in law got me a great Christmas present. A Roadster 2. It's not going to be a show bike. My bikes are riders.
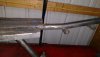
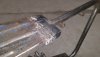
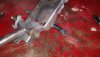
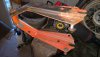
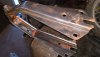
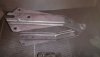
I started disassembly on Christmas morning. The forks are frozen. I've got one of them loose. The other is more stubborn.
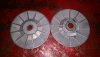
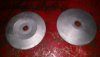
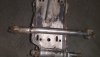
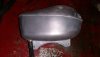
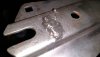
The rear shocks aren't much better. The drive clutch is cracked, but even if it wasn't both clutches are really worn.
Has anyone converted to a 3/4" belt setup on them or do you stick with the 5/8 and modify Comet 20 series to use the 5/8" belt? I'd be OK with either because it looks like I'll be replacing both clutches.
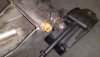
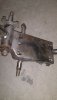
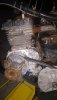
The engine is seized, but I don't care. I've got a 4HP Techumseh from the 60s for just such an occasion. I'm definitely glad to get my hands on a 12" tired Rupp. My cousins used to own a gas station where the sold and serviced them. I loved visiting there to see all bikes, carts and sleds. I just had to wait until I was in my 50s to get one! :laugh:

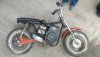
It's pretty ugly at the moment, but I'll get it fixed up.

IMG_20161224_162455630.jpg IMG_20161224_160854362.jpg IMG_20161224_160833363.jpg
 
#2
Please post pics as you work on it. I have 3 Rupps I'll be restoring this winter (as soon as I can get the car project I'm working on out of my garage).
I read somewhere in a thread about using the 3/4" belt 20 series clutches but don't remember where. You just have to make sure to measure your jack shaft diameter to get the correct driven clutch. Also measure the crankshaft to jack shaft center line distance to find the correct belt. Comet has a chart showing what belt you need for each center line measurement but I don't have the link to it either, sorry.
What year is your Rupp project? At first I thought 72 but saw the red front fender and red trailing arm and wasn't sure. Of course someone could have painted them... Are the rims in good shape or am I seeing silver spray paint covering rust?
This should be a fun project. Keep us posted.
Thanks
Danford1
 
#6
Please post pics as you work on it. I have 3 Rupps I'll be restoring this winter (as soon as I can get the car project I'm working on out of my garage).
I read somewhere in a thread about using the 3/4" belt 20 series clutches but don't remember where. You just have to make sure to measure your jack shaft diameter to get the correct driven clutch. Also measure the crankshaft to jack shaft center line distance to find the correct belt. Comet has a chart showing what belt you need for each center line measurement but I don't have the link to it either, sorry.
What year is your Rupp project? At first I thought 72 but saw the red front fender and red trailing arm and wasn't sure. Of course someone could have painted them... Are the rims in good shape or am I seeing silver spray paint covering rust?
This should be a fun project. Keep us posted.
Thanks
Danford1
I'm sure I read the same post on using the 3/4" belt as you. Found it in a search. I see that EBay has complete setups, front and rear, in the $100 range. I may just go that route. My driven clutch is usable, but it needs some work. Replacing it would be smart, I think.
I'm not sure of the year. There are no numbers stamped into the seat, and anywhere else I looked.
The rims aren't perfect. Just some surface rust though. you are correct on the silver paint. It is on the tires too...which are original Rupp tires. The rims will clean up perfectly for a rider.
Joe
 
#8
Now that's a great Christmas present !:thumbsup:
I've been lucky this year. I've got my 92 year old Dad for the Holidays(he is normally with my sister), my 26 year old daughter and her hubby here too. Great Family. Great food...and a Rupp roadster project!

Great present. Nice kid!! :) Post progress pics, please. Congrats! Merry Christmas and Happy New Year!
She and her hubby ride my minis when they come to the house. They understand the sickness. I'm glad that they know a busted up project mini is a great gift. As silly as it is, it's a proud parent moment. :) Merry Christmas to you as well.

Joe
 
#11
Thanks for the link, Danford. That EBay clutch looks like it might work with a little effort. It needs a 3/4" belt, but it looks like some folks have been able to cut them down.

I got the bike completely apart today. The forks came out hard. I won't be able to reuse them though. Someone welded new ends on the forks, and one of them is cut over an inch shorter than the other. Thankfully new ones are available.
IMG_20161227_123637388.jpg

The fork bushings cleaned up nicely. I ran an injector bore brush down them to clean any crud out of the upper tubes. They are in great shape, so I'm not going to replace them.
IMG_20161227_130907941.jpg

The driven clutch was a little sticky, and corroded. A trip to the glass bead cabinet got it working again. It's not worn like the drive pulley, so I'm going to try reusing it.
IMG_20161227_164619614.jpg IMG_20161227_164608224.jpg
 

Attachments

Last edited:
#12
That liner that you were sending the bore brush into, is removable. It pulls out of the fork tube. It is a plastic sleeve. What happens is the tube rusts behind that plastic sleeve and tightens the sleeve then the lower forks don't slide in and out well. Pull that plastic liner out then send that bore brush in the tubes to clean out the rust.
The liner has a lip that goes into a groove on the inside of the upper fork tube. Carefully pry the liner lip out of the groove and it pulls out easily. Use some PB Blaster or something to help remove it. Putting it back in is very easy. just push it in and it snaps into place.
Yep, Black Widow sells the forks tubes. I just bought a couple, they look very nice.

Danford1
 
#13
I'm continuing to work on my Roadster. Today I welded the seat back where it was cut off. I used a thinner gauge steel so it was easier to work with. It's still pretty sturdy though.
IMG_20170128_145101044_zpstg2t1udv.jpg

IMG_20170128_145054160_zps4miso2dv.jpg

IMG_20170128_153321510_zps7cvwpe6i.jpg

IMG_20170128_155437733_zpsqkjmajzo.jpg

Next I cut off the right foot peg. It had broken off at some point and welded back on....poorly. the weld was bad, it was shortened, and out of clock position. There was also a piece of rebar welded inside for extra strength, but it was way too short to do any good.

IMG_20170128_155501711_zpsh6vacf1m.jpg

IMG_20170128_155743373_zpsaux1k45z.jpg

IMG_20170128_161153768_zpsxzk9e60n.jpg

I'll pick up some 7/8 pipe to fix it. This thing is quite the project so far.

Joe
 
#14
I took another look at the footpeg post, and chose a different path. I lightly pressed an 11/16" solid rod into the remaining parts of the post. Then welded it in place. The hard part for me was building up the metal to make it 7/8" again. After a significant amount of grinding it doesn't look too bad. I'm sure it'll look worse with paint on it though. At least it will be strong.

Before:
IMG_20170128_155448110_zpsmpvgxcl4.jpg

After:
IMG_20170129_140730176_zpspd64ohs2.jpg

Glass beaded the tank I bought from capguncowboy. Thankfully he fixed the dents. That's definitely outside my skill set!

IMG_20170128_165544528_zpsx4wkmbll.jpg
IMG_20170128_165537658_zps3phv7iy4.jpg
IMG_20170128_165527304_zpsierhm2fd.jpg
 
Last edited:

capguncowboy

Well-Known Member
#16
Hey Joe. the frame looks like it's coming along nicely. I'm glad you're happy with the tank. Looks like it'll suit your needs just fine!

A note on those footpegs. The left peg mount needs to overhang the frame by about 4 inches so it'll clear the TAV when you fold it up. I'm not entirely sure you didn't, but it didn't look like it in the pictures.

My 70 frame before I had it blasted and powder coated:


My 72 Hustler frame:

 
#17
Hey Joe. the frame looks like it's coming along nicely. I'm glad you're happy with the tank. Looks like it'll suit your needs just fine!

A note on those footpegs. The left peg mount needs to overhang the frame by about 4 inches so it'll clear the TAV when you fold it up. I'm not entirely sure you didn't, but it didn't look like it in the pictures.
Hi Cowboy,
Thanks for the reply. Unfortuntaly have showed me that I'm an idiot...but not for the reason you posted.
My frame definitely has the 4" overhang on the clutch side. The right side was the stubby side. I assumed, incorrectly, that they would be equal length posts. I needed to repair my right peg post anyway....but I didn't need to extend it 4" to match the other side.

Now I need to decide if I want to leave it like that, or shorten it back to original length.

Joe
 

capguncowboy

Well-Known Member
#18
Well, at least you erred on the side of caution and have a choice if you want to leave it or not. Honestly, I can't see anything wrong with leaving both sides long. It'll give you a little more symmetry and be more comfortable. Once the bike's done, I seriously doubt anyone would ever notice
 
#19
Cleaned up the swingarm and fender today. They both had heavy paint on them, so it was a lot faster to hit them with the wire brush and then glass bead them to get in the tight spots. There was blue paint under the crappy red paint job.

Starting to wire brush.
IMG_20170205_154814482_zpsddzmkouj.jpg

That's about all I can get off with that.
IMG_20170205_155908332_zpse85ehwmm.jpg

That's better. The wire brush also doesn't get down in the bottom of the deep scratches either.
IMG_20170205_161451096_zpsmhdill1c.jpg
 

Attachments

Last edited:
Top