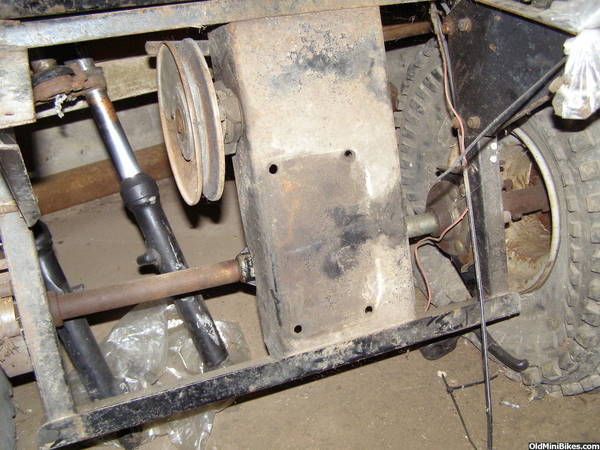
Hey guys, I got a snowco trike that I would like to put back to original. Can you post some pics of the backside where the motor is mounted. I am trying to figure out how the torque converter was hooked up and if there's anything different about mine thats not like yours...... There's not really a lot of info on these that I can find. Here's the backside of mine
View attachment 12481
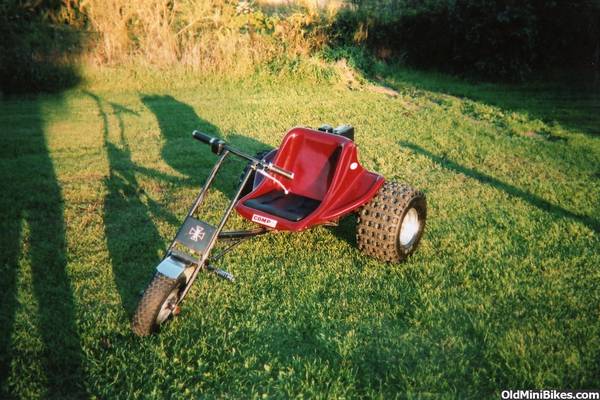
Snowco trike
- Thread starter swamperjmb
- Start date
- Tags snowco trike

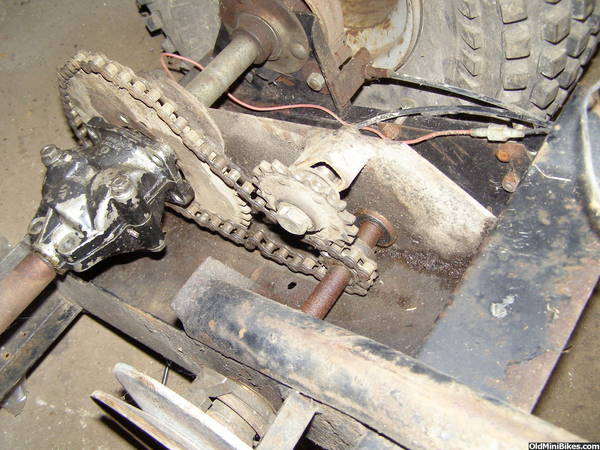
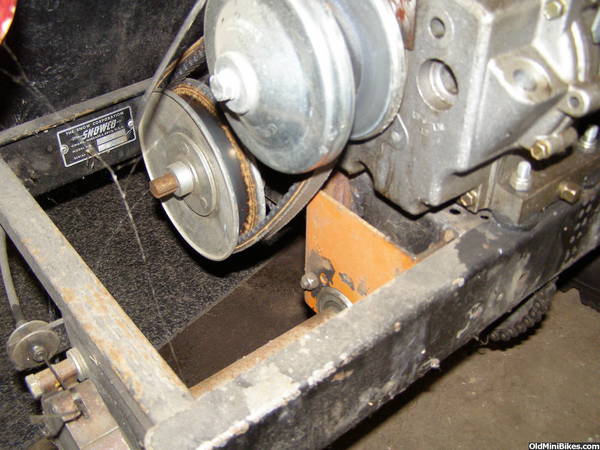
OK Steven here they are.....
View attachment 12485
View attachment 12486
View attachment 12487
View attachment 12488
I noticed that some of these had the mounting slots instead of fixed mounting holes, this one has the fixed holes. I think the arm next to the pulley is a belt tensioner??? I want to get everything on here so I can sandblast the frame and paint. I hate to paint it and nothing fits right or I have to modify after paint. Thanks for all of your inputs in advance :smile: I can't wait to ride this thing next spring!!!!!!
Well Swamperjmb : The pictures are great every thing under the trike looks as it should but the motor plate looks like Swiss Cheese LOL What should be on the jack shaft is not just a pulley but a Comet style of torque converter usually a 6 inch diameter driver 30 series unit and on the motor a 30 series clutch. as for mounting the motor this nay not have adjustment hols because the use of a torque converter calls for an exact center to center measurement so motor adjustment slots would not be required. and of course motor mounting holes would be in a 4 bolt 5 / 16 pattern. and that arm that they used to adjust belt tension is something they added to be able to use a clutch only set up.
The cutout in the body was possibly used so that a Tecumseh engine with a front mounted gas tank could be used. This machine could of had other engine choices like the ever popular 5 HP Briggs. For that I am not sure. But you have a very doable project.
Steve
The cutout in the body was possibly used so that a Tecumseh engine with a front mounted gas tank could be used. This machine could of had other engine choices like the ever popular 5 HP Briggs. For that I am not sure. But you have a very doable project.
Steve
Thanks. I think I can rob a 30 series off another one of my projects and use it for this. Yes the motor plate looks like swiss cheese :laugh: Its been through a few motors and has changed hands a few times.. Jleon stepped up and sold this one to me. I must have been pissing and moaning about getting a trike :001_cool: Thanks again for the info. Time to start a new project in the projects section :thumbsup:
Ok here is the pic of the of the original engine plate.
Steven is correct, there are no adjustment slots, just holes for the engine. As far as I know, these came with H series Tecumsehs. Both of mine had 20 series comet clutches on them. you could run a 30 but you would need a longer jackshaft. There was a trike site a few years ago that had a bunch of info on these, but it is gone now. Here is the underside:
As you can see it looks just like yours. The tensioner is a good setup:thumbsup:
This is the modified trike. I got this one first, and the factory tensioner was long gone, and someone welded (poorly) some big ass plates where the jackshaft bearings go. The bearing holes were trashed, so the plates had to stay.
heres it is before:
here it is after:
I ended up putting on a 9Hp OHV Tecumseh w/ 12v electric start and a charge coil. I went with a 20 series comet because I already had the driven that came with the trike (the used driven exploded apart in the first test ride so I had to buy a new one anyway, coulda went with a 30 o begin with:doah") The wheels are Douglass aluminum with some crazy "Razr" tires. The ride is terribly stiff. Without the tensioner and the extra HP and an adult hammering on it the rear end also exploded. As in about a hundred pieces. And this is after I spent a bunch of time polishing the aluminum case to a blinding shine. That is why that extra (orange) bearing holder is welded on there. it took me a long time to find a replacement diff, but they are out there. The last time I rode it the battery died. Then I flooded it, and tried to start it with the pull starter. Then the rope broke.:doah: I have not touched it since. If I could do it all again, which I will- I'm going to use the un modified frame, with the same flotation tires it came with, and I have a nice H60 w/ 12v start & charge coil. It will have plenty of torque, but hopefully not enough to blow everything apart and maybe this time I can spend more time riding and less time fixing.:thumbsup:
The wheels are Douglass aluminum with some crazy "Razr" tires. The ride is terribly stiff. Without the tensioner and the extra HP and an adult hammering on it the rear end also exploded. As in about a hundred pieces. And this is after I spent a bunch of time polishing the aluminum case to a blinding shine. That is why that extra (orange) bearing holder is welded on there. it took me a long time to find a replacement diff, but they are out there. The last time I rode it the battery died. Then I flooded it, and tried to start it with the pull starter. Then the rope broke.:doah: I have not touched it since. If I could do it all again, which I will- I'm going to use the un modified frame, with the same flotation tires it came with, and I have a nice H60 w/ 12v start & charge coil. It will have plenty of torque, but hopefully not enough to blow everything apart and maybe this time I can spend more time riding and less time fixing.:thumbsup:
Hope this helps.
Steven is correct, there are no adjustment slots, just holes for the engine. As far as I know, these came with H series Tecumsehs. Both of mine had 20 series comet clutches on them. you could run a 30 but you would need a longer jackshaft. There was a trike site a few years ago that had a bunch of info on these, but it is gone now. Here is the underside:
As you can see it looks just like yours. The tensioner is a good setup:thumbsup:
This is the modified trike. I got this one first, and the factory tensioner was long gone, and someone welded (poorly) some big ass plates where the jackshaft bearings go. The bearing holes were trashed, so the plates had to stay.
heres it is before:
here it is after:
I ended up putting on a 9Hp OHV Tecumseh w/ 12v electric start and a charge coil. I went with a 20 series comet because I already had the driven that came with the trike (the used driven exploded apart in the first test ride so I had to buy a new one anyway, coulda went with a 30 o begin with:doah
The wheels are Douglass aluminum with some crazy "Razr" tires. The ride is terribly stiff. Without the tensioner and the extra HP and an adult hammering on it the rear end also exploded. As in about a hundred pieces. And this is after I spent a bunch of time polishing the aluminum case to a blinding shine. That is why that extra (orange) bearing holder is welded on there. it took me a long time to find a replacement diff, but they are out there. The last time I rode it the battery died. Then I flooded it, and tried to start it with the pull starter. Then the rope broke.:doah: I have not touched it since. If I could do it all again, which I will- I'm going to use the un modified frame, with the same flotation tires it came with, and I have a nice H60 w/ 12v start & charge coil. It will have plenty of torque, but hopefully not enough to blow everything apart and maybe this time I can spend more time riding and less time fixing.:thumbsup:Hope this helps.
Hey Mark : Your a Prince of a guy putting up the right pictures. And I have never seen that differential that you showed. So I take it it went south, I would think it was from being the point of all the stress and flex .
And the choice of the torque converter being the 20 or 30 series is determined by the width of the engine. I guess that's why so many trikes end up with hacked up motor mount plates. I like keeping the belts torque close to the supporting bearings in the engine as well as on the Jack shaft.
When you mention the ride not being comfortable at the higher speeds that's why Alsport came out with the RTS Trikes they ride like a dream regardless of the engine power. You do loose some power but you can ride much longer without fatigue.
Steve
Thanks again guys. I ended up buying a 30 series for $150 from the local kart shop, got the last one :thumbsup: I put my briggs 5hp on it and lined everything up. This one had a longer jackshaft thank God. The only thing I had to do is loosen the collar and add a shim so the jackshaft had little to no play. It was wobbling side to side a bit causing the driver to chew on the belt a bit. Got her going as good as it going to get till spring. All I can say is this thing is fun, my kids love it and my wife can't get me off of it to eat dinner :laugh: I will be completely redoing this thing in the spring. I need to find someone that does fiberglass. I want to redo the seat/ tub. I think I want to try a clone motor on it, if it will fit. If my diff explodes, cant I put in a live solid axle or would that make it impossible to turn????? I know my old honda big red had a solid live axle. Well that might be apples and oranges..............................
Try to fix the seat yourself. I didn't know the first thing about fiberglass either and when I got mine the seat had some serious cracks, and a few chunks busted out of it. I took it to NAPA and the guy hooked me up with some resin, fiber matting, etc. Basically everything I needed. It was actually really easy, you just build it up, let it dry, sand, repeat until it's fixed. If you mess up, you can sand it off and try again. I did this all by hand (this was before I had air tools) and it was not only a piece of cake, but it was VERY rewarding. :thumbsup: I'm sure a body shop would have easily charged me over $100, prob. more. As far as the metalflake, that was also not that hard. I used gold flake, and then over 30 coats of clear on the top, then I wetsanded it to a smooth gloss, then I painted a blood red over that, then some more clear and finally sand and polish. In the sunlight it looks like it's a mile deep. :thumbsup: in all it took me about 3-4 weeks to do the seat, but it was only about a half hour day. Most of the time was letting the clear dry.
As far as the diff goes, if you put a solid axle in it, your right- you won't be able to turn. You can find these diffs in older (70s) John Deere snowblowers, as well as on other yard equipment.
Yes Steven I agree, I also like to keep the torque closer to the support, it seems to flex or bend the shaft the other way.