Square Tubed Minibike Frame project

#21
Cleaned up the other Rupp wheel some, but don't think I'll do the whole thing. I'm starting to consider just selling the pair. There is some rust on them, but it's more cosmetic and doesn't affect the balance of the wheel. The acorn nuts on the rear wheel had become rusted, so when i did a few quick passes with the wire wheel brush (didn't think about this part until it happened), it chewed up the acorn nuts. I went to Lowe's right before closing and was able to find some regular "10-32" size nuts to put in place of them.

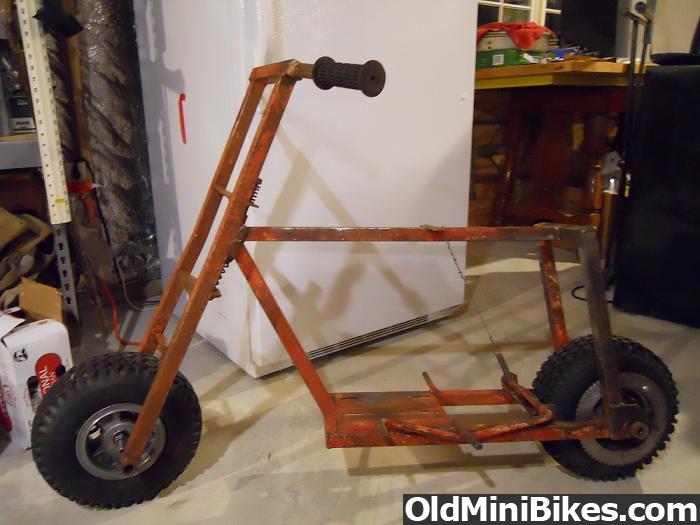
I put the tri-spoke wheels back on my minibike for a few quick pics, and also some pics of the "sanding" process from earlier. I'll be posting those before I go to bed tonight. Gotta go clean up the basement.
 

Mac

Well-Known Member
#22
I saw from that ad for the Hound Dog that there was a smaller version, called the "Hot Dog". I haven't seen a pic of one yet and wondered what it looks like in comparison to a Hound Dog?
The red one here is probably the Hot Dog you speak of:

 
#23
I agree with the no wire wheels ever mindset. As a powdercoater, I get tons of stuff in the shop that others have tried to strip themselves using wire to save money on my end, when the real end result is that I still have to media blast to even out and hopefully hide some of the lines they have put into the material via the wires.
I would suggest getting the small cheapo cabinet from harbor freight ($80 with coupon) and any small home compressor would run it (most folks have a small to medium garage compressor already) and go buy a 50# bag of black beauty for $4-6, or iron oxide medium grit and then you can clean tons of smaller items, rims, bolts and nuts, brackets, side covers, belt covers, handle bars etc etc etc for a hundred bucks or so and use it over and over and over until the media turns to dust, dump it and buy another $6.
you will be happier with your end result, you will be happier with the efficiency and speed and that you will even get into all the little cracks so easy and before you know it, you are grinning so hard your face is gonna hurt


I wound up using some wire wheels and an old Montgomery Ward drill that my dad loaned me. I haven't finished cleaning up the frame yet, as it got cold, dark and windy pretty fast tonight, but I hope to finish that by the end of the weekend. I also did a little cleaning up of the other Rupp wheel. I took a few pics and I'll post those soon.
 
#24


Here are the photos I took from yesterday evening/last night. Before, during and after shots. I put the wheels back on the frame to get an idea of how it may look, but before I get back to working on the frame again, I'll have to take them back off.
 

TomH

New Member
#25
Wheels look great, looks like you have knocked a bunch off rust of the frame too. I really like the lines of that mini. If you have the money, KS8ball would make a hell of a seat for that.
 
#26


Found this under the paint and rust. I think it has something to do with the identification of the square tubing rather than any sort of serial number. It says "10-318".
 

TomH

New Member
#27
I don't think that is a steel number..more of the mystery, kinda think that bike was made in a small factory, or a prototype, or somebody that really knew their stuff.
 
#28
I looked it up and I am pretty sure it is for identifying the grade of steel tubing. Using the SAE steel grades chart, "10" means it's a plain carbon based steel, and 318 is a number to reference the type of steel. It's in 300 series, meaning "austenitic chromium-nickel alloys", which are sort of like marine grade stainless steels, very rust resistant.

I've located a machinist vise, and now am gonna try to find a dry log in which to mount it to, and hopefully make the sanding process easier than it has been. And that'll hopefully all happen tomorrow!
 
#29
2/3rds the way done with the sanding process. Some spots are pretty heavy on the primer and paint, and it's taking some time and muscle to get it all off. No pics tonight, but hopefully more to come tomorrow.
 
#30
I looked it up and I am pretty sure it is for identifying the grade of steel tubing. Using the SAE steel grades chart, "10" means it's a plain carbon based steel, and 318 is a number to reference the type of steel. It's in 300 series, meaning "austenitic chromium-nickel alloys", which are sort of like marine grade stainless steels, very rust resistant.

I've located a machinist vise, and now am gonna try to find a dry log in which to mount it to, and hopefully make the sanding process easier than it has been. And that'll hopefully all happen tomorrow!
um i may be wrong but nope not a steel number ... or not like you read it .
if you have carbon in a ss it will cause it to split , something to do with chromium carbide ? it think it was. it ends up that the chrome and the carbon mix in the weld making a compound that is bigger then the start and put pressure on the joint causing it to crack .
or that is what i remember from reading on welding ss . also it looks like you have rust on the frame and the only way i have seen ss rust it if its been hot as hell in a fire and the chrome gets burnt out .
 
#32
I looked it up and I am pretty sure it is for identifying the grade of steel tubing. Using the SAE steel grades chart, "10" means it's a plain carbon based steel, and 318 is a number to reference the type of steel. It's in 300 series, meaning "austenitic chromium-nickel alloys", which are sort of like marine grade stainless steels, very rust resistant.

I've located a machinist vise, and now am gonna try to find a dry log in which to mount it to, and hopefully make the sanding process easier than it has been. And that'll hopefully all happen tomorrow!
besides, all the steel ive ever bought ws marked with A. chalk (more from smaller yards) or B. A heat resistant blue grease pencil
 
#33
You're all probably right. It's most likely not a steel number.

I sort of looked for info on steel numbers on Wikipedia... :doah:

It just made more sense to me, figuring it's most likely a homemade minibike, so I guess you could say I was trying to see something that it's probably not? I'm no expert on steel.

Does it look sort of similar to a serial number pattern on any other minibikes?
 
#34
You're all probably right. It's most likely not a steel number.

I sort of looked for info on steel numbers on Wikipedia... :doah:

It just made more sense to me, figuring it's most likely a homemade minibike, so I guess you could say I was trying to see something that it's probably not? I'm no expert on steel.

Does it look sort of similar to a serial number pattern on any other minibikes?
im not expert ether just happened to remember that info from a search i had done .
from what i have seen of new steel they dont stamp it like that . if there is some id on it its rolled in (raised numbers from the rollers ) . it could me a low production custom or protype .i would say some one stamped it with that number for a reason .
neat non the less ,i would ride it and have fun with it .
 
#35
Hopefully gonna get back to my project soon. My computer has been screwed up for a few days, and I spent some of that time reformatting it, etc.

In other news, the air filter I ordered for the engine I bought, came in last Thursday, so I picked it up, brought it home, and it fits good.
 
#36
Wow, it's been a good while since I've posted! I guess it's time for an update. :doah:

I sold the 7HP Briggs I had a couple weeks ago, locally, to a guy who works on small engines, repairs mowers, etc. Did pretty good with it, got back what I paid for it, plus cost of some of the parts.

A couple days later, I bought a 3HP Briggs & Stratton (circa 1978) that is/was attached to a MTD/Hechinger Rototiller. The thing is in pretty good shape overall. Low hours (tines are still pretty sharp, but everything had a bit of surface rust) on the engine, so it seemed like a good deal to me. Bought it from a guy who deals in farm tractors and agricultural equipment. Had a broken starter clutch on it, so I talked him down from $40 to $35. Brought it home, got a new starter clutch from NAPA, and cleaned/adjusted the points and condenser a bit, and she's good to go.

At the moment I have it bolted to my minibike frame and am doing some measurements to make sure everything will fit and have clearance. I've got a ways to go, but I'm hopeful.


Last edited:
#38
I'll get a good pic of it on the frame tomorrow, the frame is in the back of the garage tonight, and the car is in the way. :doah:

@ Tom H- Thanks! Just added the pics in my post above!
 
#39
As promised, here are the pics I have of the engine on my minibike frame. The space between the spark plug and the frame is minimal. It's not a big frame, but it's all good.


TomH

New Member
#40
That engine look good on there. good to see you back after it. you are going to love it when you get it back on the road.
 
Top